Jekyll2026-06-25T00:54:33+00:00https://wafer.space/index.xmlRun 2 Deadline Update and Reminder2026-06-24T12:00:00+00:002026-06-24T12:00:00+00:00https://wafer.space/news/run2-deadline-updateHi all, quick announcement about the Run 2 deadline.
Due to delays in getting the submission platform up and running, the deadline for having a clean GDS submitted for Run 2
has been extended by 2 weeks. Note: the purchase deadline has not changed. You have less than a week to purchase a
slot, if you haven’t already.
The new dates are:
Purchasing on CrowdSupply: 30 June 2026 @ 11:59 PM AoE.
GDS in for Run 2: 14 July 2026 @ 11:59 PM AoE.
The submission platform is up and running right now, those who are submitting a design please confirm access and
create your project on there as soon as possible.
GDS in means that the project has successfully passed the precheck on the platform. This is the same precheck
which is found at github.com/wafer-space/gf180mcu-precheck.
This is a one time extension and will not be happening on future runs. Do not expect any other deadline extensions
this run.
After You Purchase
Once you’ve purchased your slot, you have until 14 July 2026 to create, verify and submit your design. Ensure
you run the gf180mcu-precheck locally to verify your design before
submitting. Verify early and often! If you find problems last minute, you may not have the time to fix them.
If you do run into issues or just want to stay in the loop, join the wafer.space Discord
or connect with us on Matrix. Many people are finalising their designs,
and problems you encounter have likely been solved by others who could lend a hand.
wafer.space bringing open accessible custom silicon fabrication
]]>Tim 'mithro' AnsellTaping Out KianV - a Linux/XV6-capable RISC-V SoC2026-06-05T12:00:00+00:002026-06-05T12:00:00+00:00https://wafer.space/news/kianv-riscv-socHi everybody!
In this update we’ll be exploring a homegrown SoC which is capable of booting Linux, µLinux and XV6. It
implements the RISC-V RV32IMA ISA alongside additional extensions for more functionality.
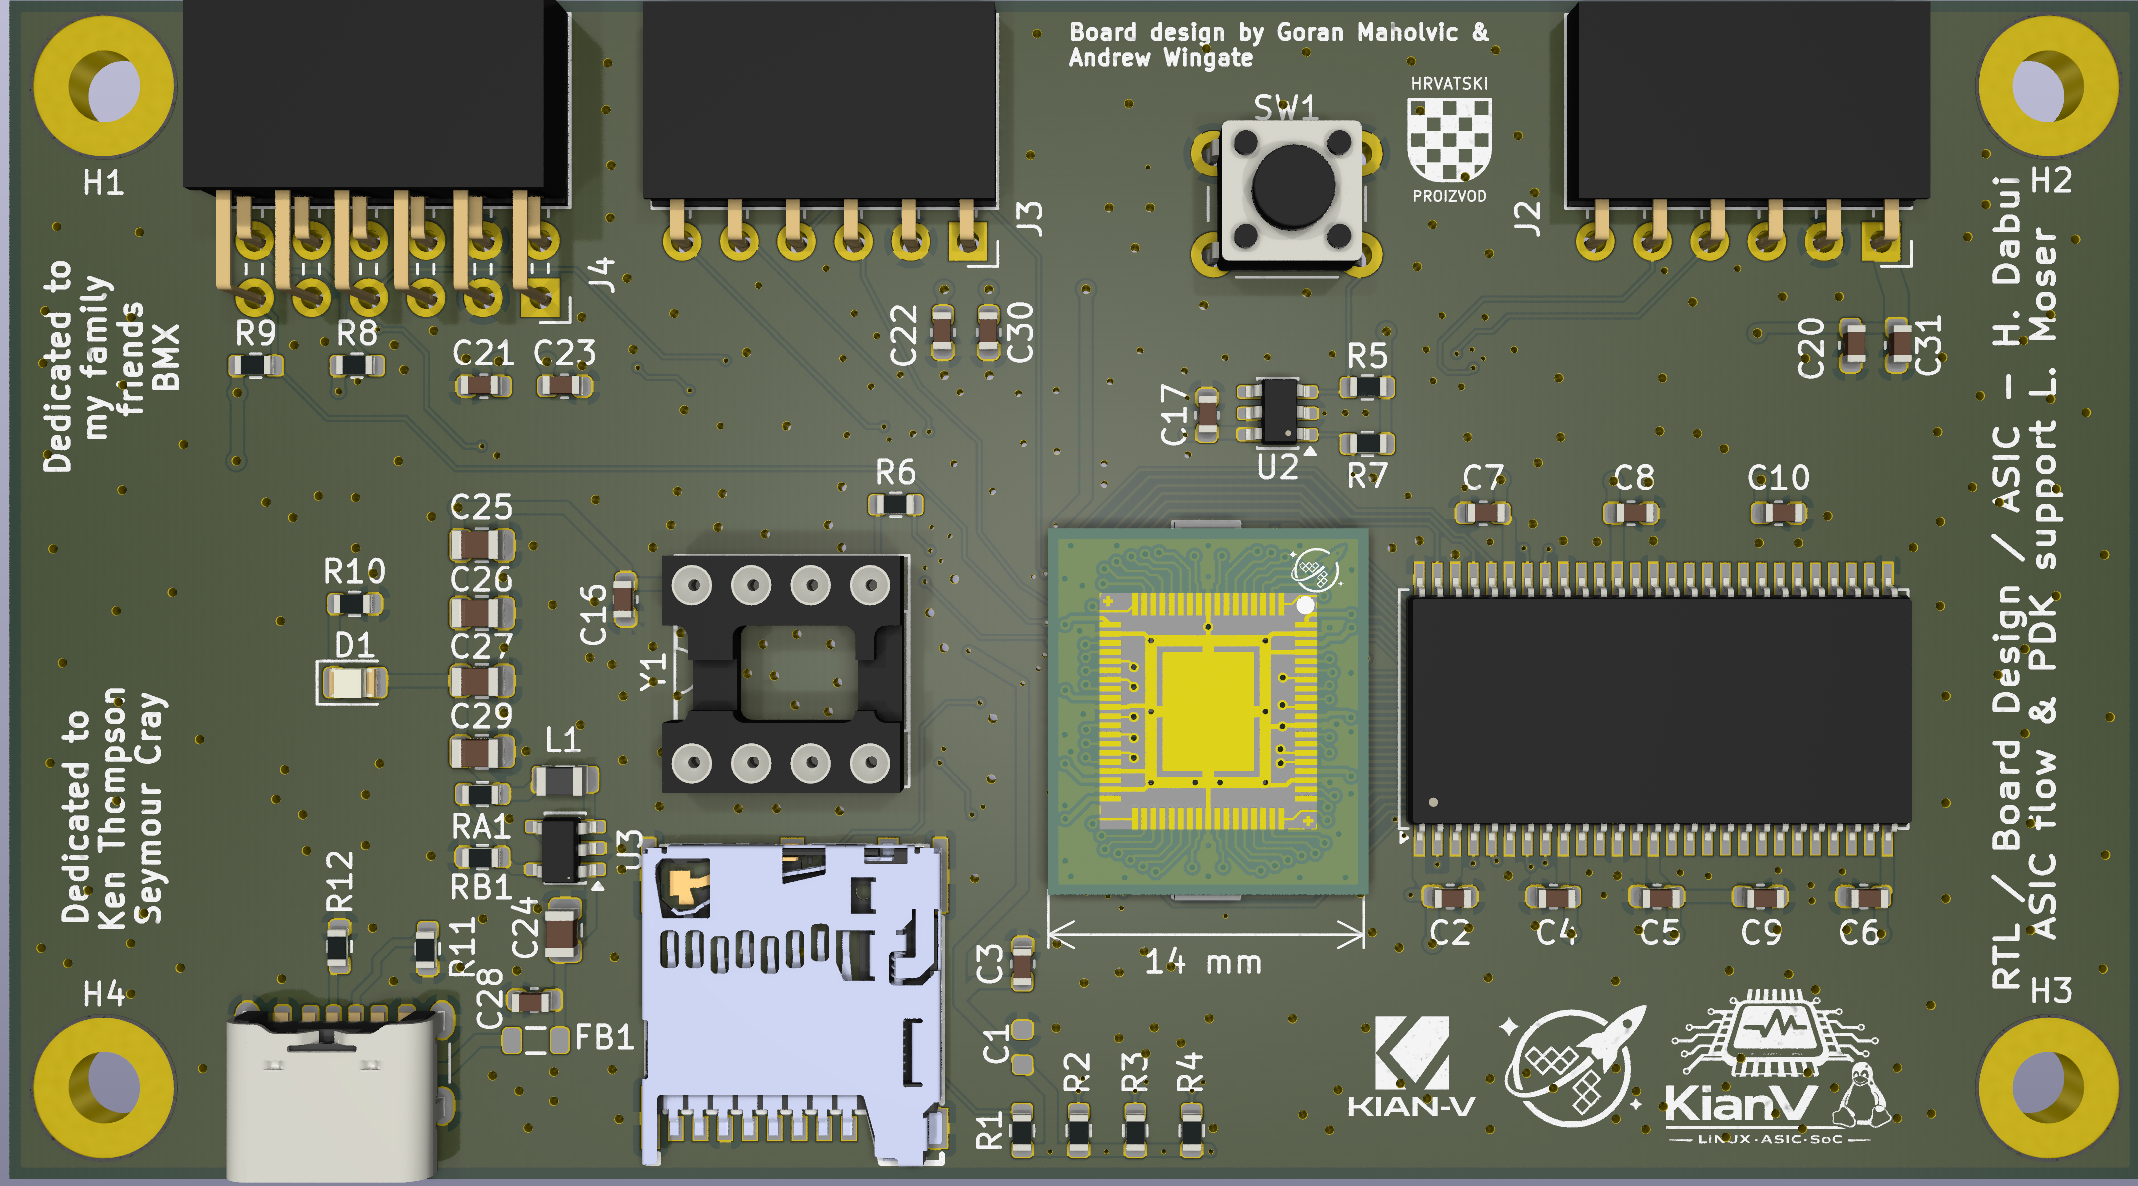
In addition to the ASIC, a compact bring-up PCB was designed to enable hardware validation and early software development.
SoC Overview
The KianV SoC is built around an RV32IMA core - that’s a 32-bit base with integer multiplication & division (M) and
atomic instructions (A) extensions. In addition to those, it has support for Zicntr, Zicsr,
Zifencei, SSTC and
Sv32.
The Sv32 extension allows KianV to access memory - this is done using a page-based 32-bit virtual memory system,
which then interacts with 32MiB of external memory through an on-board SDRAM controller.
The CPU itself includes a 2-way set-associative instruction cache, a direct-mapped data cache, and 4-way associative
instruction and data TLBs, sufficient for MMU-based operating systems.
Furthermore, KianV integrates a minimal peripheral set connected via an internal system bus. The peripherals are listed below:
SDRAM controller (interacting with 32 MiB external memory)
UART
2× SPI interfaces
GPIO
NOR flash controller
With these peripherals, the system is capable of booting from an external SD card and accessing networked resources via
an SPI-based Ethernet connection. A system like this may find uses in a variety of situations: industrial, IoT or educational.
Block diagram of the KianV RV32 SV32-capable RISC-V SoC
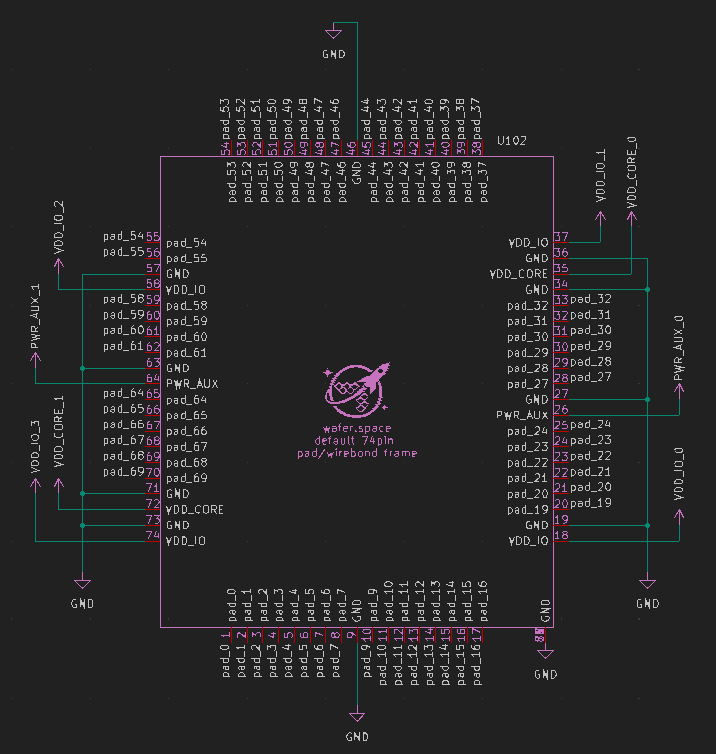
Pinout
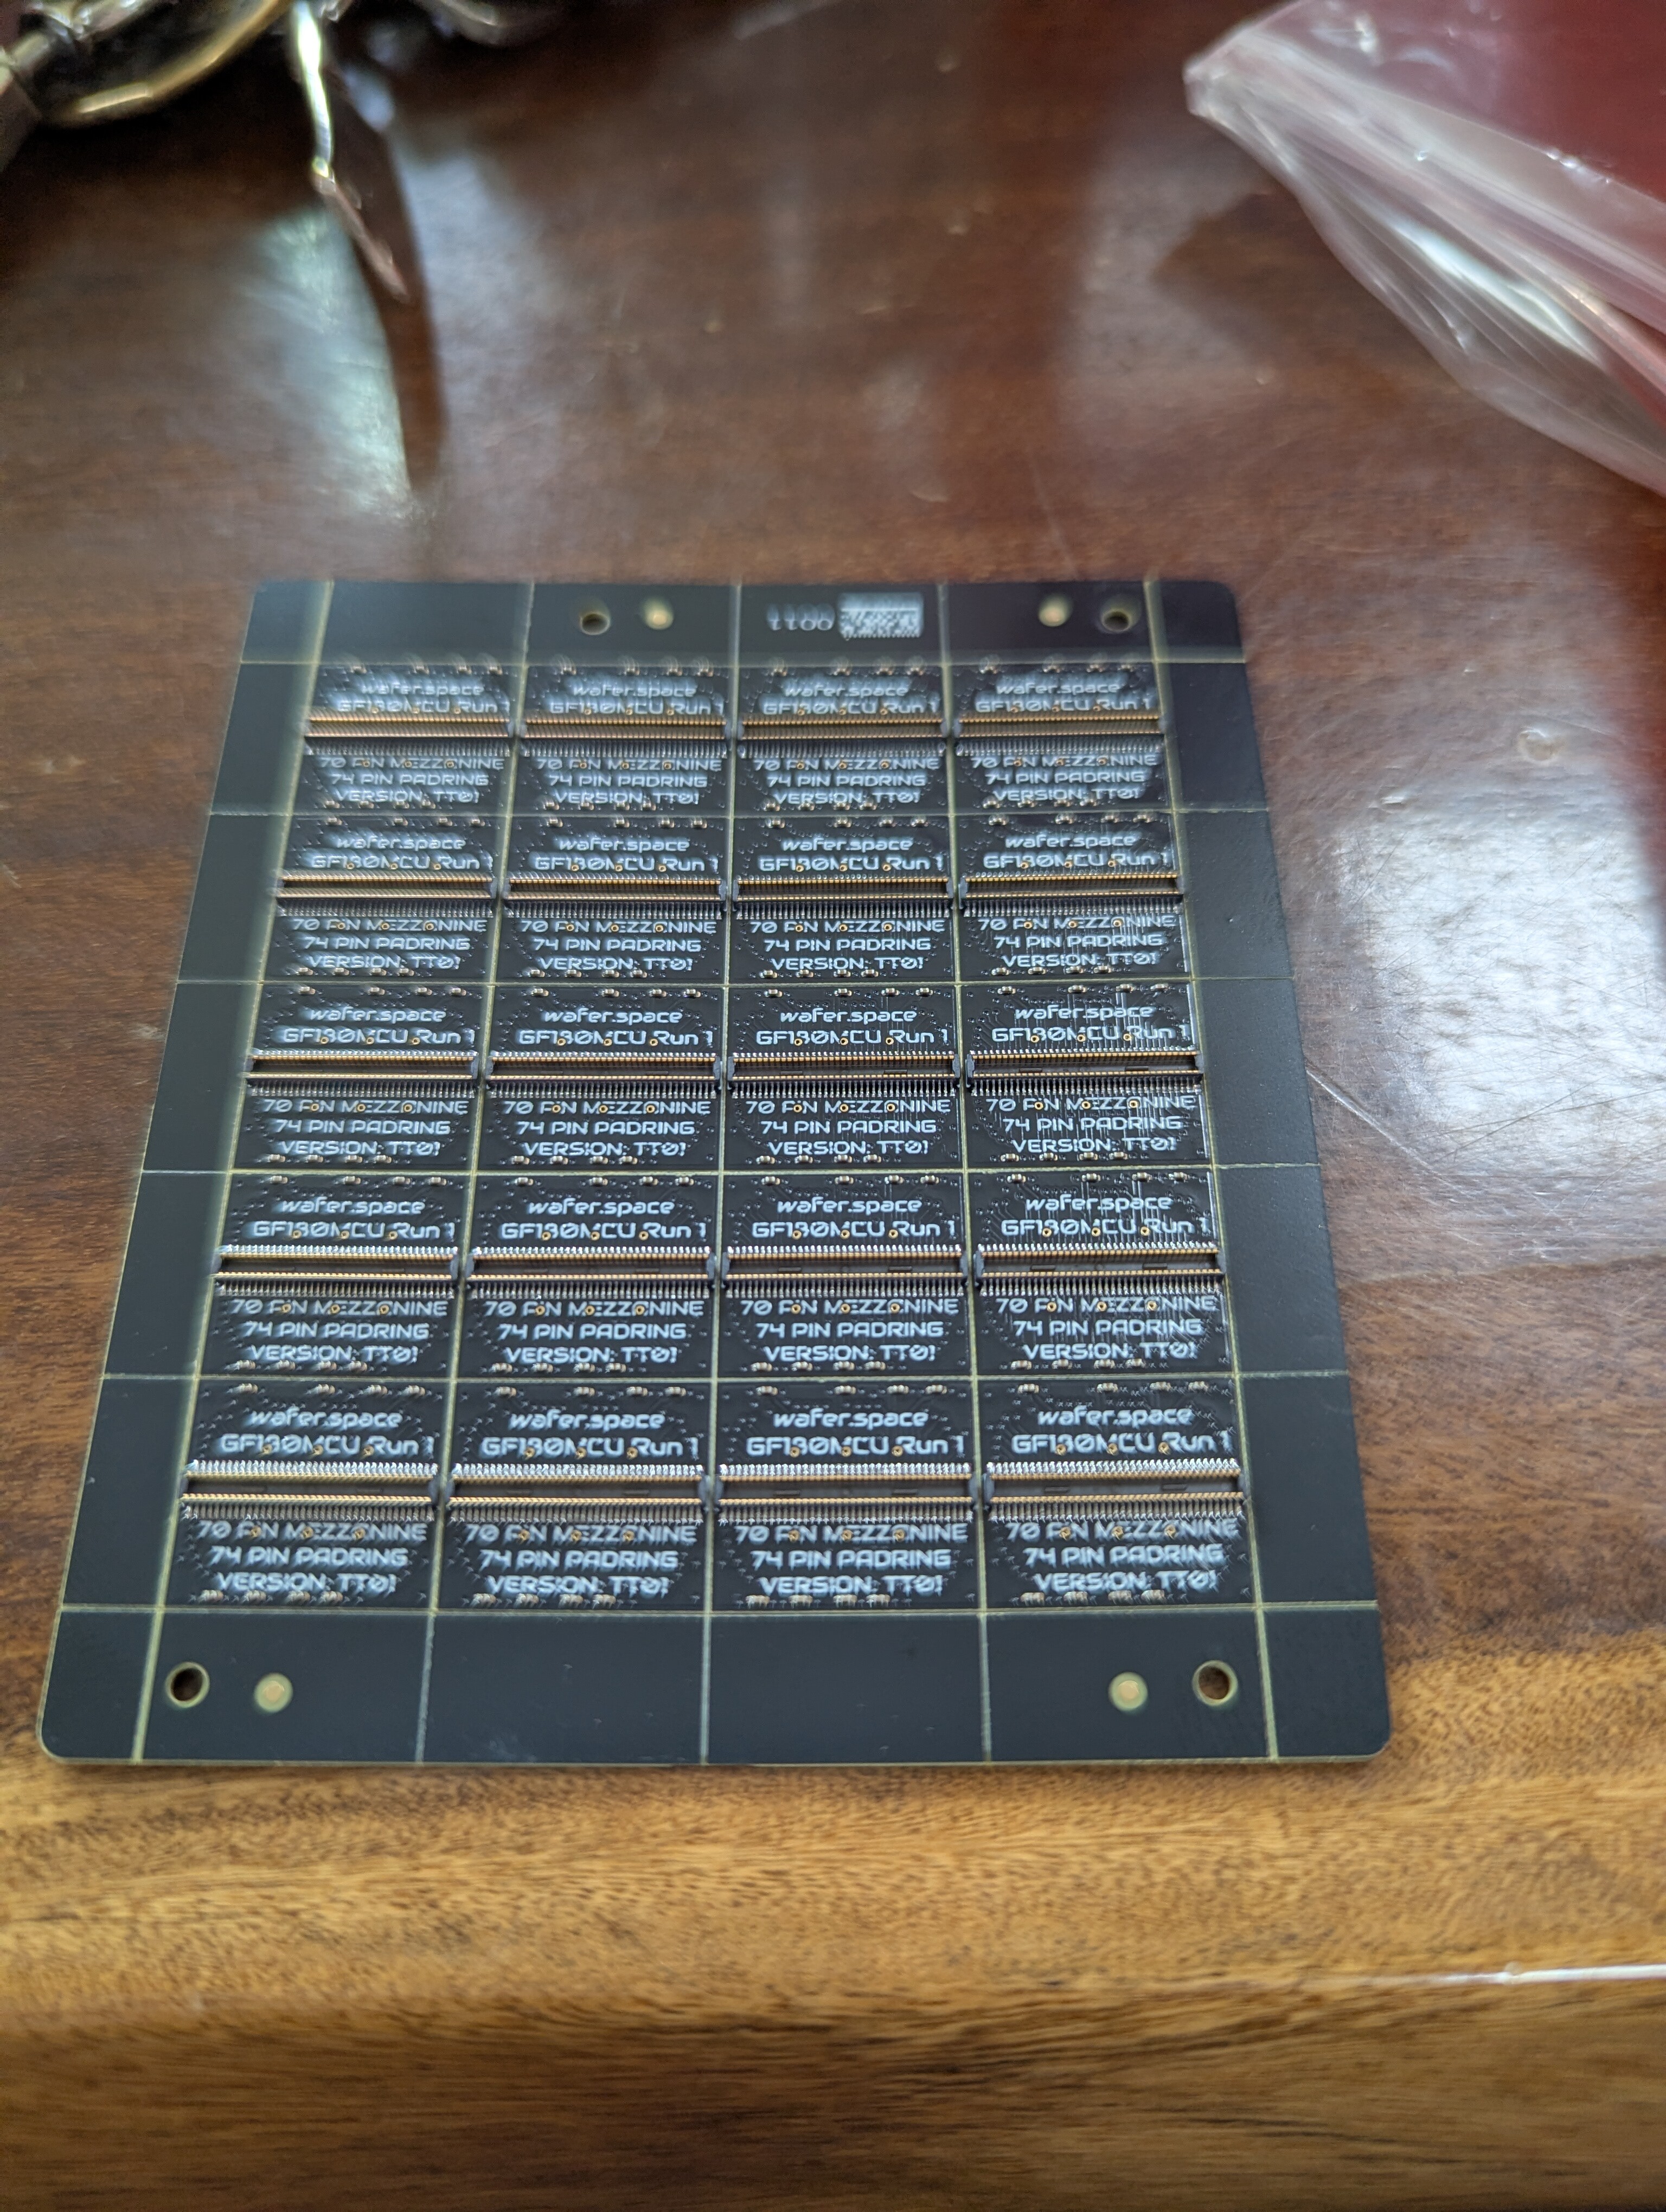
The pinout is designed around a strict 58 external IO signal limit, all divided between the peripherals mentioned
beforehand. The wafer.space template provides access to 74
pads, however these also include power and ground connections.
KianV SoC external IO pinout
Interface
Signals
Dir
Description
UART
RX, TX
I/O
Serial console
SPI0
CS#, SCLK, MOSI, MISO
I/O
SD card
SPI1
CS#, SCLK, MOSI, MISO
I/O
Ethernet
Flash
CS#, SCLK, MOSI, MISO
I/O
SPI NOR flash
SDRAM
CLK, CKE
Out
Clocking
ADDR[12:0]
Out
Address bus
BA[1:0]
Out
Bank select
DQ[15:0]
I/O
Data bus
DQM[1:0]
Out
Byte mask
CS#, RAS#, CAS#, WE#
Out
Control signals
GPIO
GPIO0
I/O
General-purpose IO
Signals are grouped by function; directions are given from the SoC perspective.
Design Philosophy
The RISC-V processor in this SoC is a multi-cycle RV32 core, optimized for area. The architecture was validated
prior to taping out on FPGA platforms, where SV32-capable mainline Linux and network connectivity were demonstrated.
Likewise, a µLinux (no-MMU) version of the KianV SoC was fabricated on multiple shuttles run by Tiny Tapeout, providing
silicon validation of the core and peripheral subsystems. You can view these submissions online on the Tiny Tapeout
website: TTSky25a, TTIHP25b,
TTSky25b and TTIHP26a.
SkyWater 130 nm die layout of the Tiny Tapeout KianV uLinux (no-MMU) SoC
Design Flow
KianV was brought to life using LibreLane and the wafer.space GF180MCU project template,
which was then submitted to Run 1, and manufactured using the GlobalFoundries 180 nm PDK.
The flow provided by the project template covers everything you’d need to produce and successfully tapeout a design. It
contains software for RTL synthesis, floorplanning, place-and-route, clock tree synthesis and physical verification
using known open-source tools.
Implementation Results
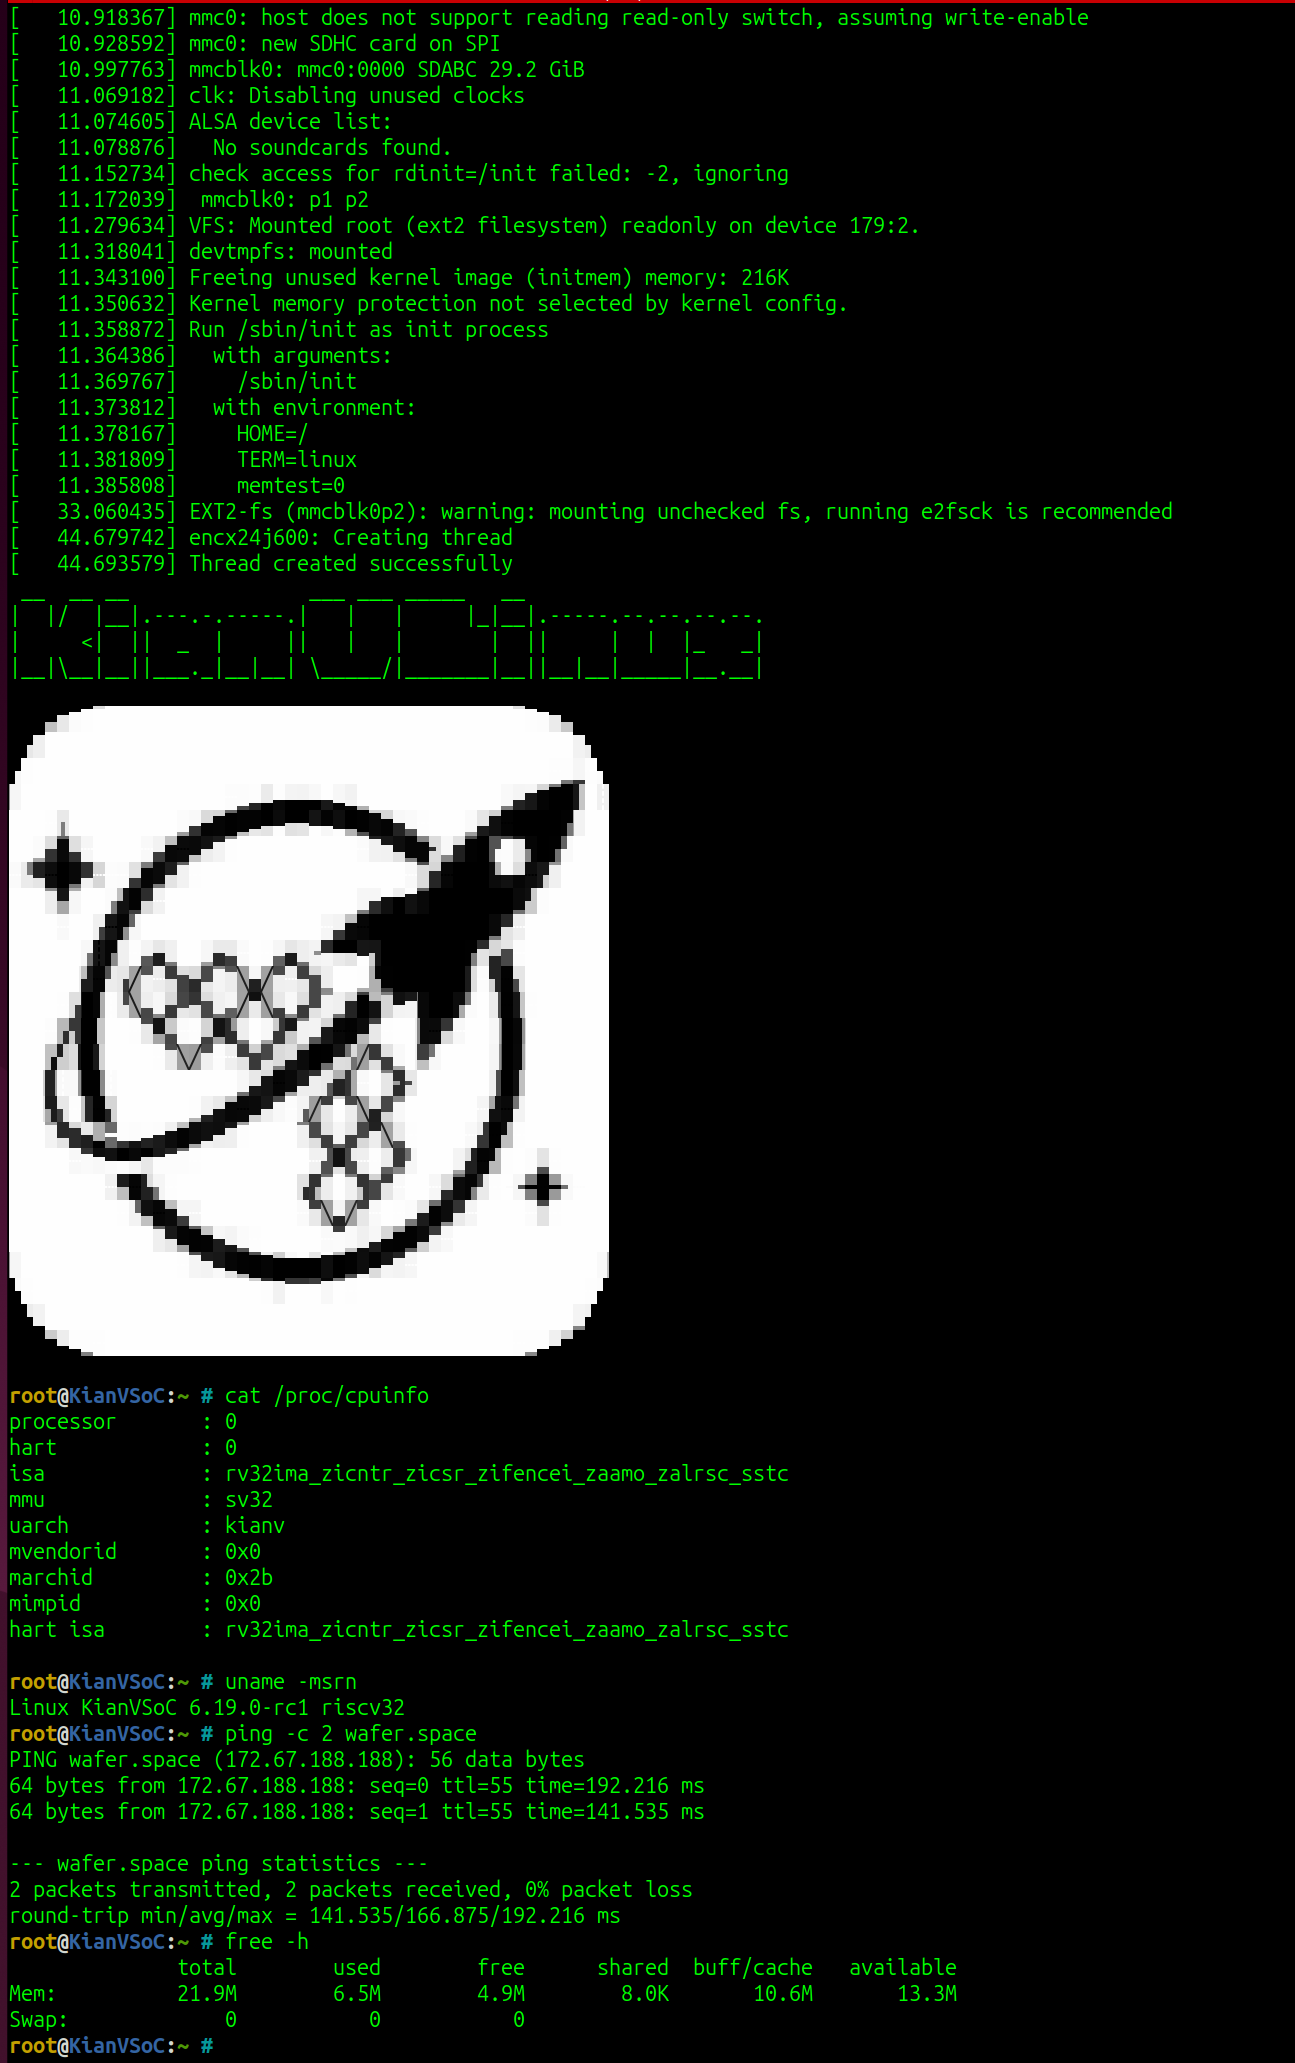
Linux was booted in a gate-level simulation which painstakingly ran for an entire month before reaching the login prompt.
This was using the mainline 6.19 version of the Linux kernel, and was validated against a Micron SDRAM simulation model
driven by the author’s SDRAM controller.
Run 1 silicon is being shipped as we speak, so why not join our Discord or Matrix
channels to see some silicon validation?
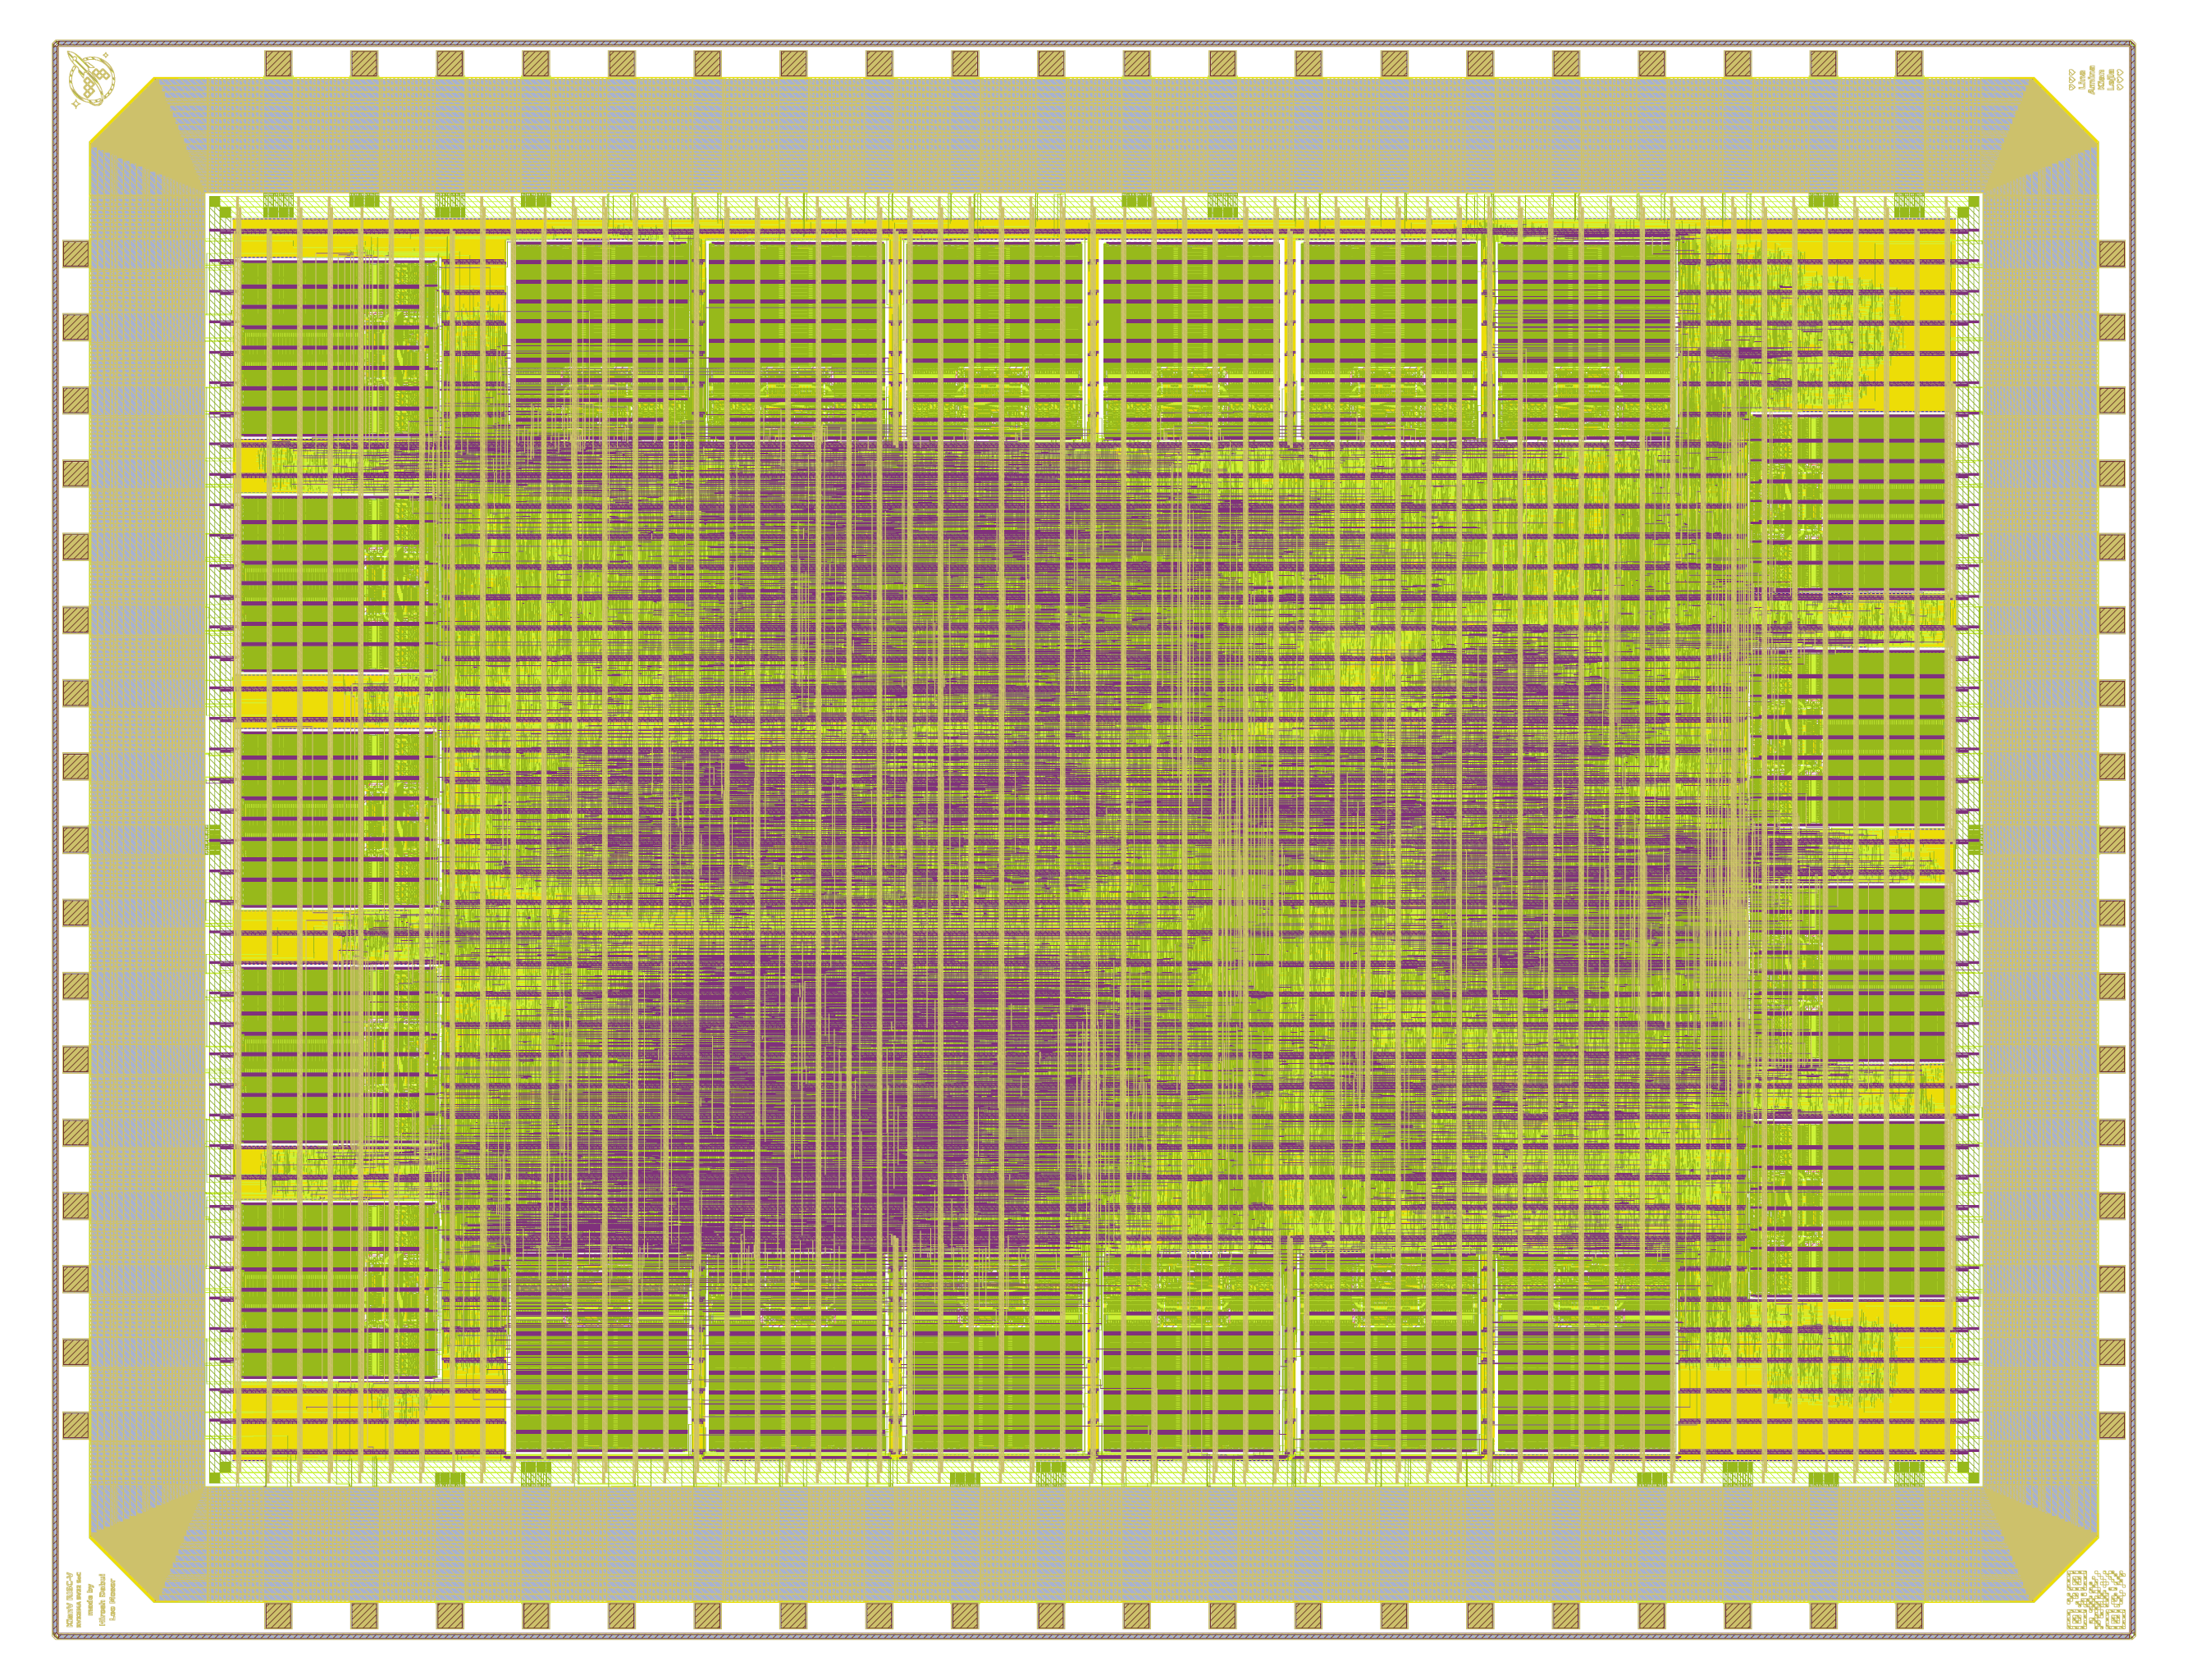
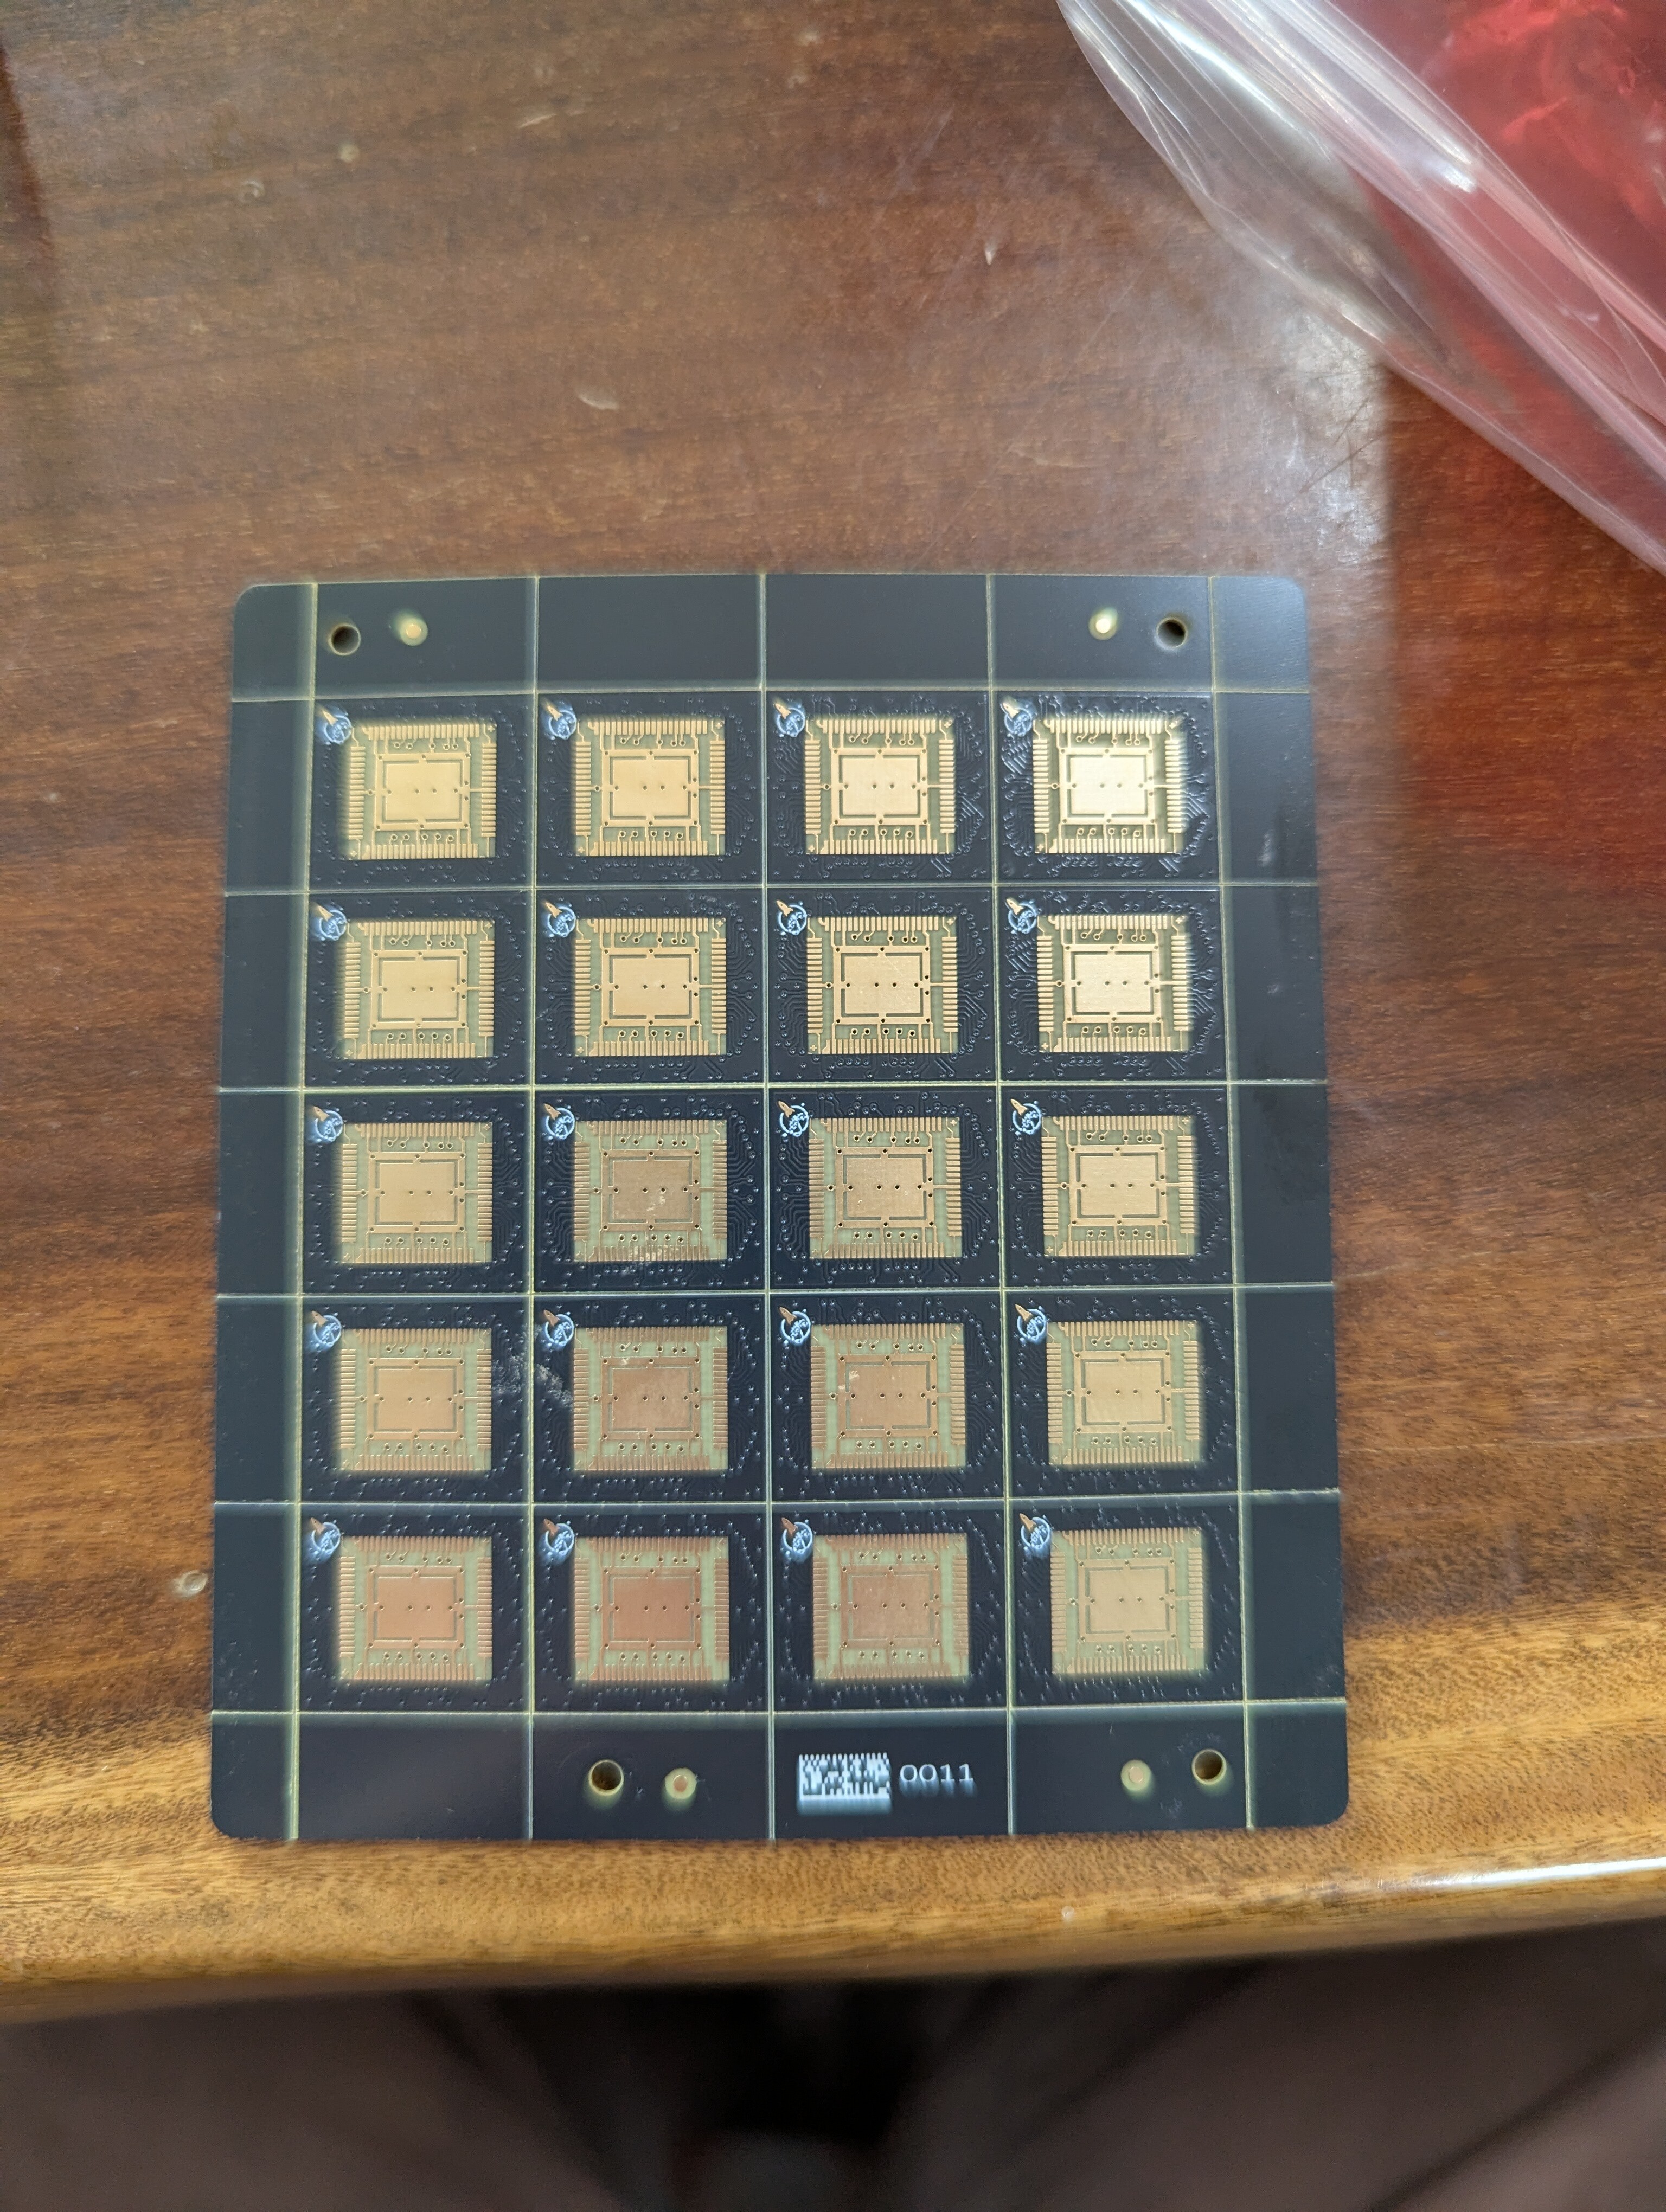
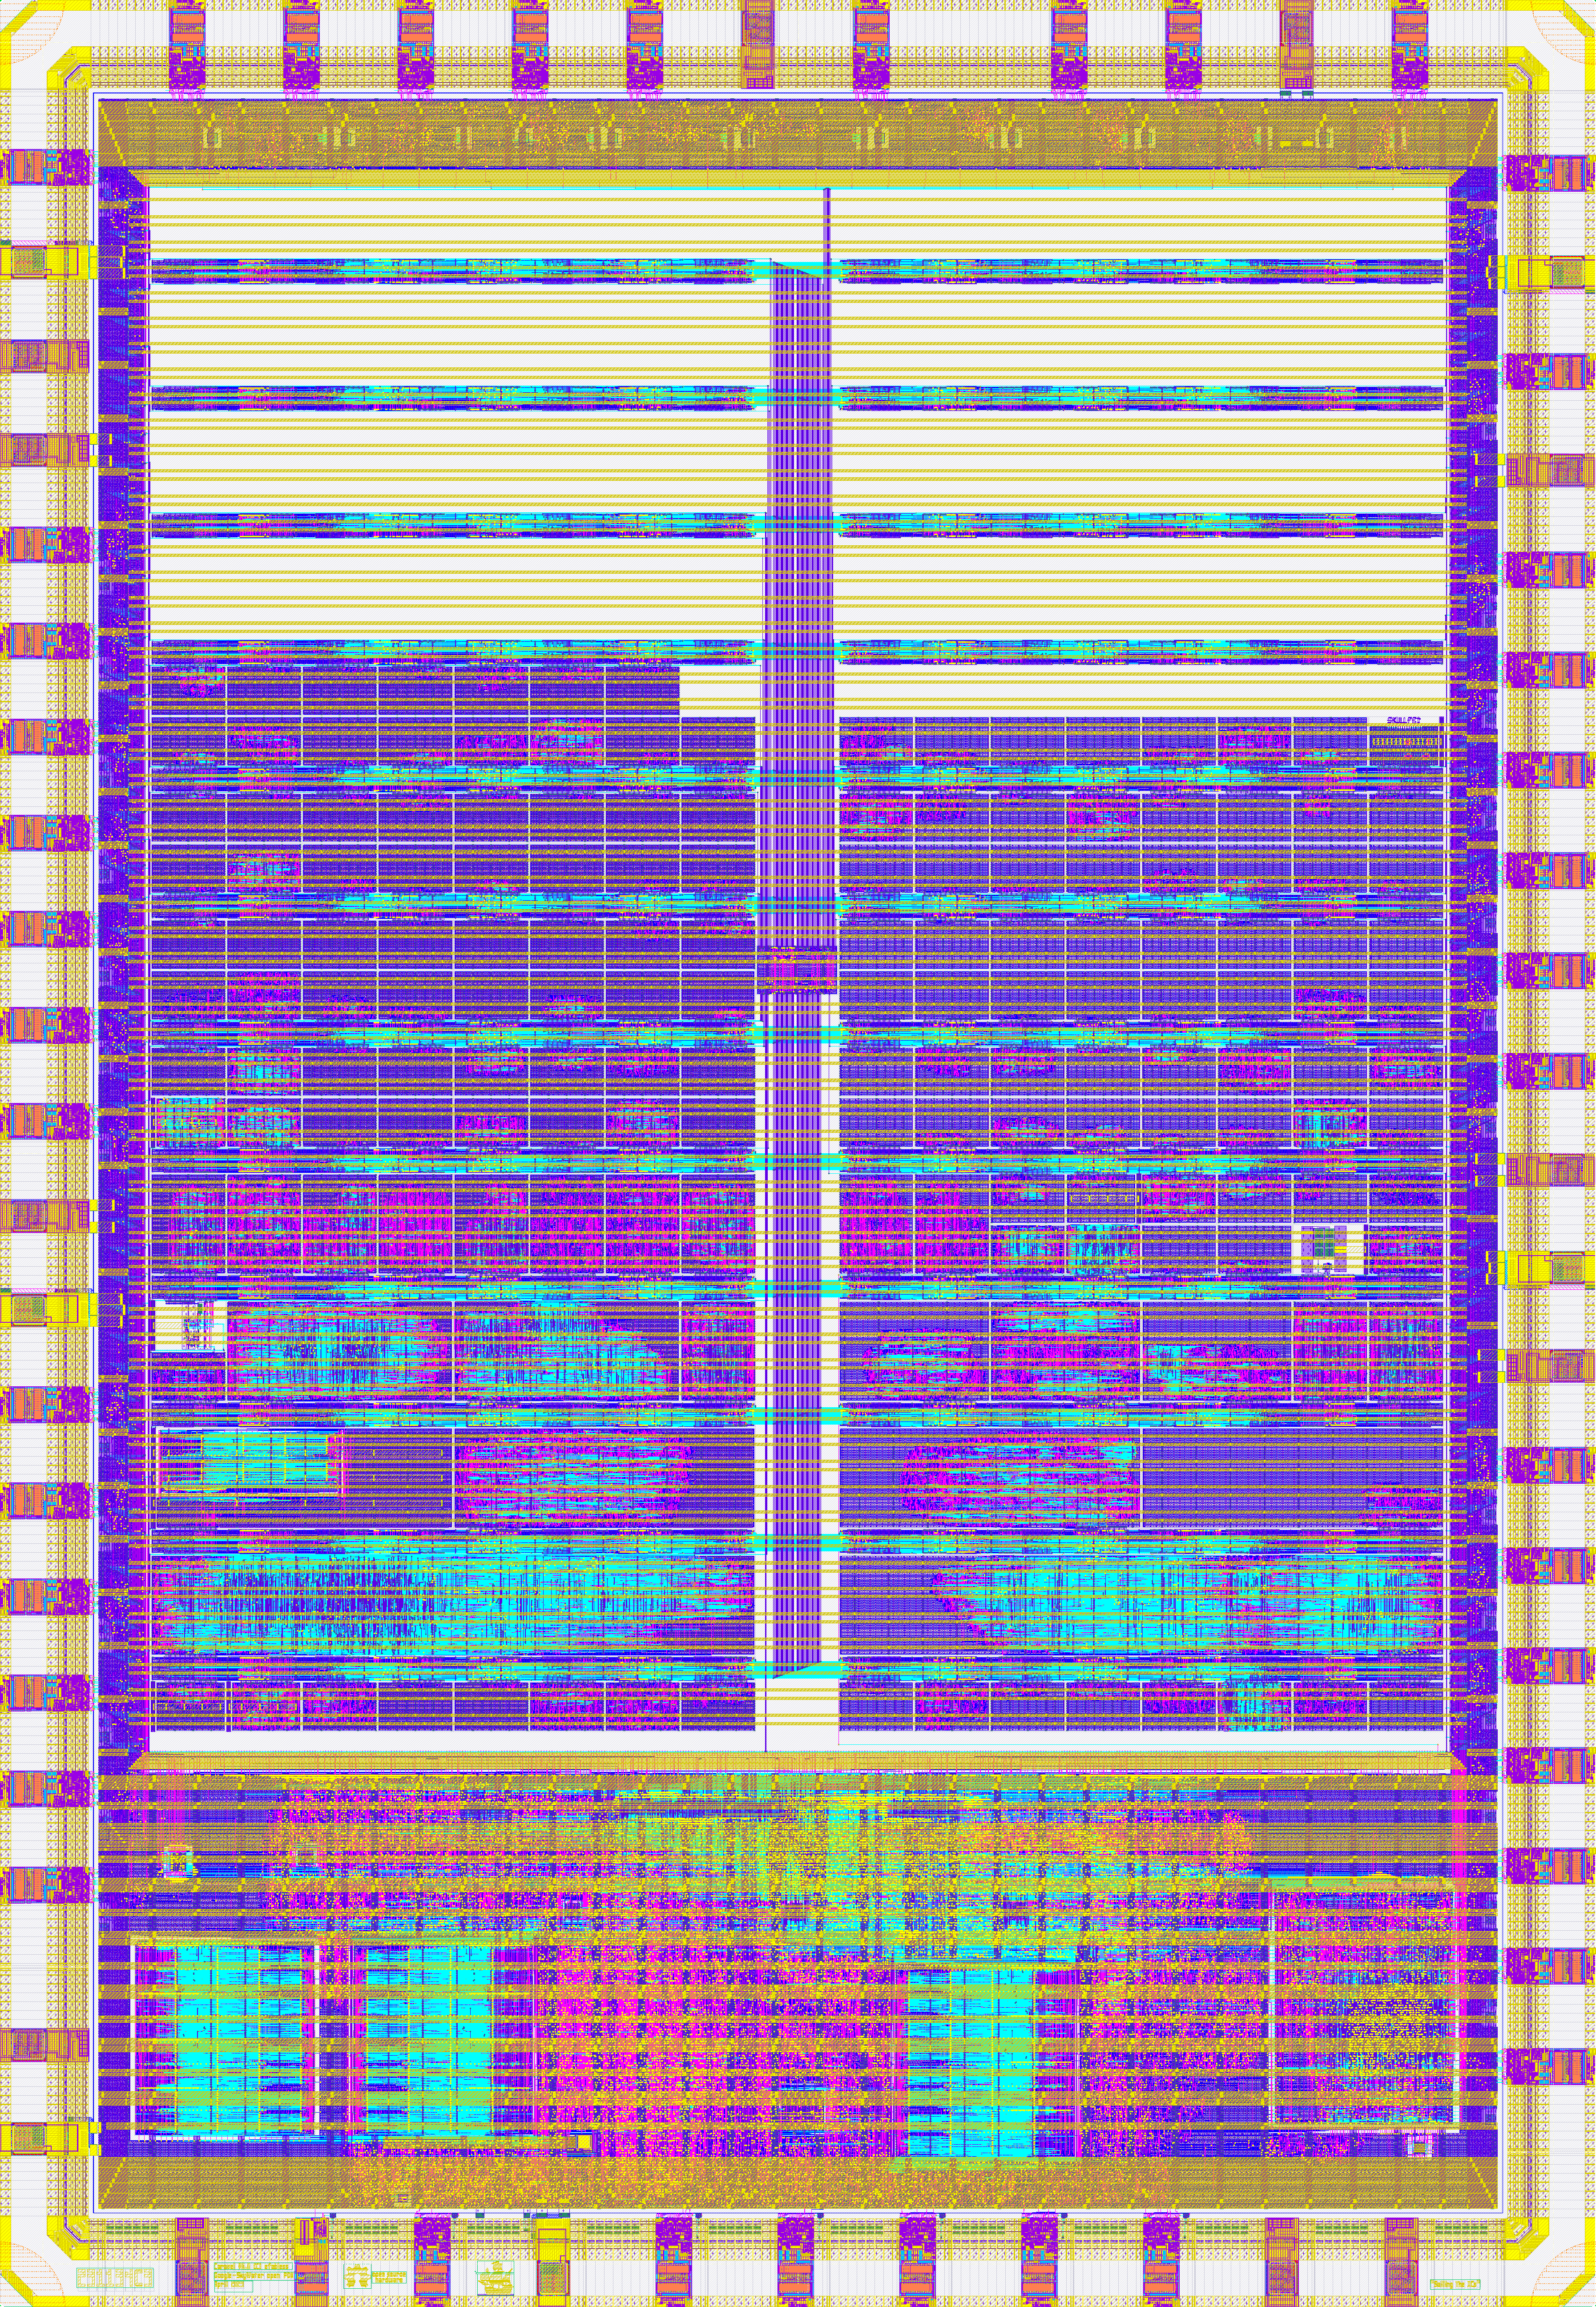
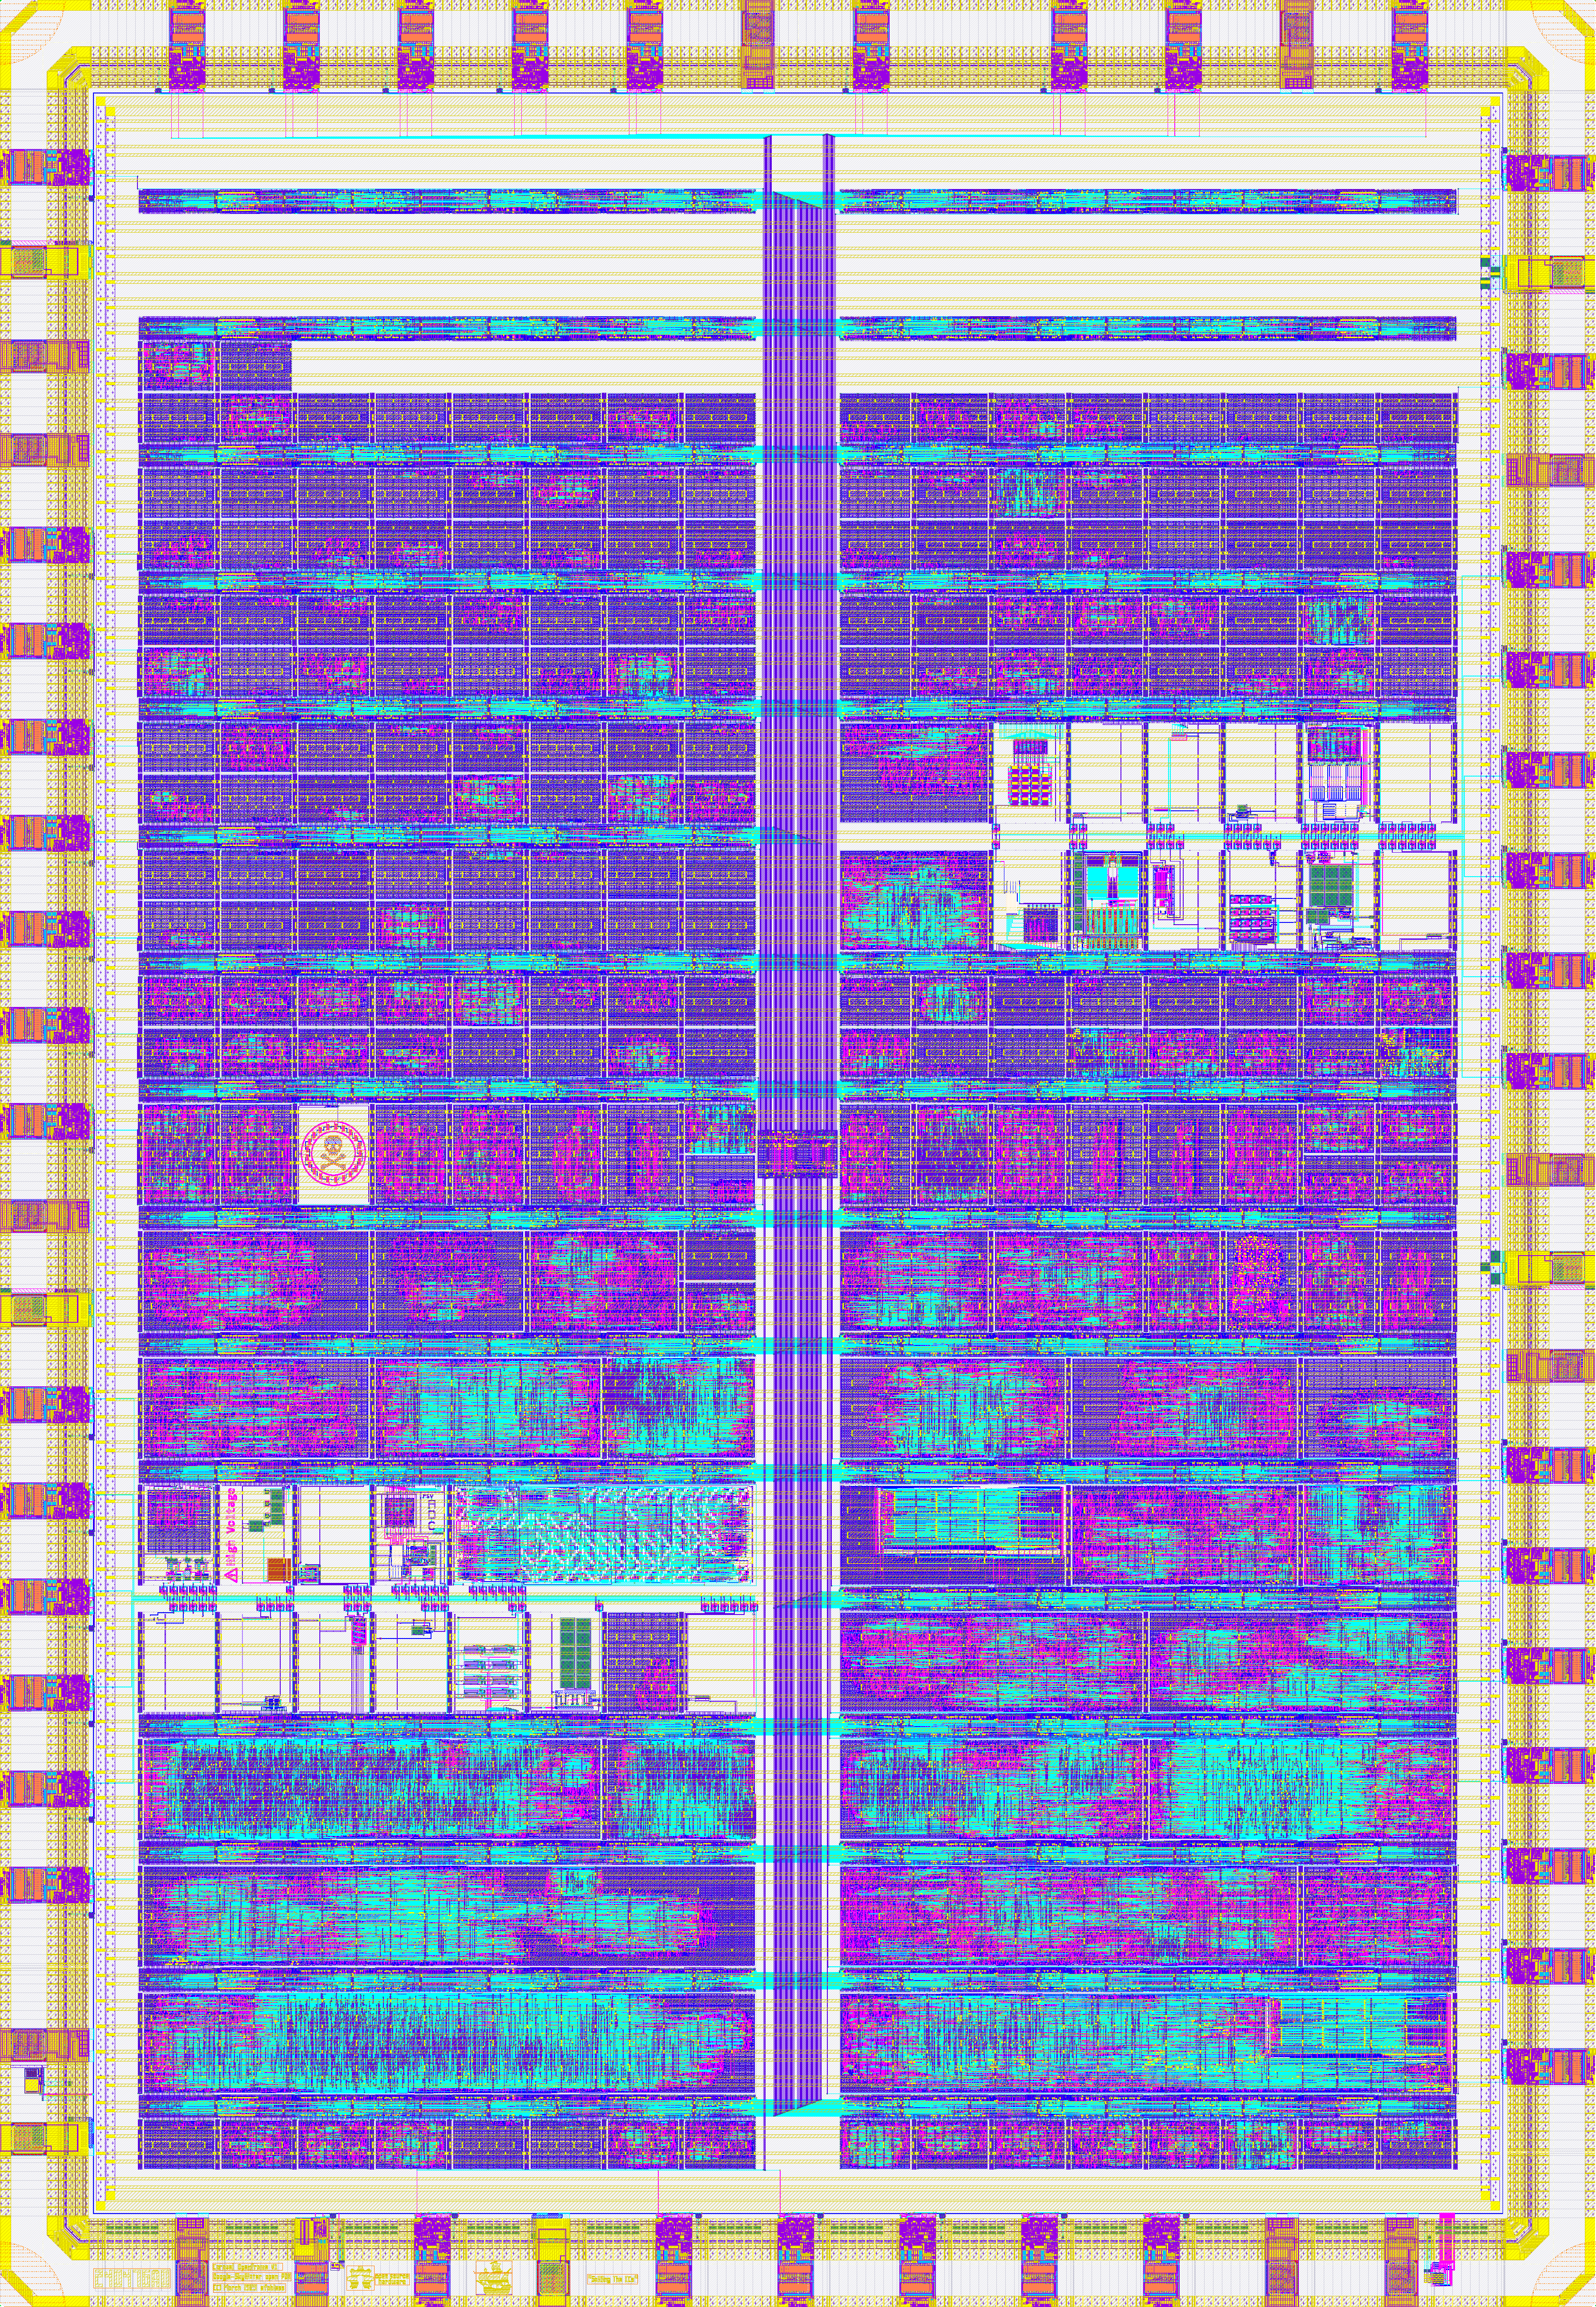
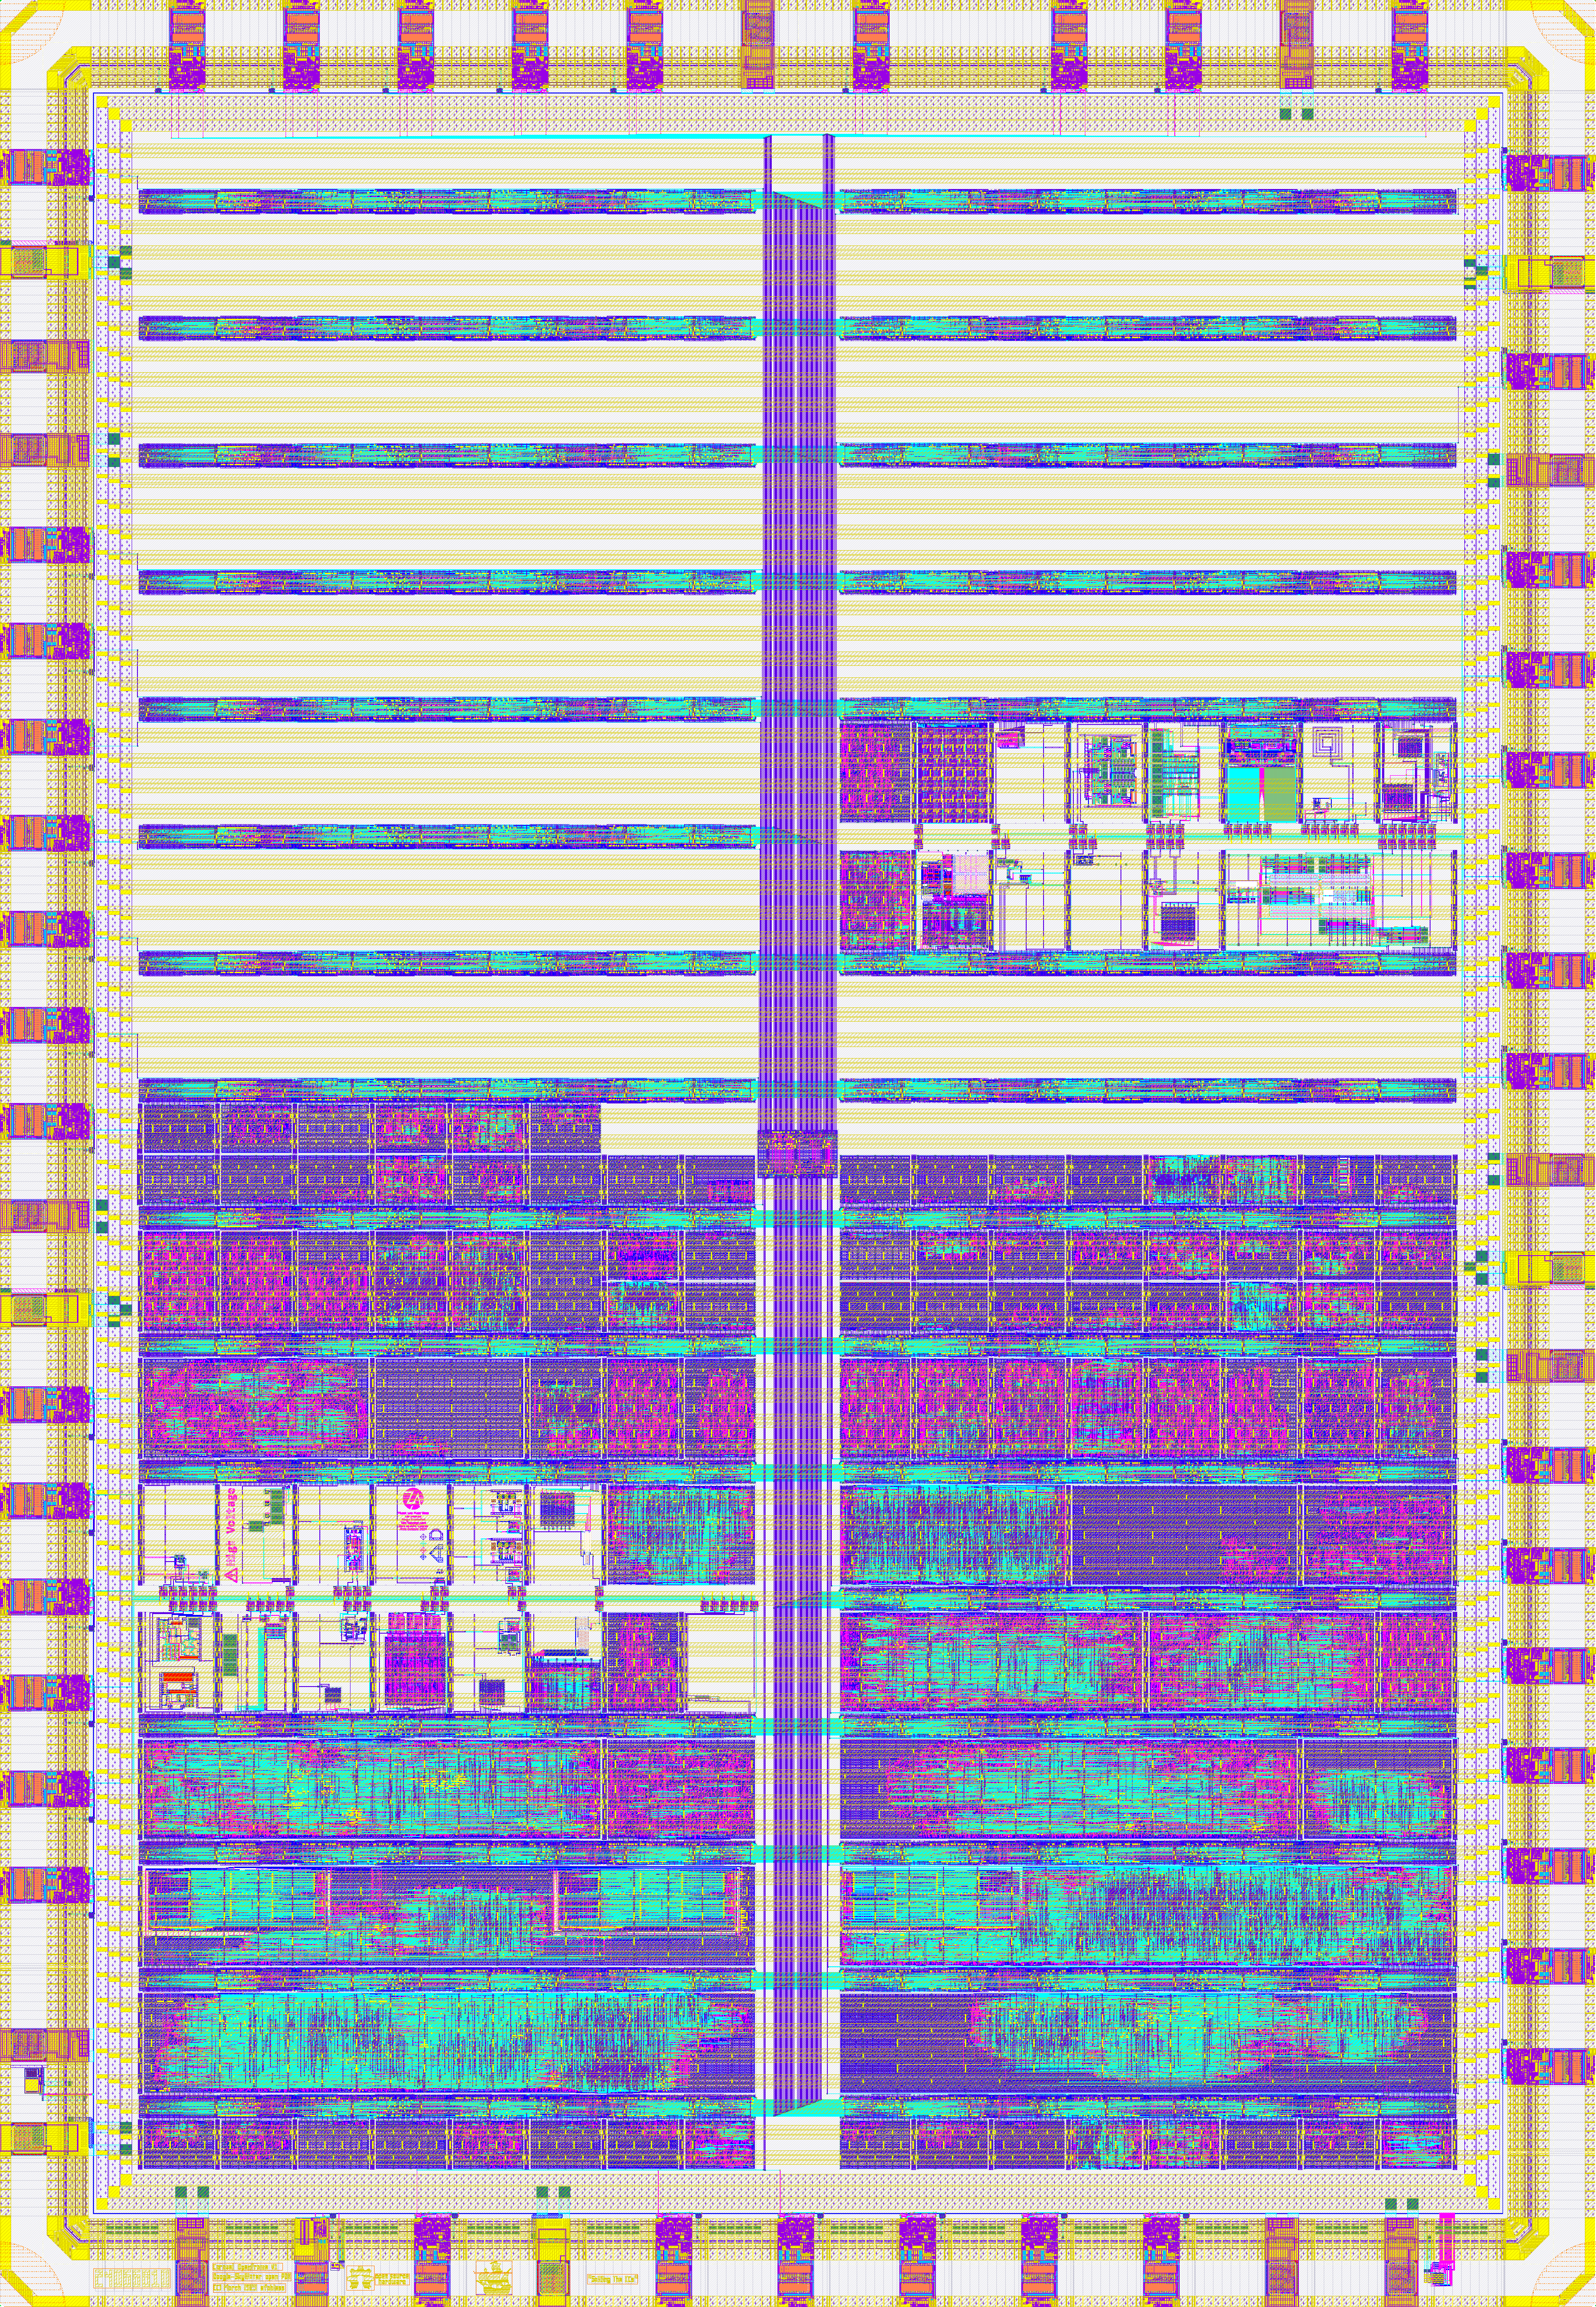
KianV was taped out onto a full-sized die (20.1 mm²), with an approximate core utilization of 65% and an estimated
~13 mW of power consumption.
KianV chip layout: cache SRAM blocks surround the central core, with peripherals and IO placed around the perimeter
Design Validation PCB
As mentioned in the introduction, a small bring-up PCB was designed to support validation and software bring-up.
The board provides a number of supporting components, such as the 32 MiB of SDRAM, an SPI-based Ethernet connection,
SPI flash, SPI SD card interface, UART access and a power supply.
KianV uses a custom bootloader, followed by OpenSBI, and then boots
the Linux kernel. Only minimal driver adaptations were required to boot mainline Linux with Sv32 MMU support on the SoC.
In addition to Linux, the system also runs µLinux and XV6 on the same hardware platform.
Linux 6.19.0-rc1 booting on KianV, with the wafer.space logo being drawn to the terminal
Acknowledgments
Andrew Wingate - Board design review (wafer.space)
Christian Stredicke - Voida PBX
Goran Maholvic - Board design support and SDRAM routing
Leo Moser - ASIC flow and PDK support (wafer.space)
Marcelo Samsoniuk - For the technical and personal exchange over the past few years (DarkRiscV)
]]>Hirosh DabuiChip-on-Board Packaging Progress2026-06-03T12:00:00+00:002026-06-03T12:00:00+00:00https://wafer.space/news/chip-on-board-progressRun 1 bare dies and chips-on-board (COBs) have shipped - join us to have a look into the process.
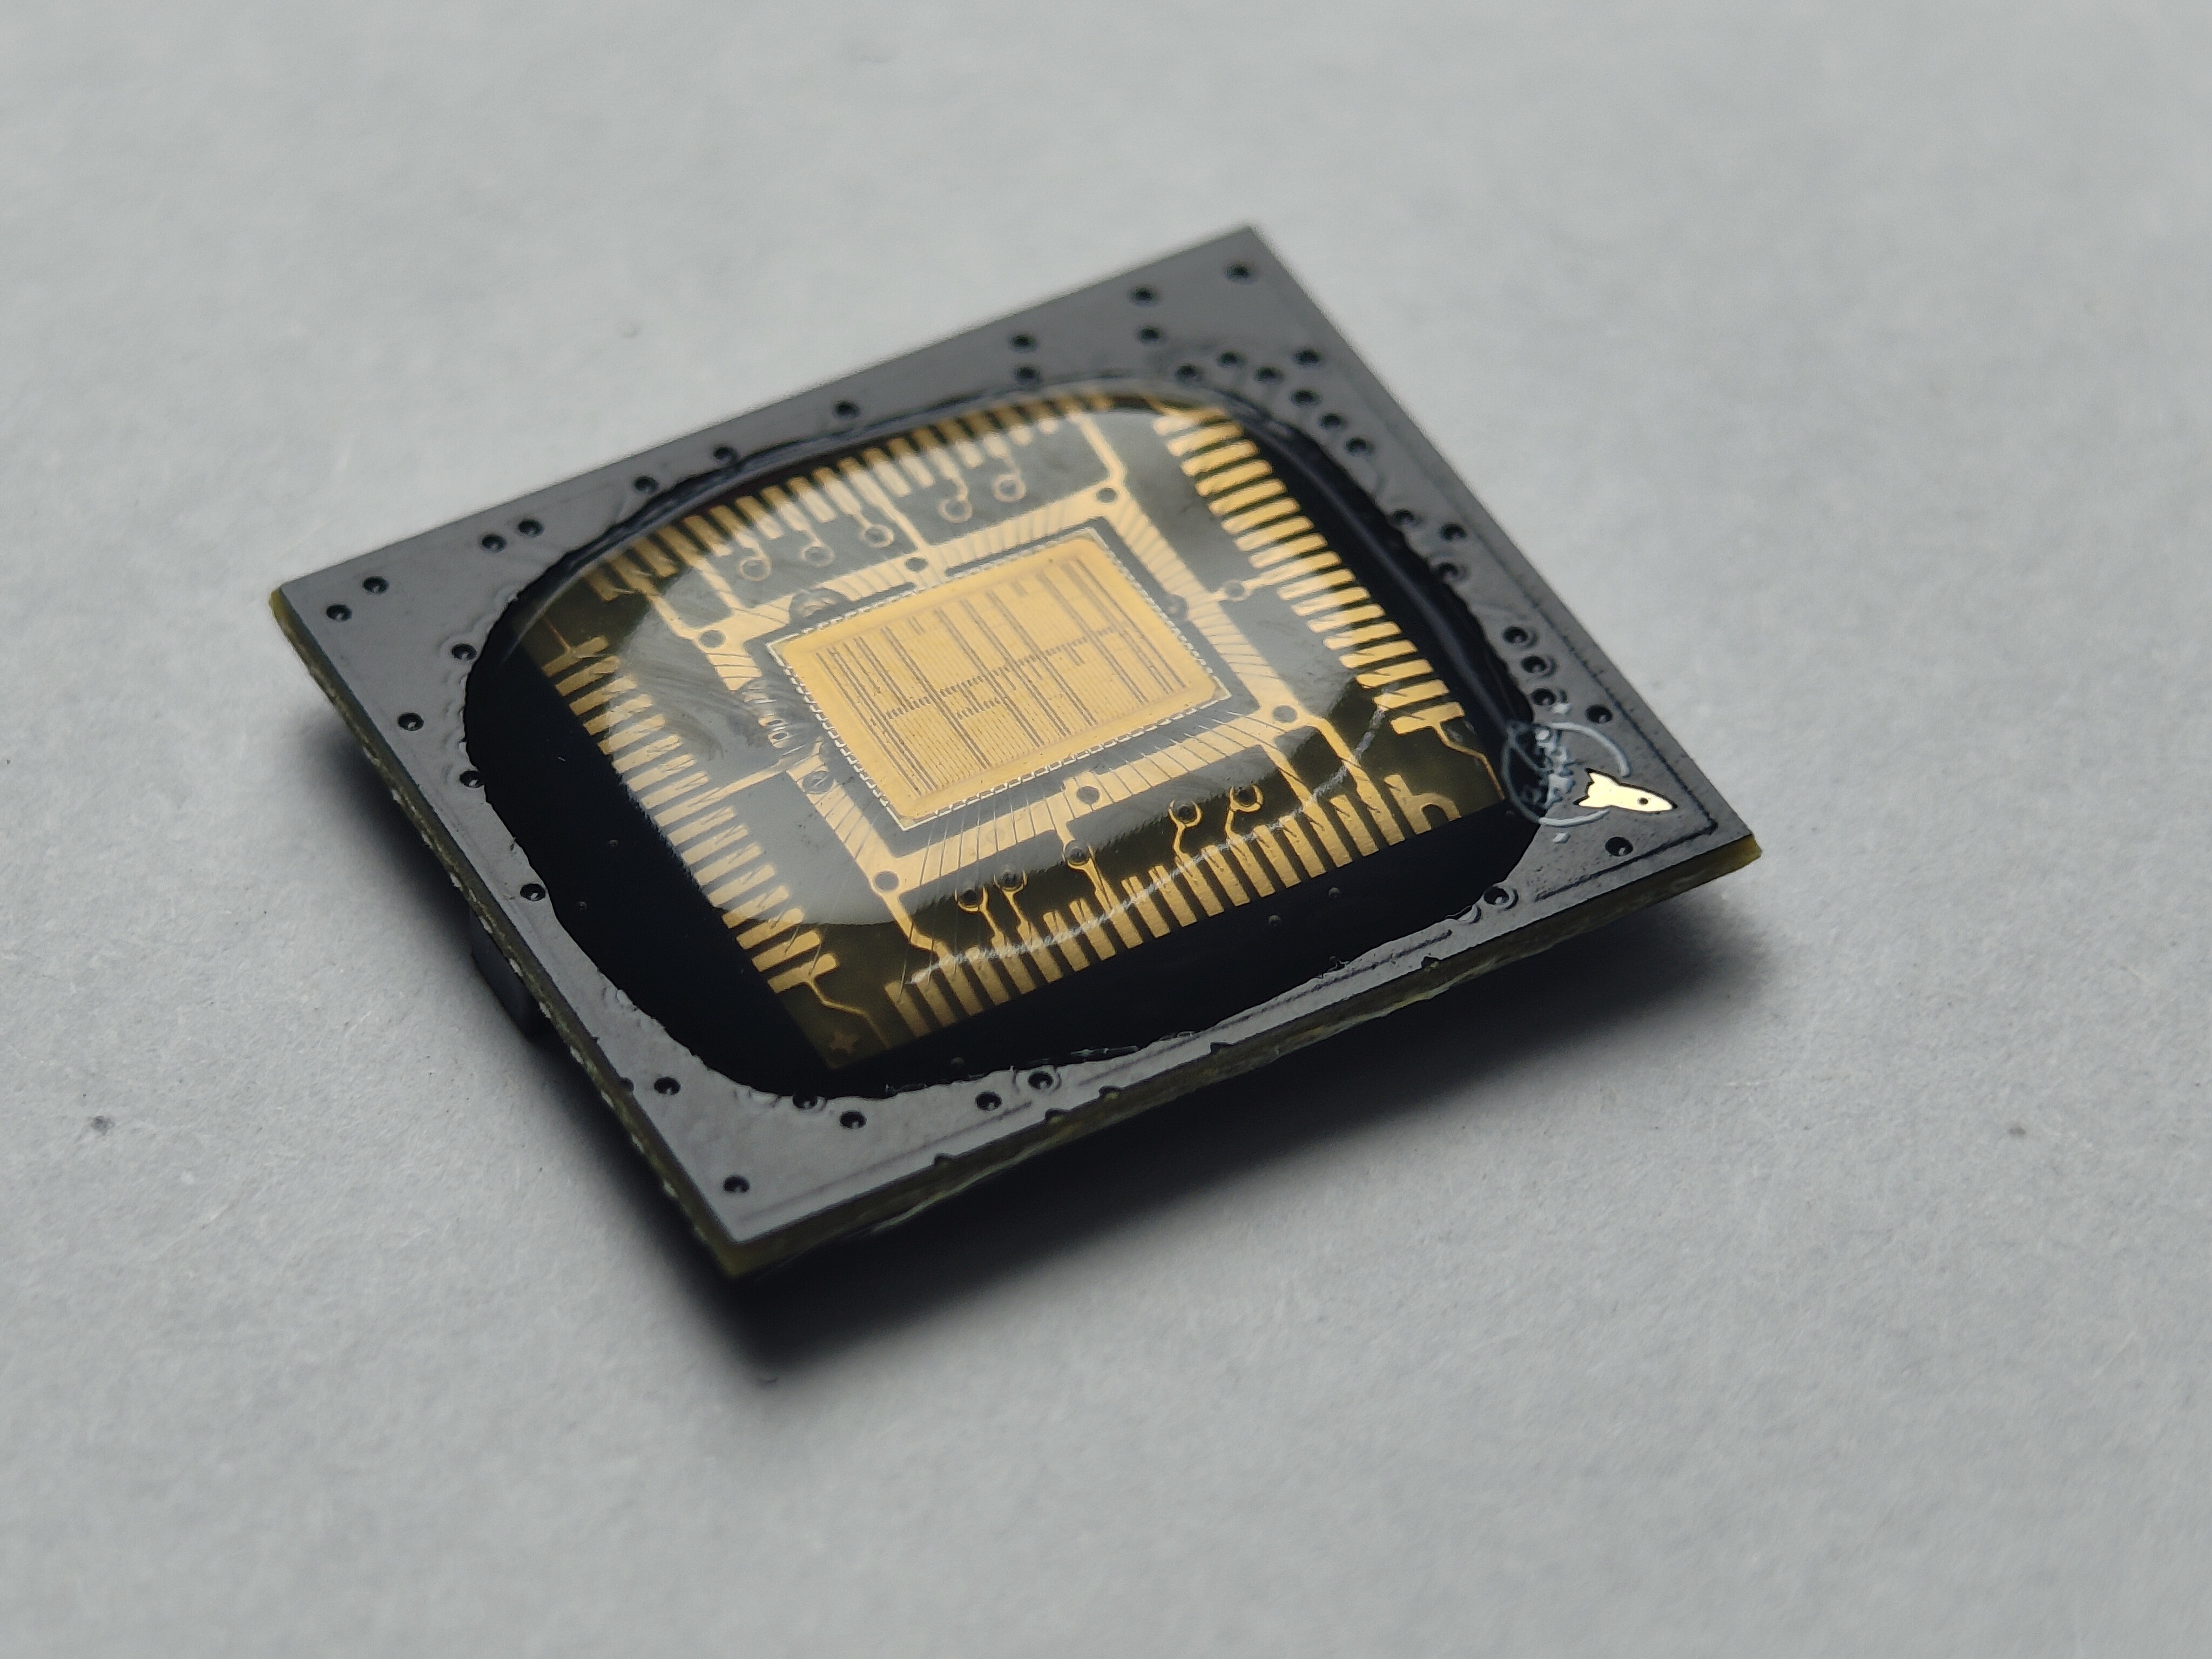
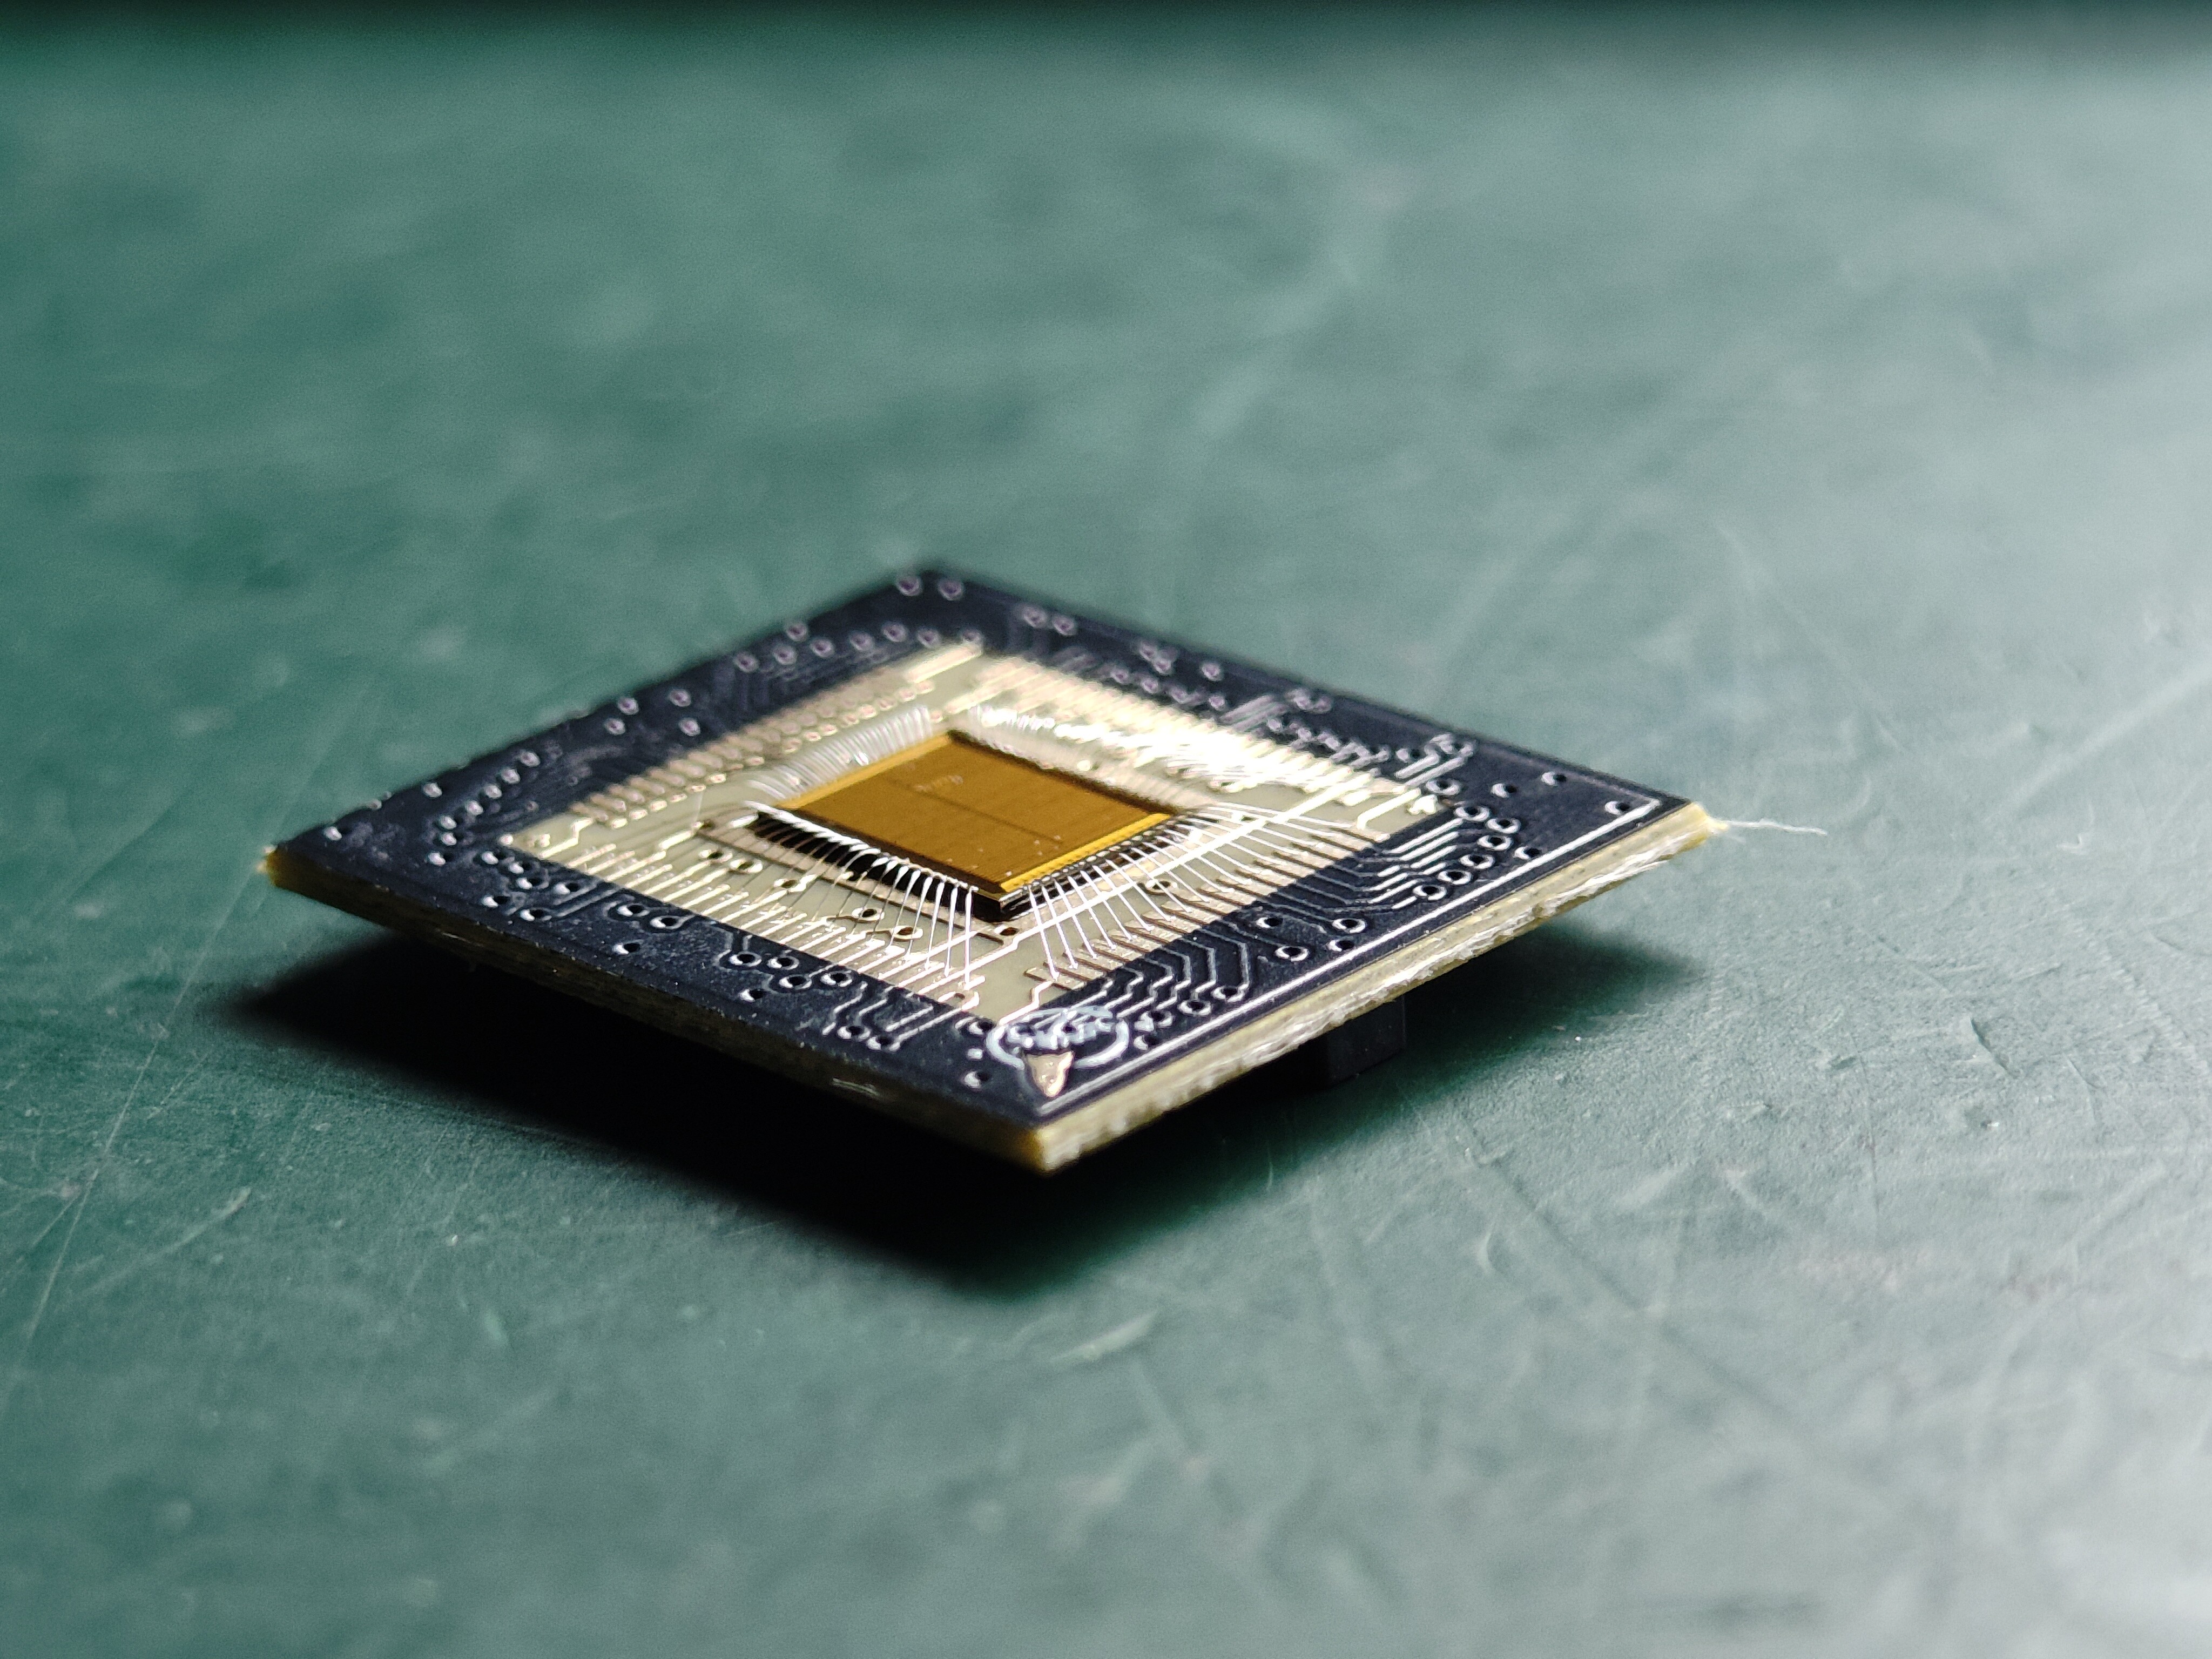
A wafer.space die wirebonded to a PCB, covered in protective epoxy
The Chip-on-Board Boards
If you’ve been following along, you may remember a previous update
where we discussed different potential strategies for chip-on-board packaging. In this update we will see all that hard
work come to fruition, as we wirebond some of the very first dies from this run.
The top-level view of the process is that each die is placed onto a small PCB and wirebonded to connect the die to the board.
Then, an epoxy glob-top is applied to protect the sensitive die and wires. The result is a packaged part that you can
plug into your own board and start testing immediately, no specialized equipment needed.
Wirebonding is inaccessible for most people, and traditional packaging solutions remain cost prohibitive due to the low
volume nature of the manufacturing runs. The COB boards were designed as an accessible way for people to use their
wafer.space dies.
These boards use an easily sourceable mezzanine connector for you to make your own motherboard. As always, the design
of this COB is available on GitHub.
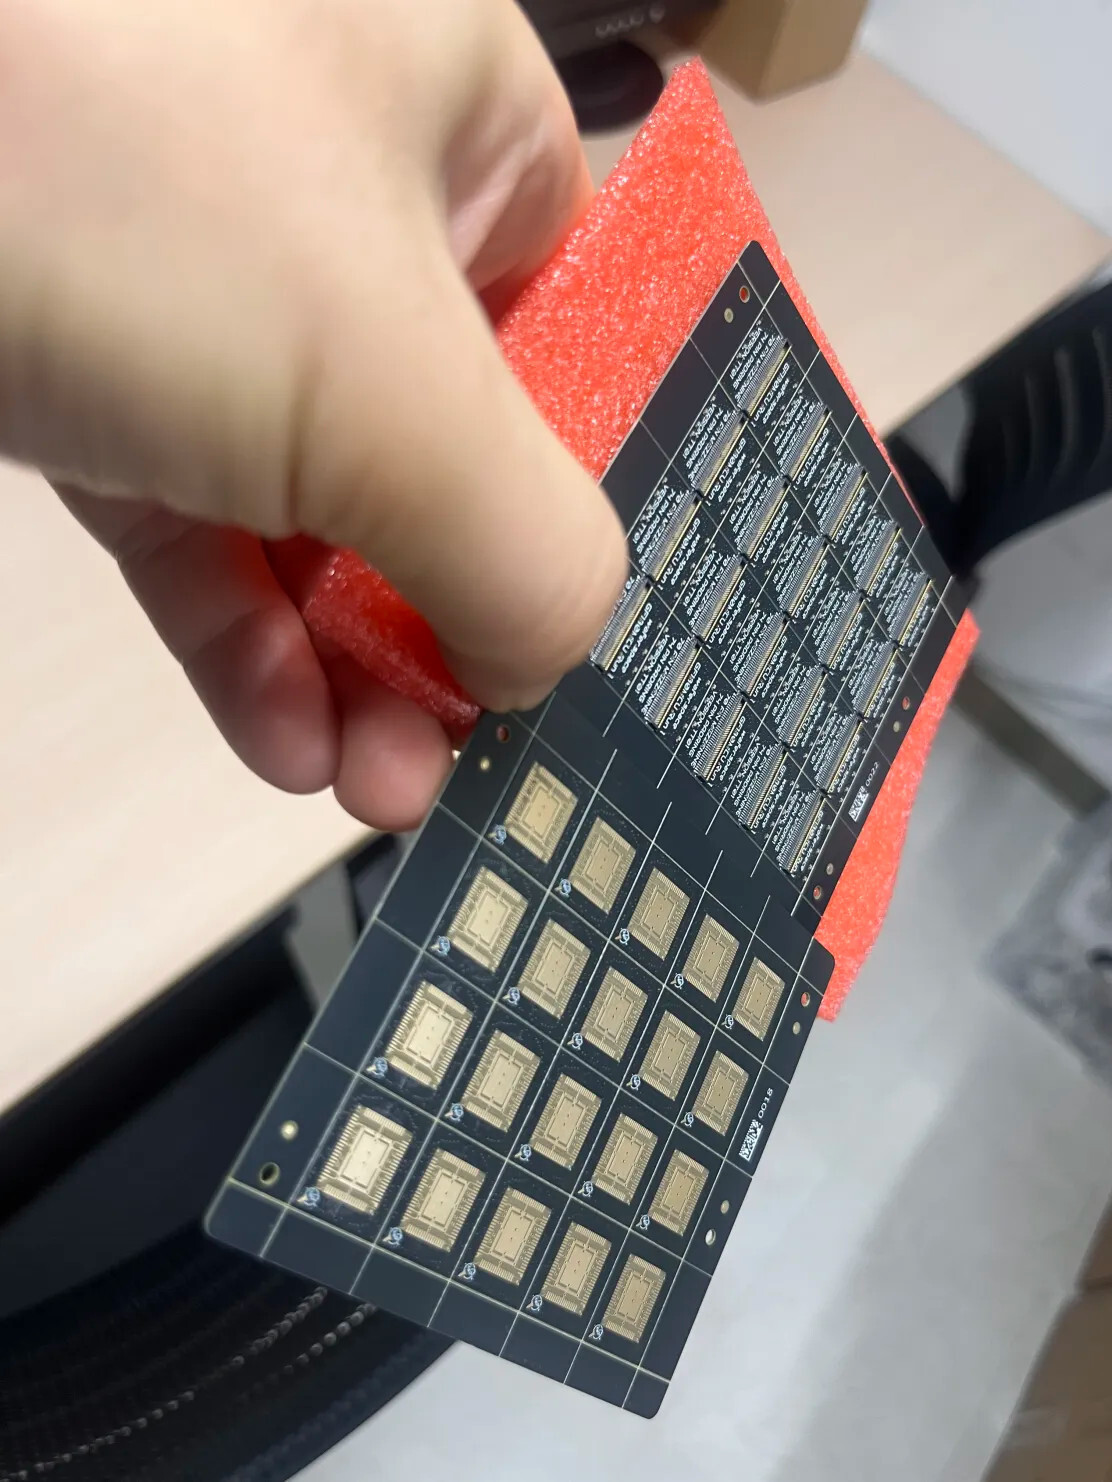
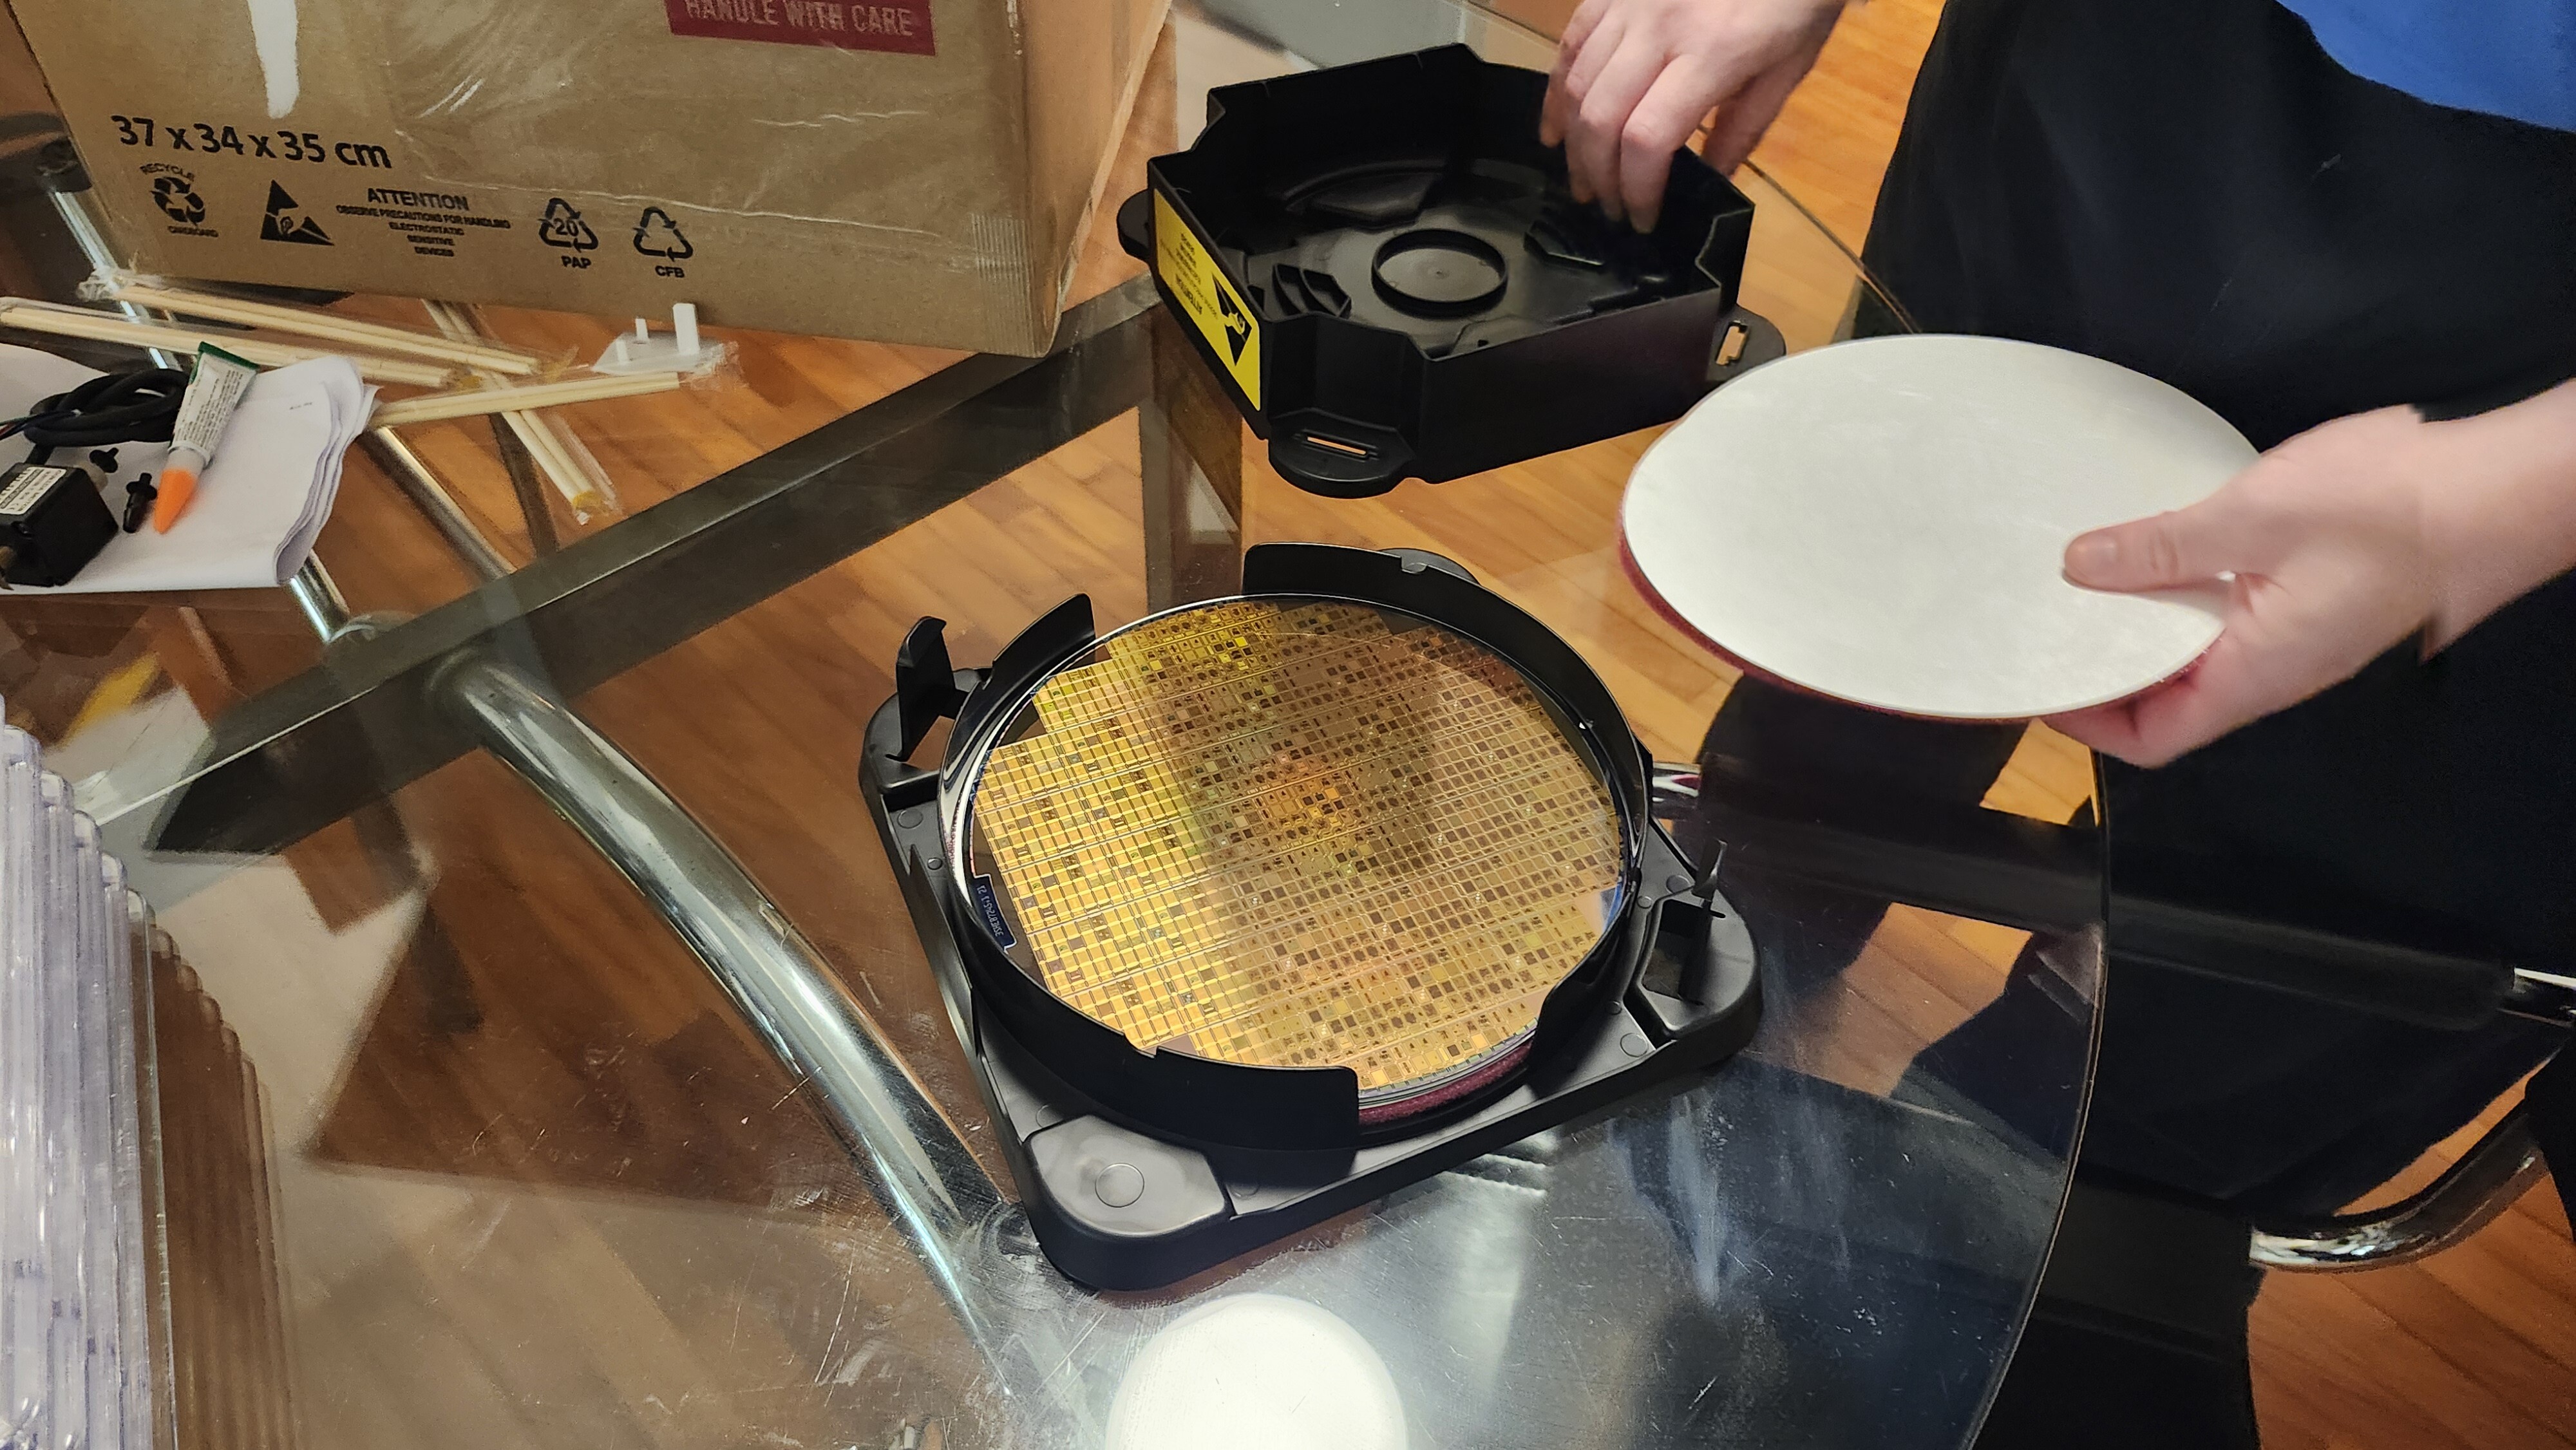
Blank COB boards waiting for their die
Preparing for Wirebonding
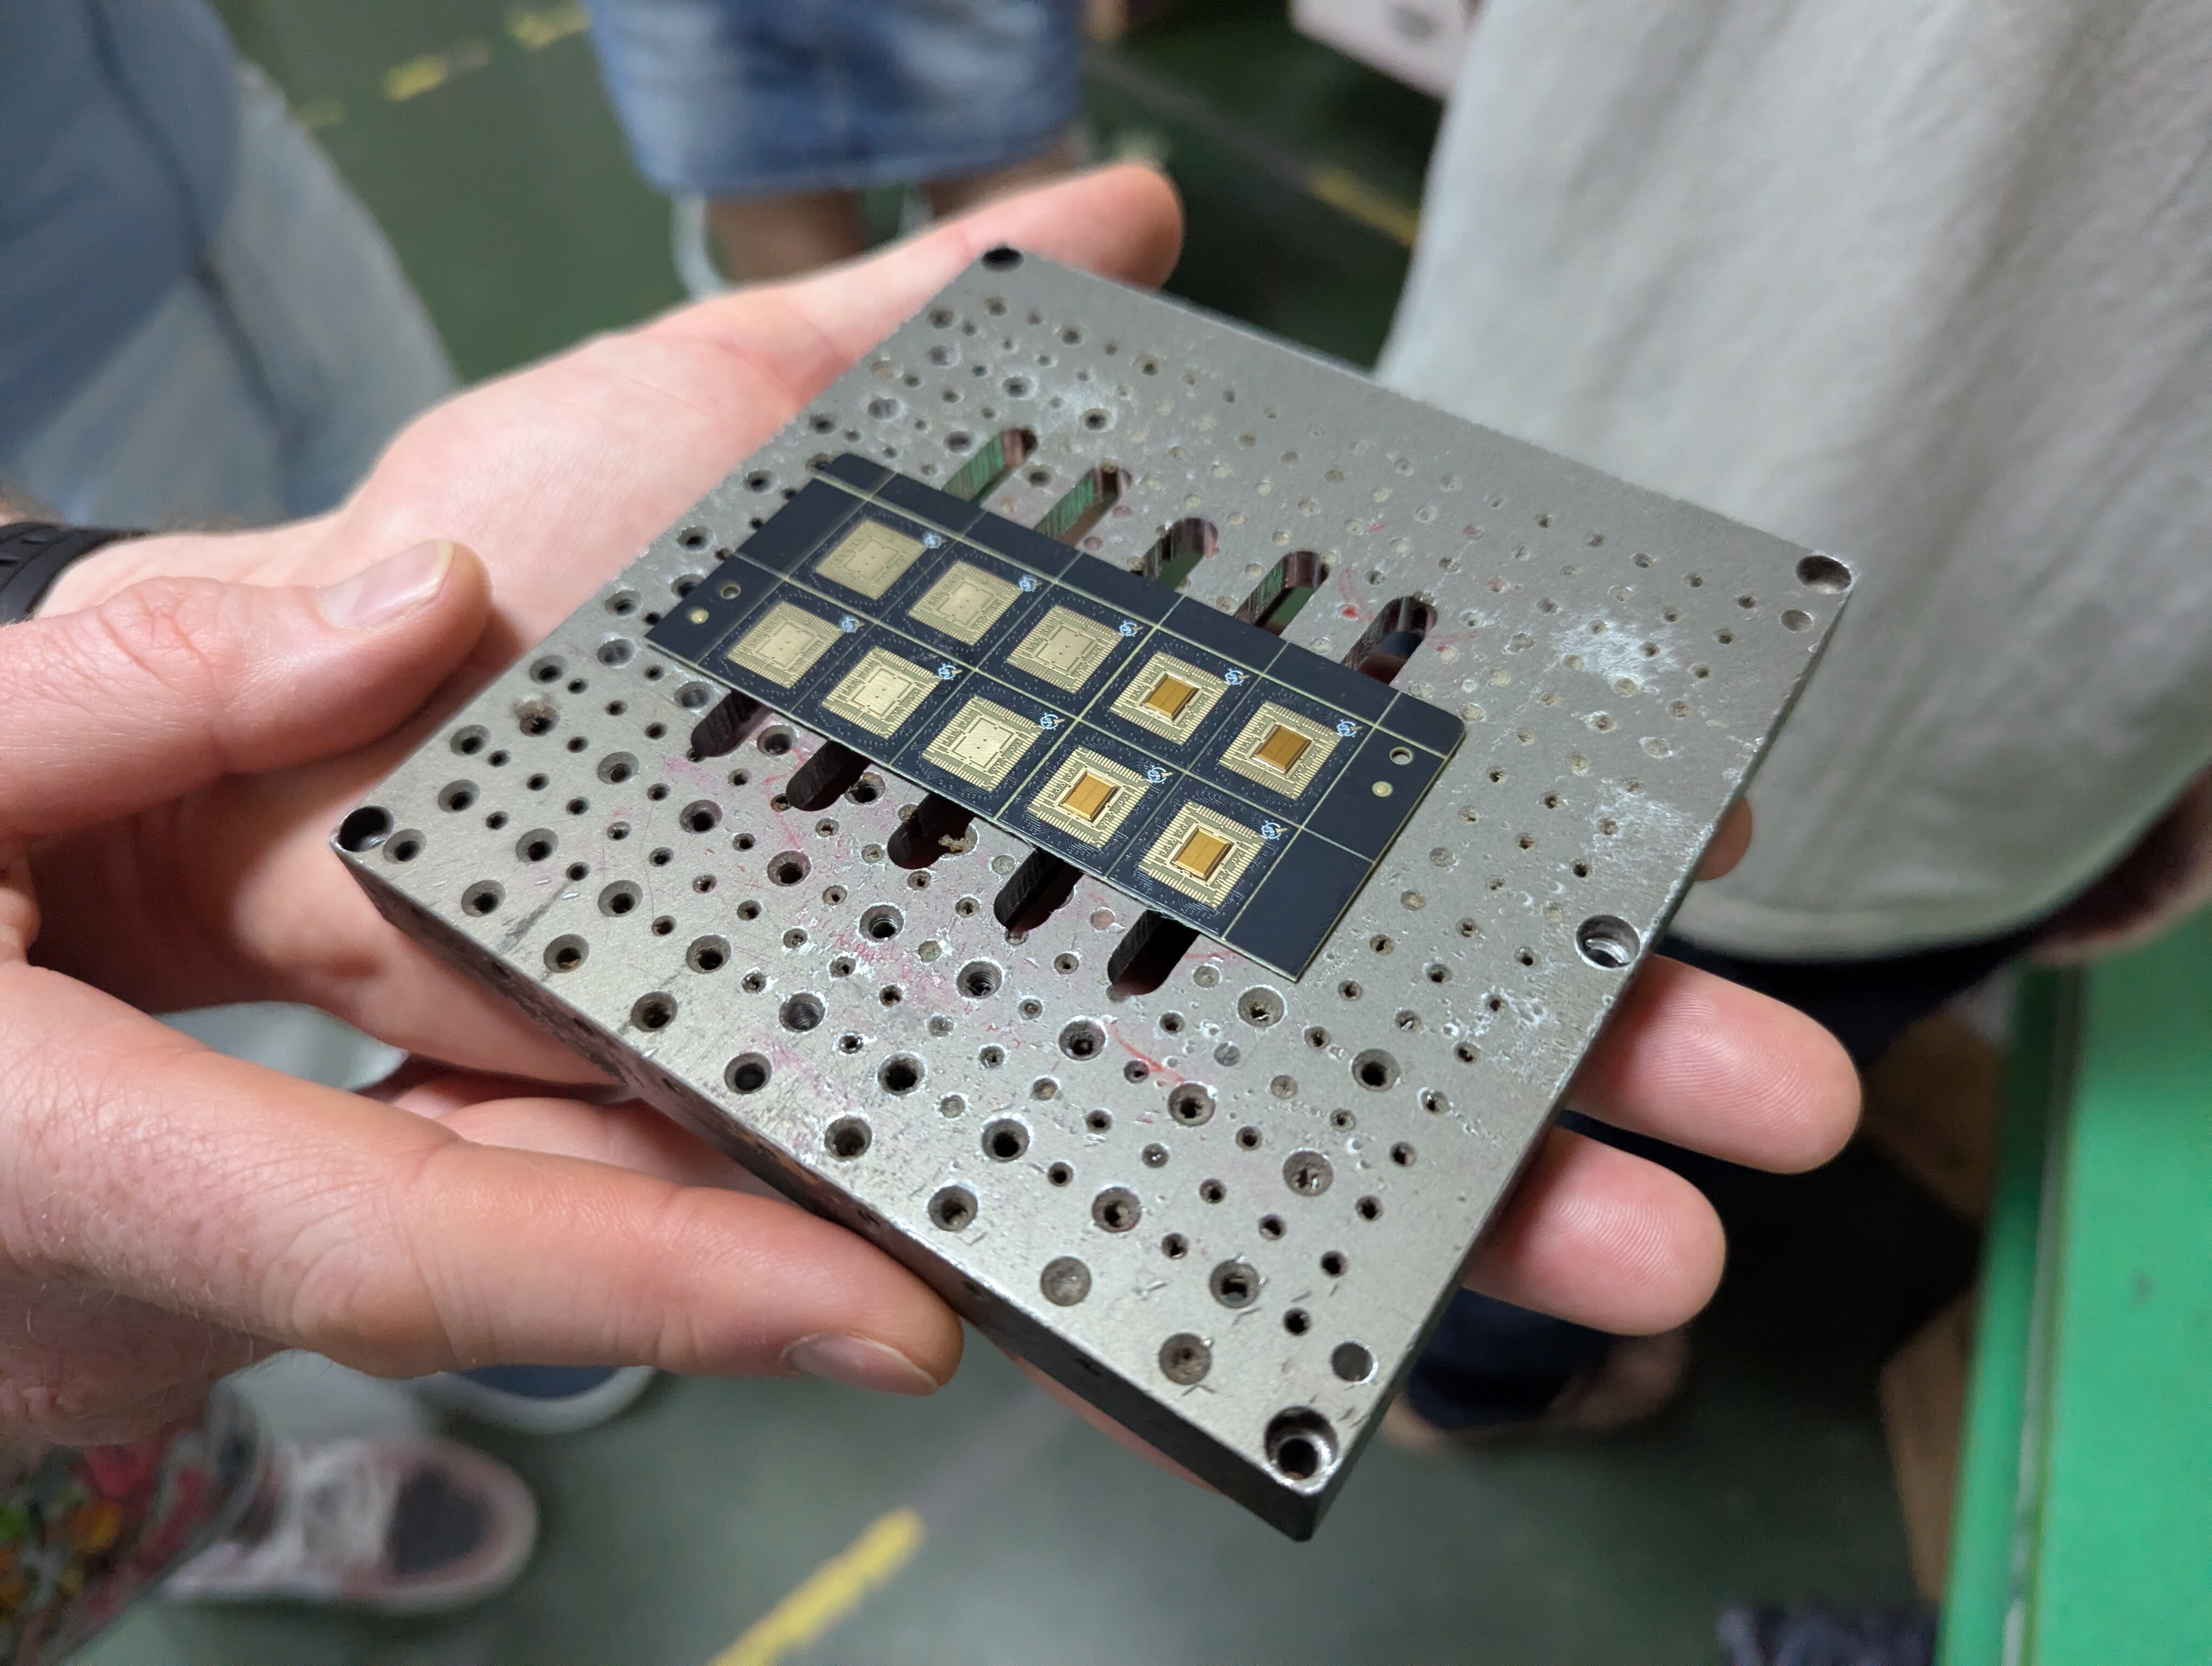
The COB boards arrive as a panel of 20 from the PCB house, but these are too large to fit onto the vacuum chuck used by
the wirebonders. The solution is simple: snap the panels in half!
Half-a-panel of COBs fixed to the vacuum chuck
Components moving during the wirebonding process is a concern. Tiny pads on the die and sharp movements caused by the
wirebonder mean that any misalignment could result in a failed bond (or multiple). These failed bonds could prevent
the chip from working properly, so our goal is to minimize any excessive movement.
The PCB itself is affixed to the chuck using a vacuum, and the die is physically glued to the PCB.
wafer.space dies being glued to a COB board
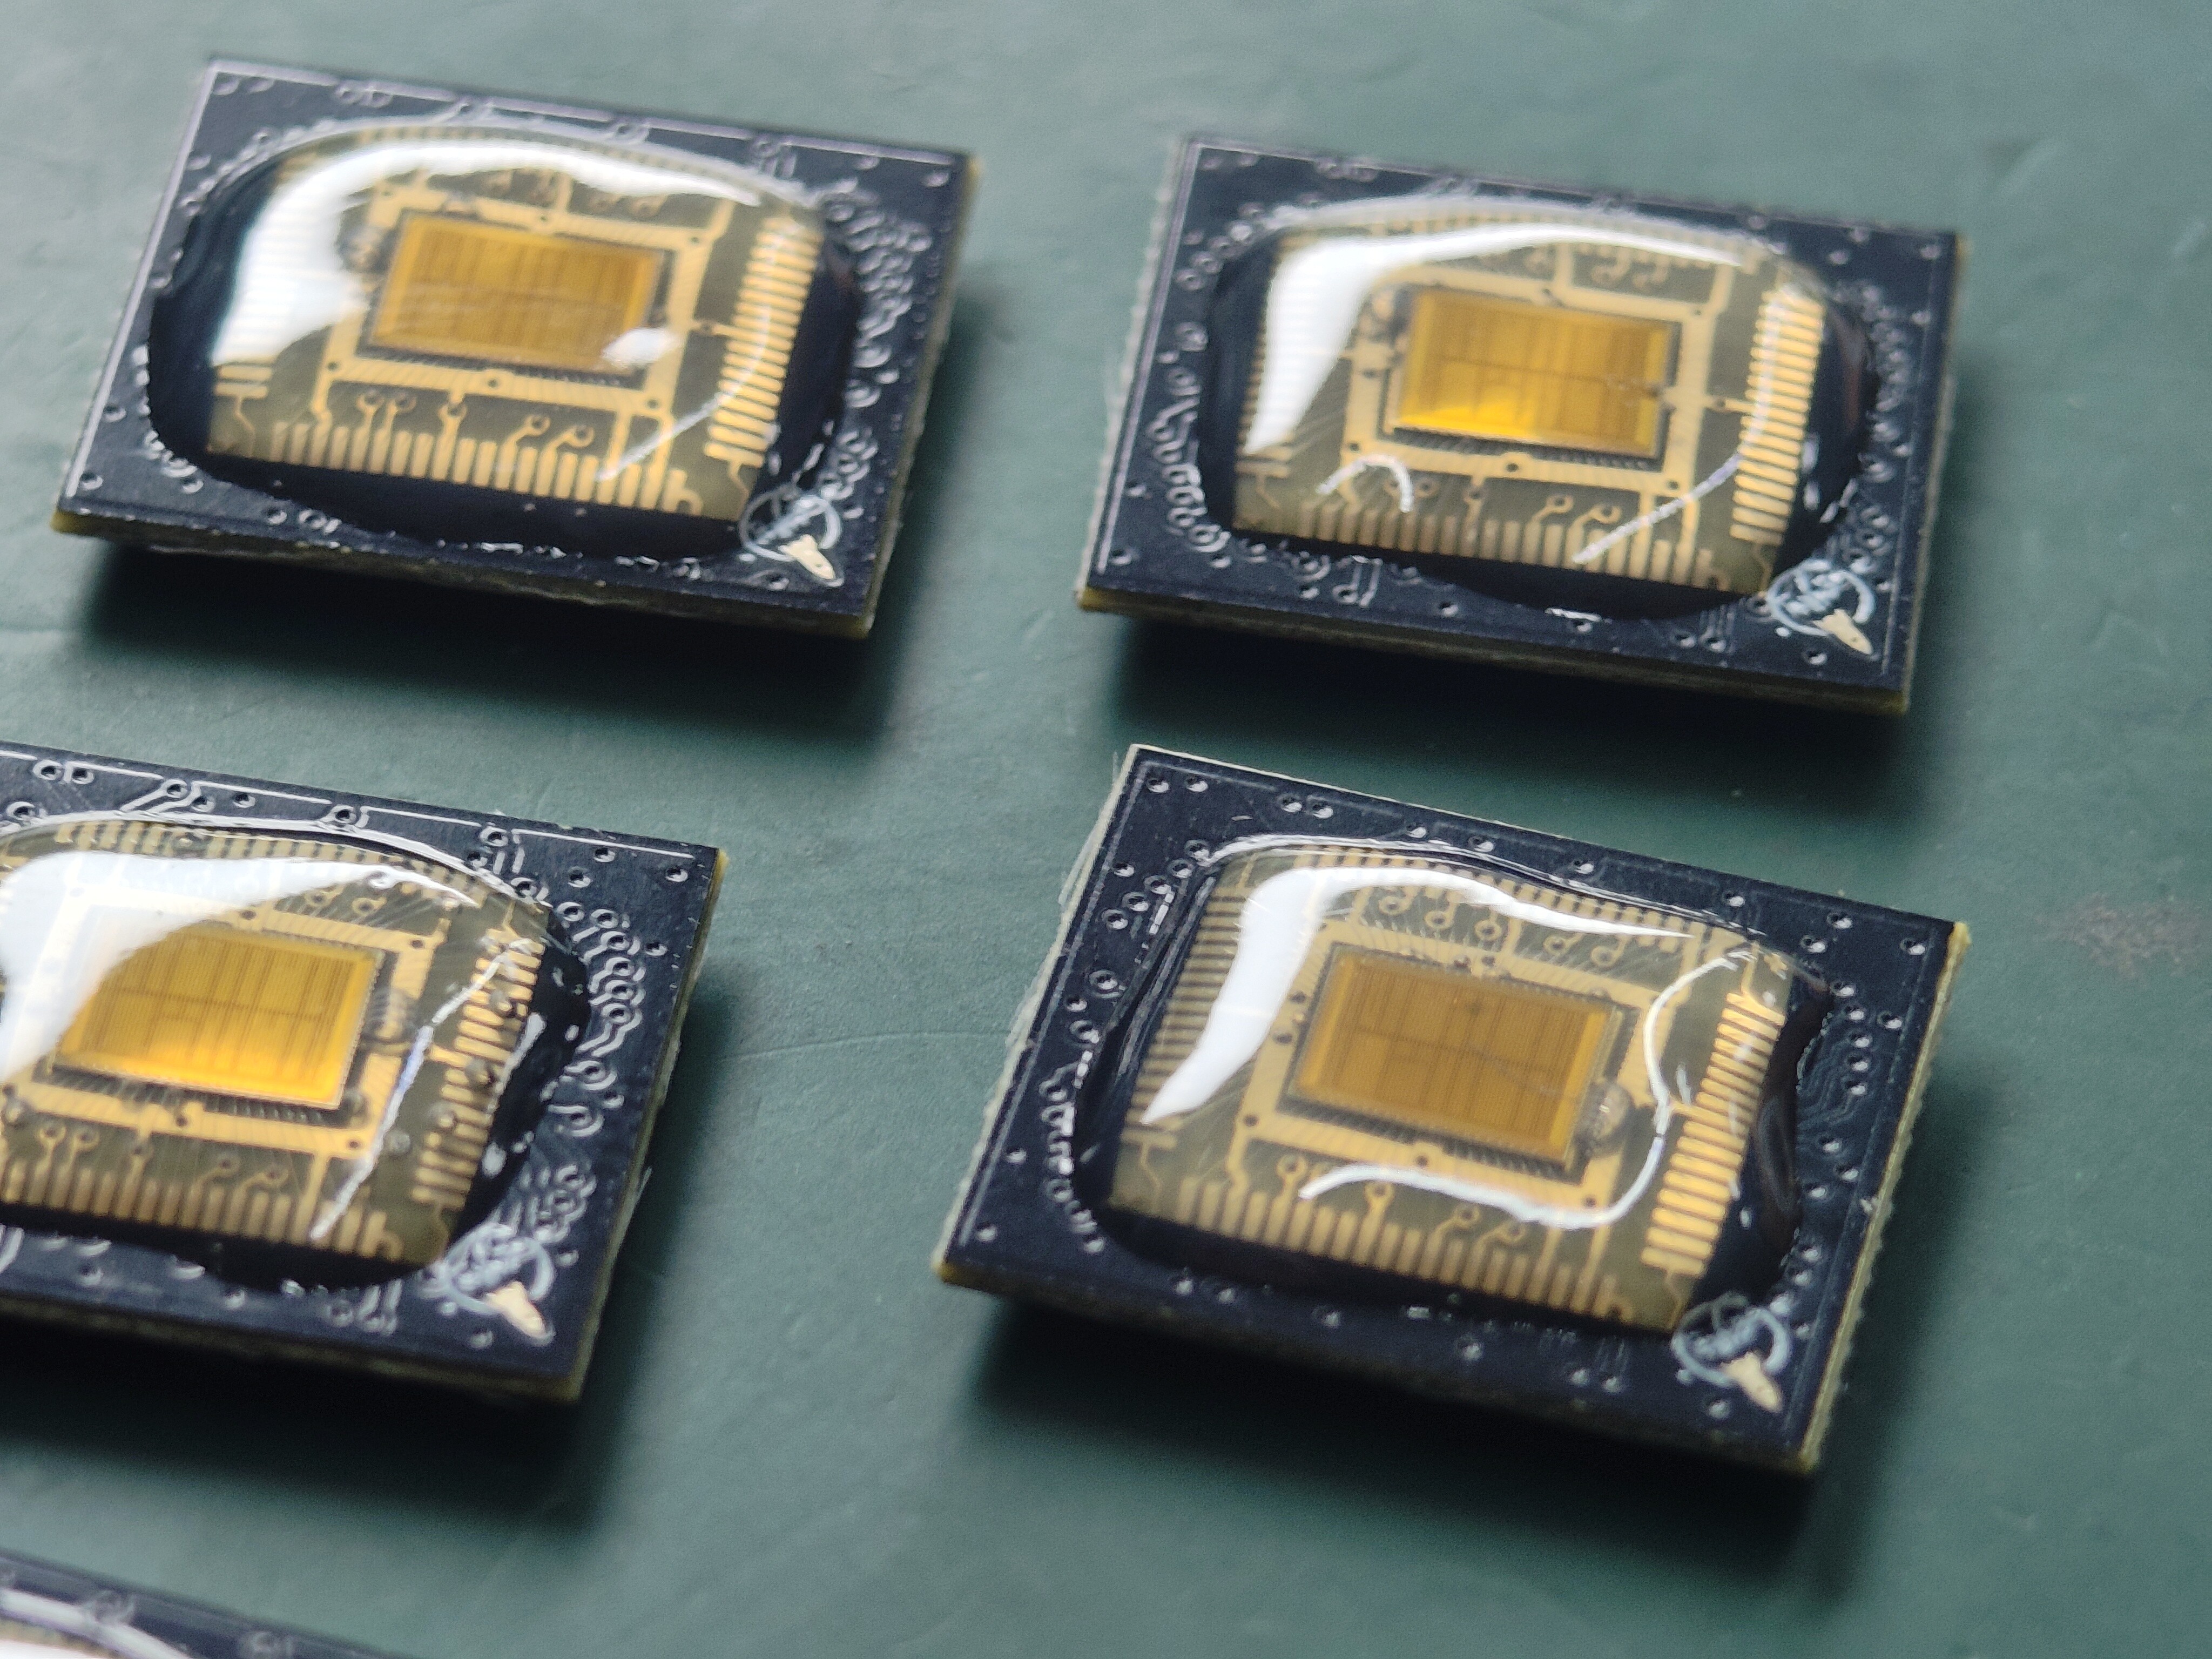
An unpopulated COB (left) next to one with a die (right)
Performing the Wirebonding
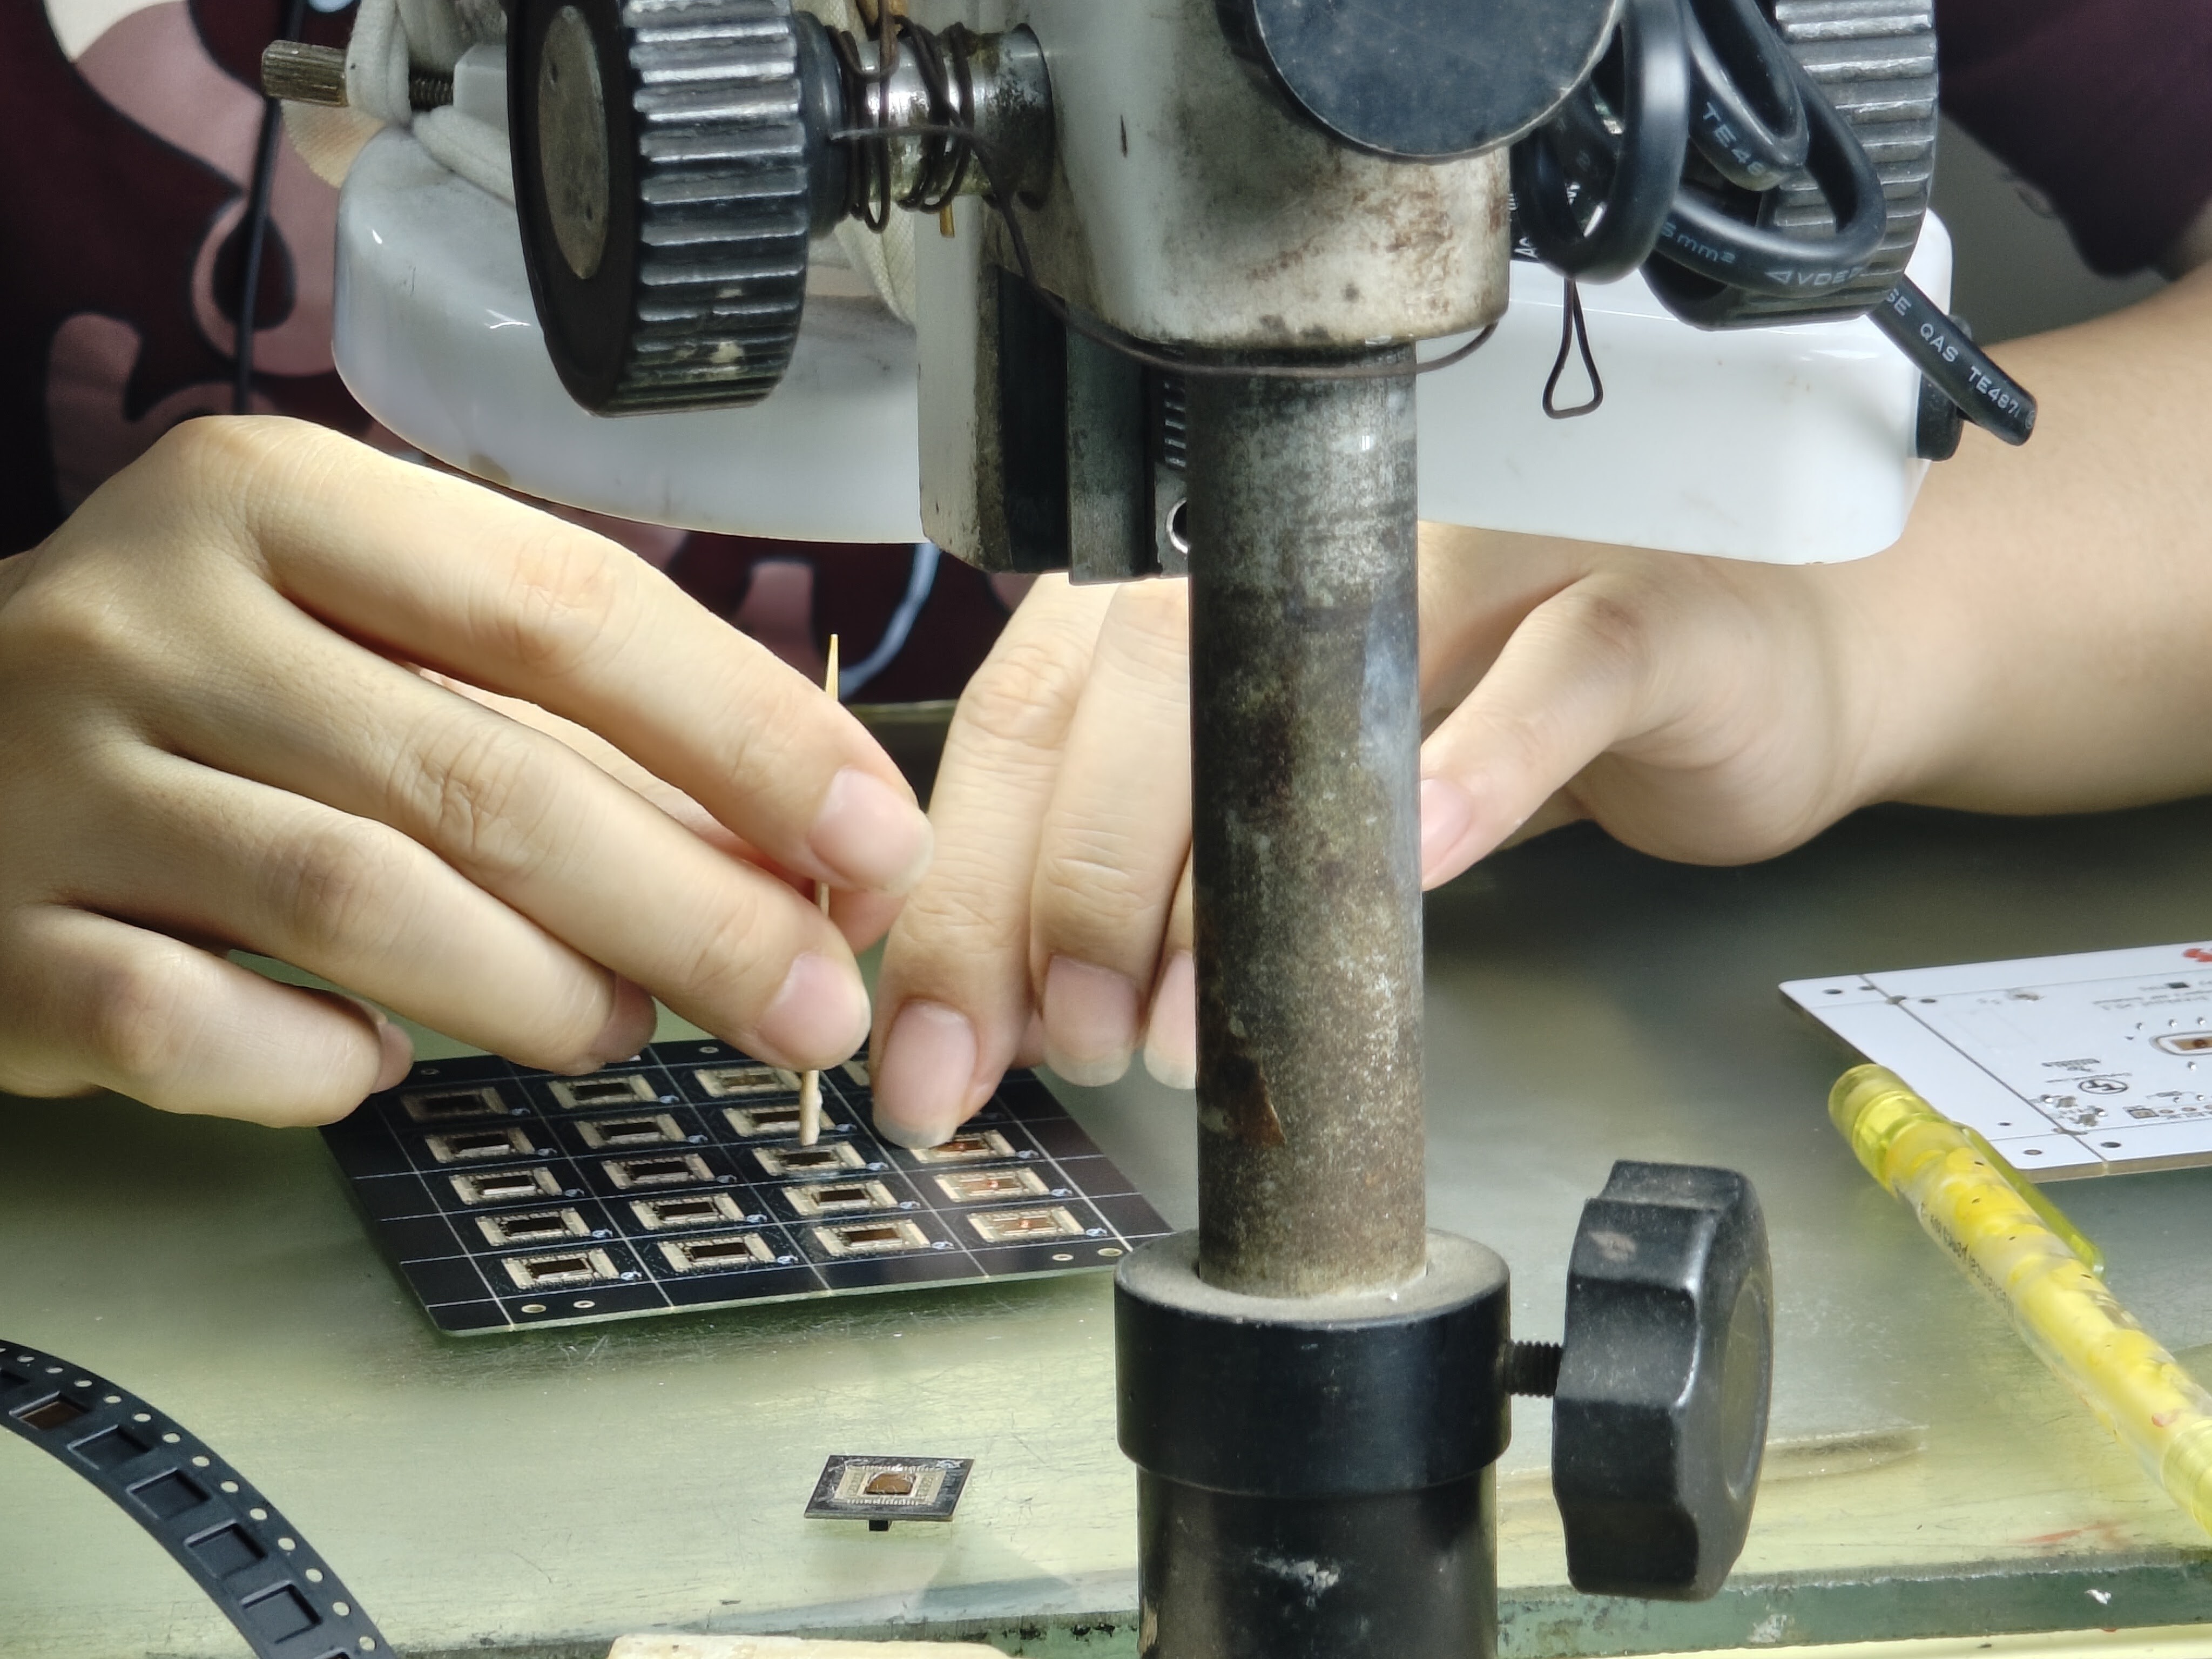
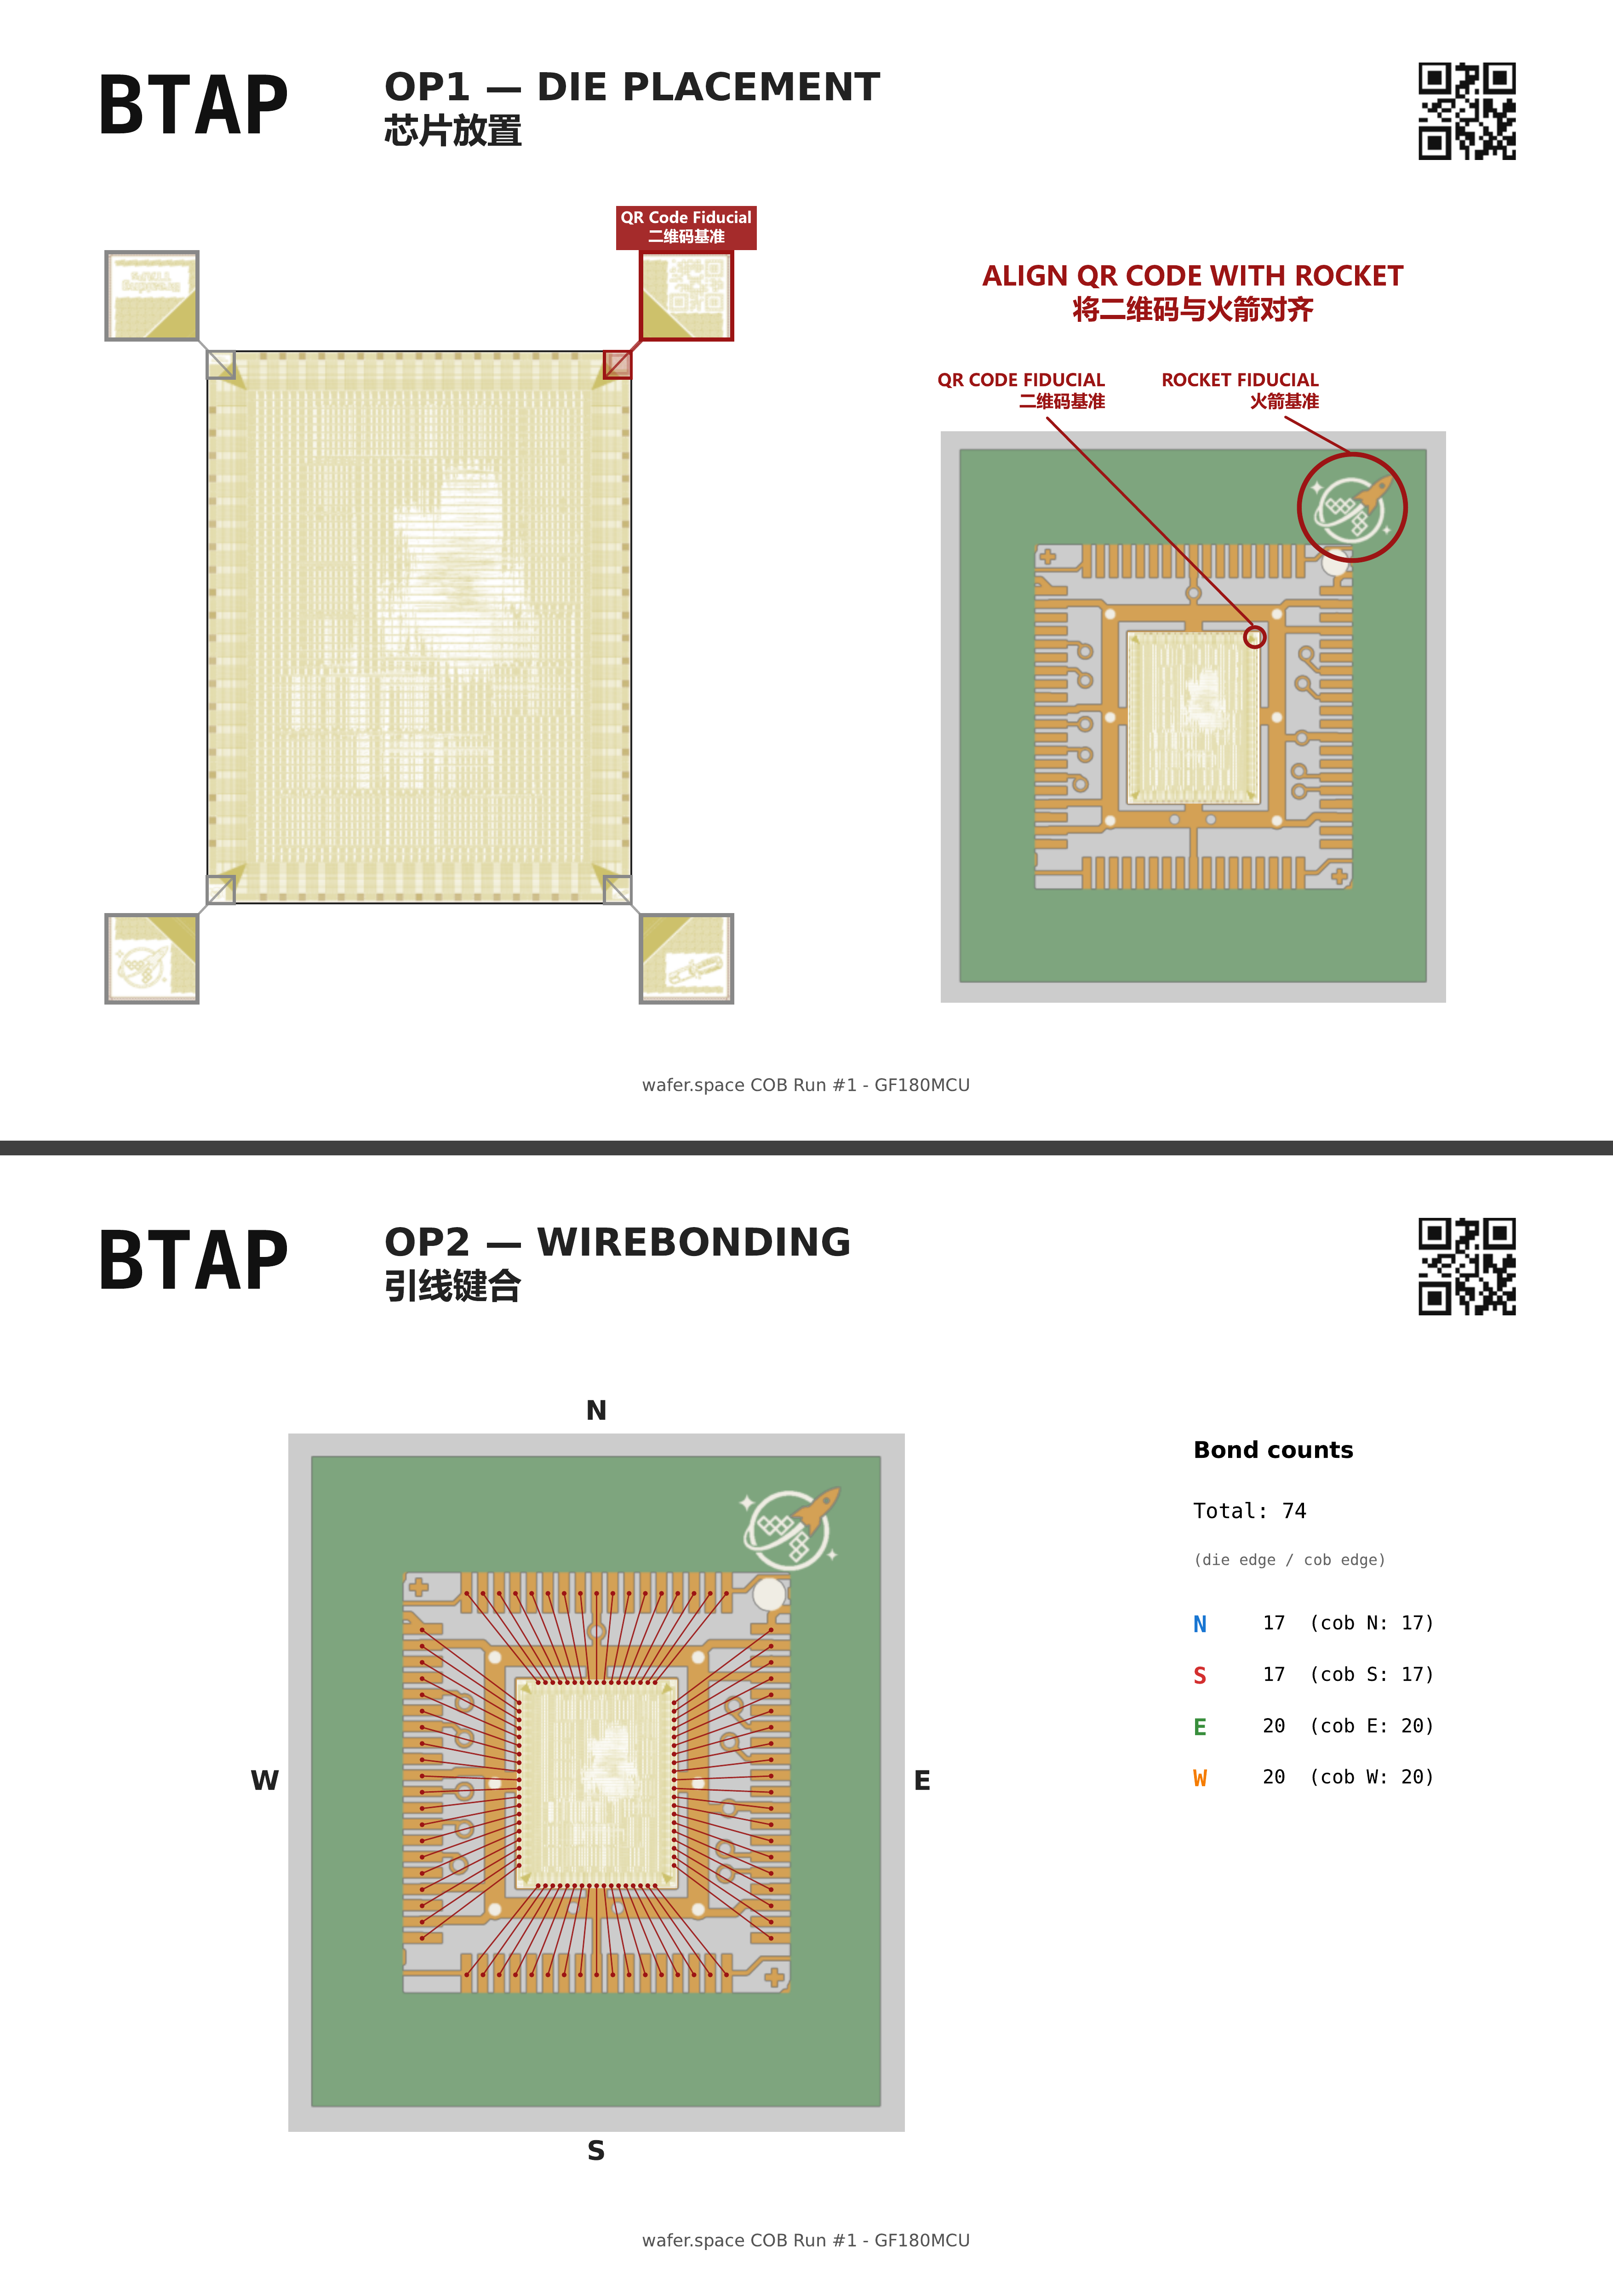
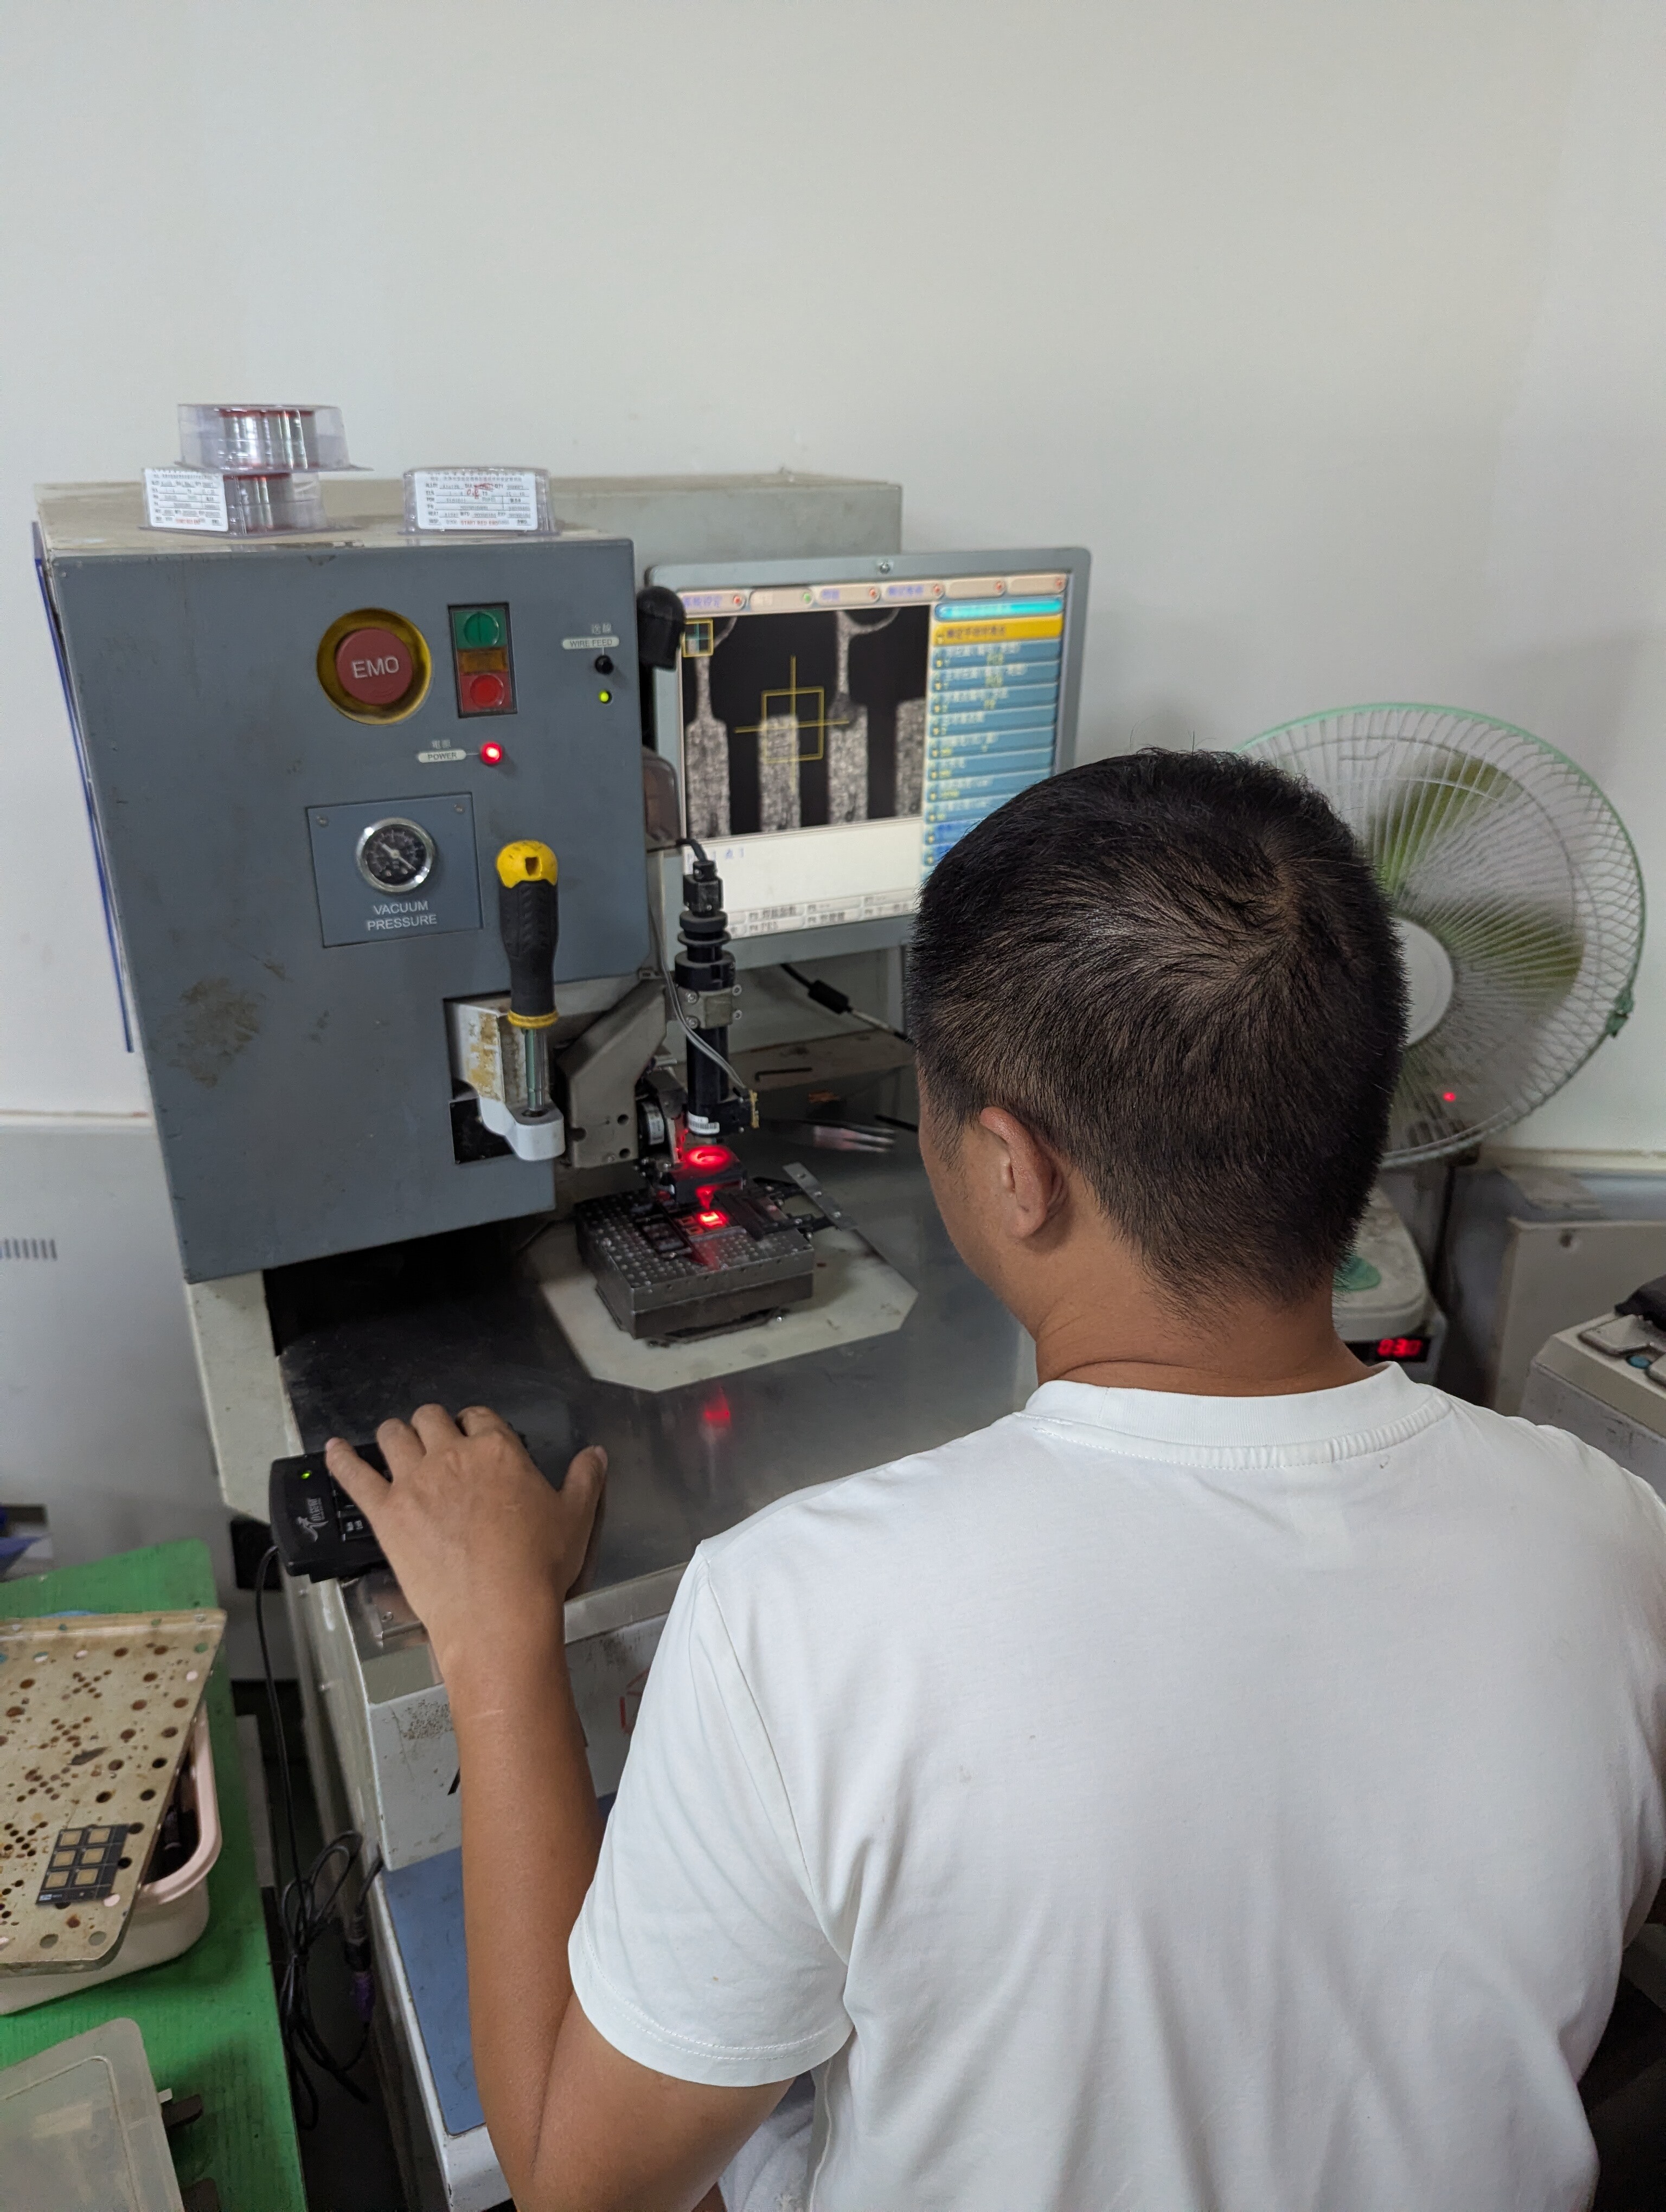
Everything so far has been quite hands-on, and this is no different with the wirebonding machine. Before any bonding
can take place, the machine must first be programmed with the desired locations and settings, and only then can it
proceed. The machine operator is provided with a diagram showing all of our requested bonds, which they will interpret
and configure the machine with.
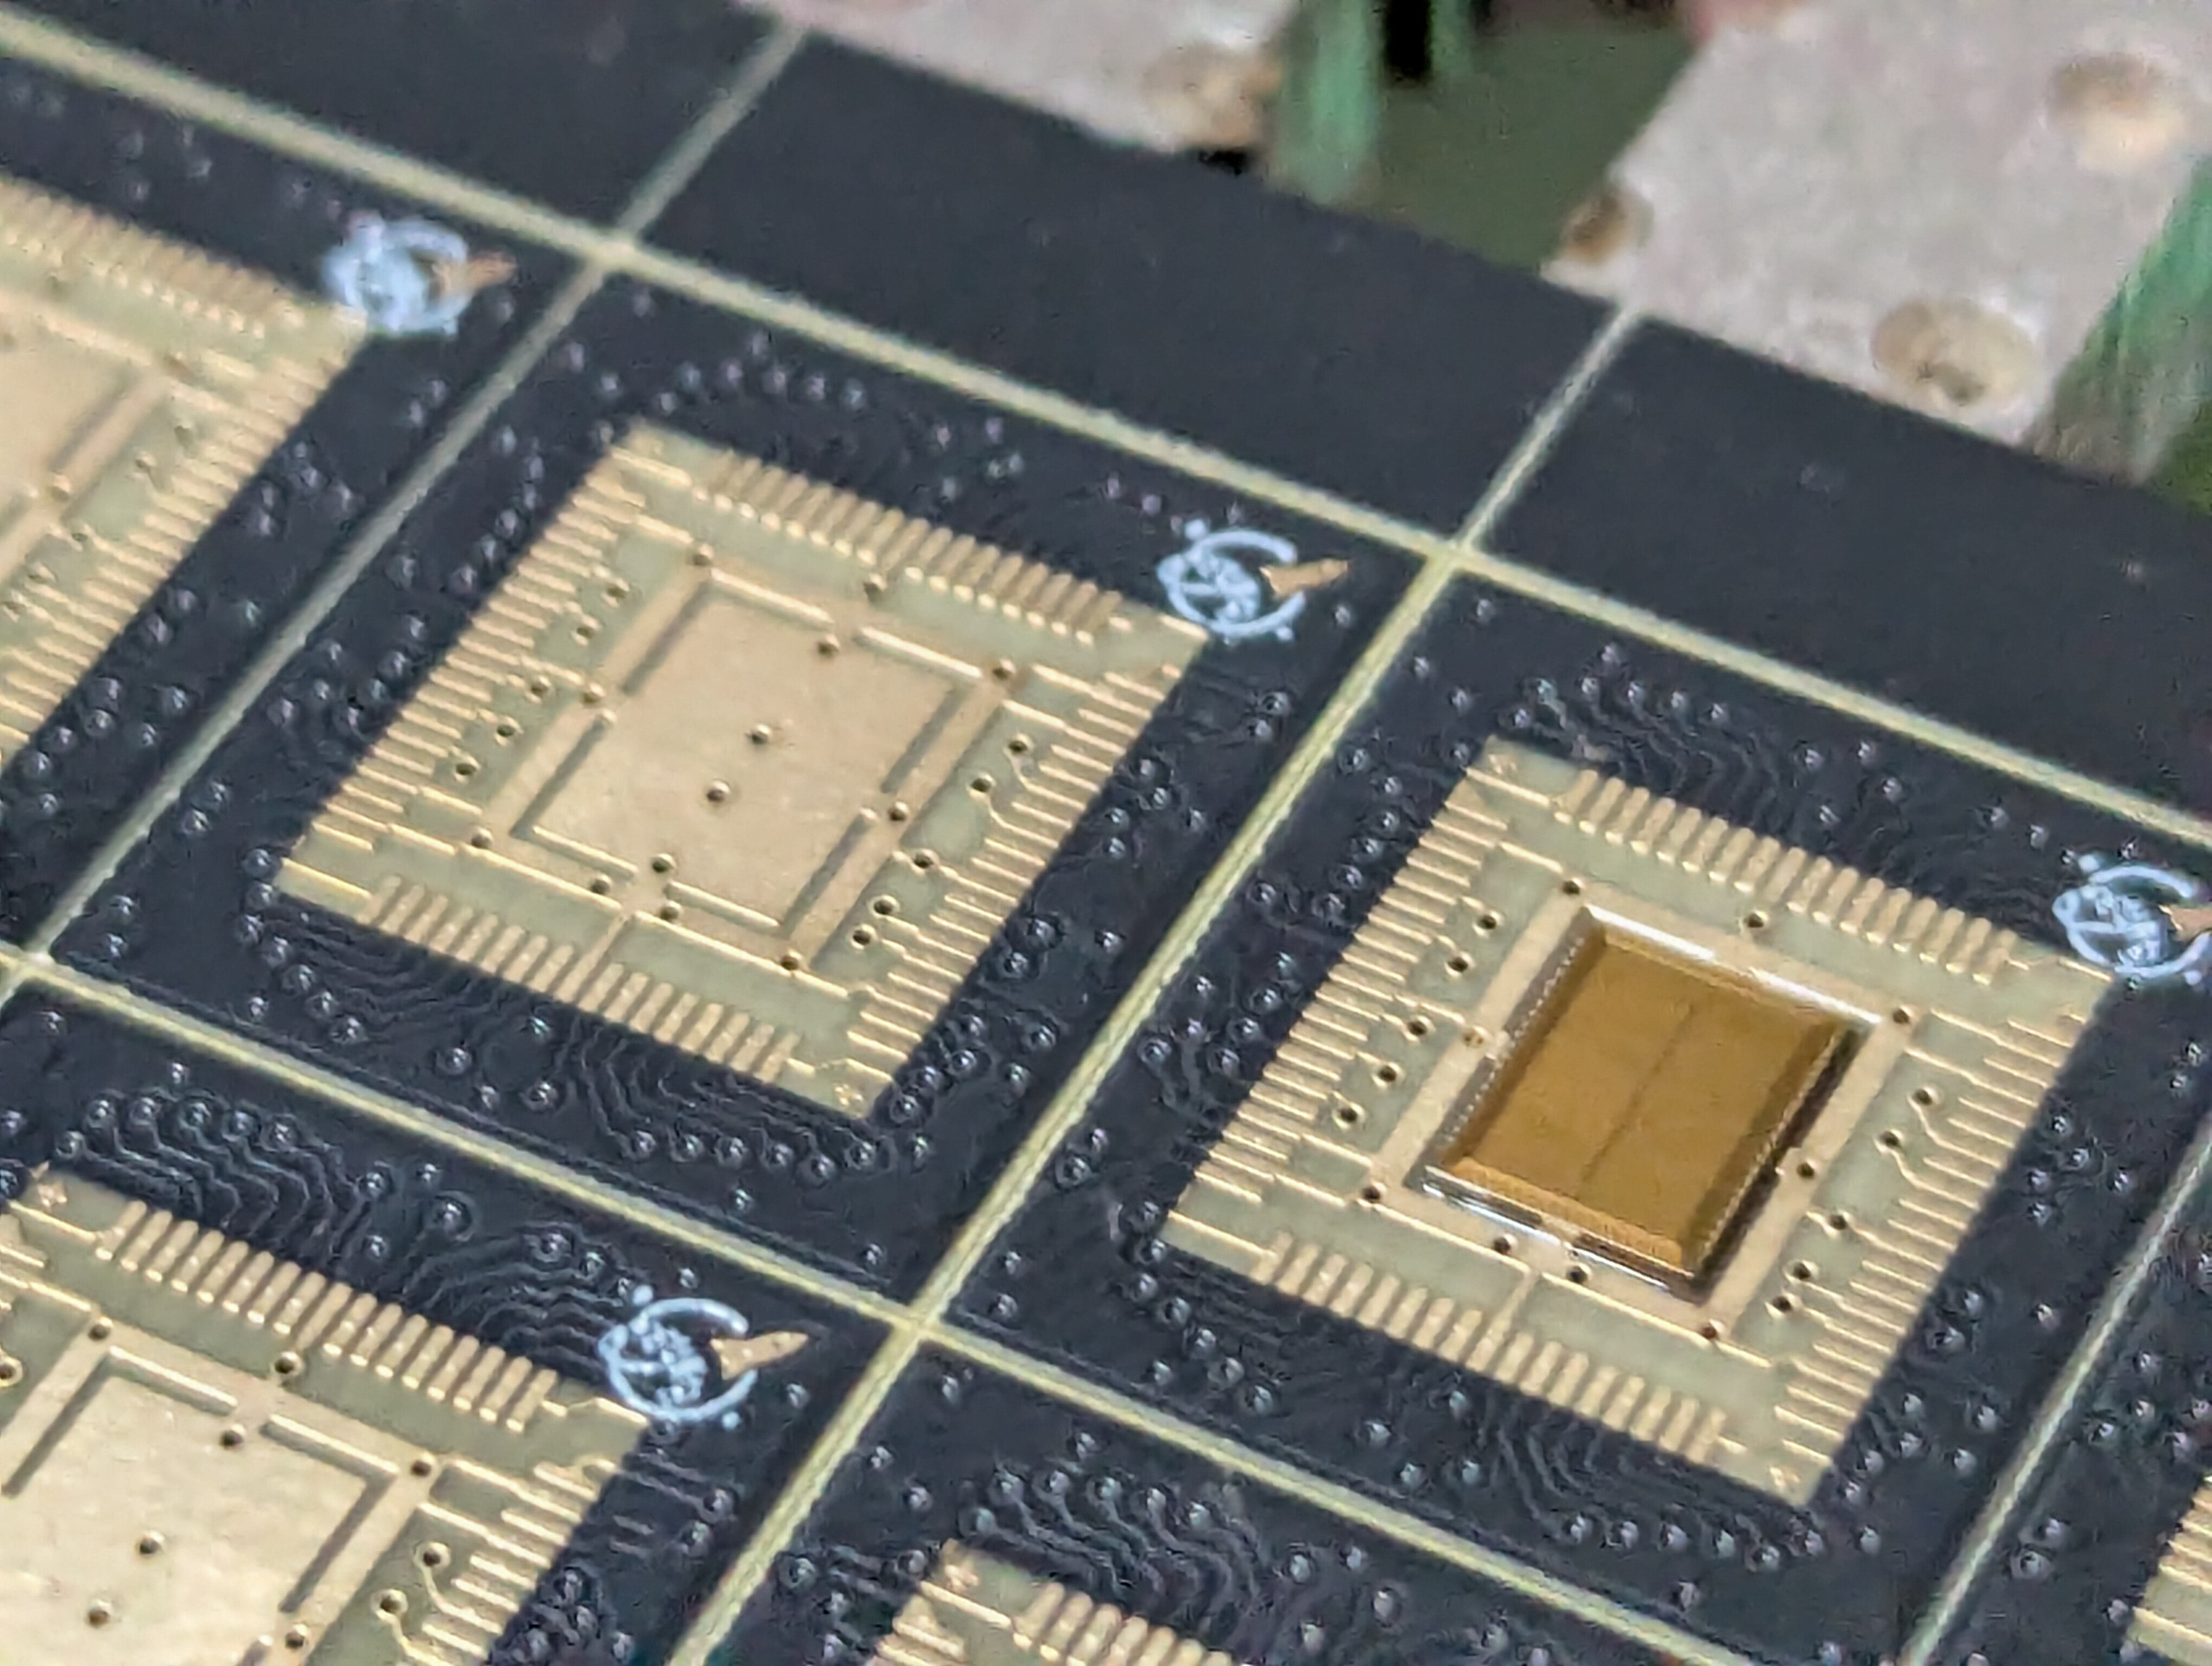
Example wirebonding diagram showcasing visual landmarks and bond locations
Since the die is mounted by hand, the machine uses a computer vision system to readjust the bond based on the visual
location.
Wirebond operator configuring the bond path visually using a high-power microscope
Wirebond operator programming the bonds the machine needs to perform
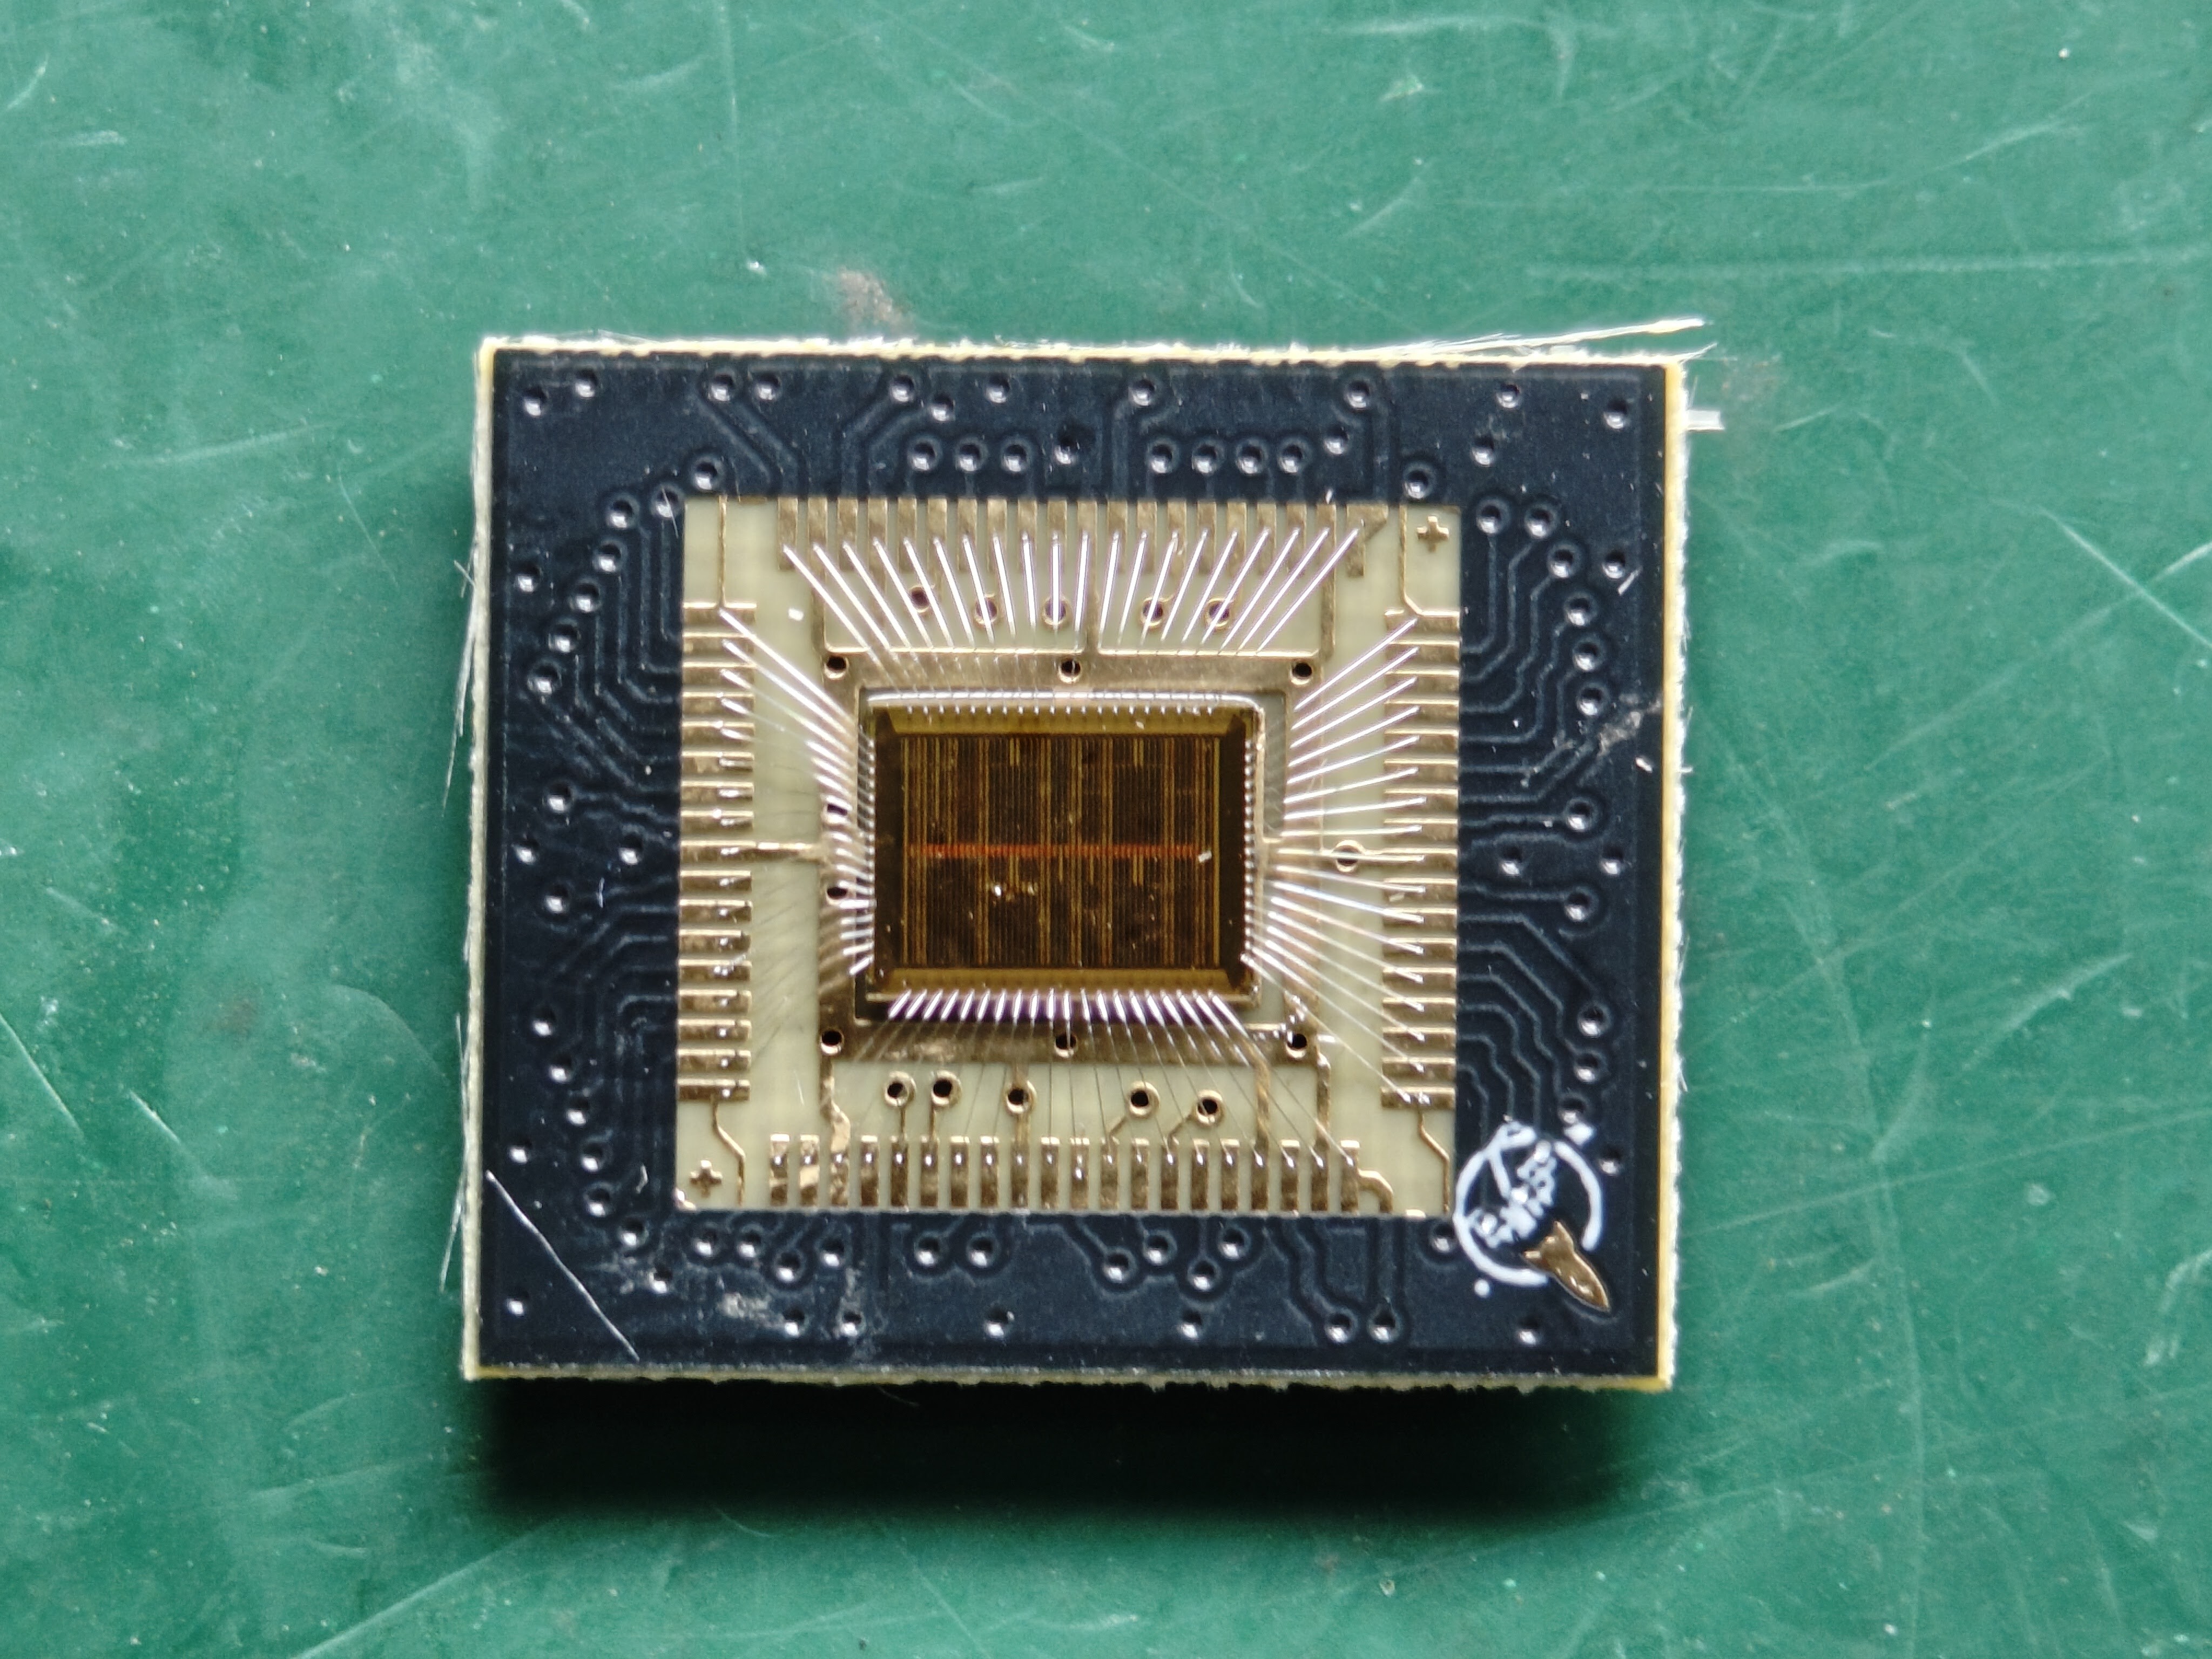
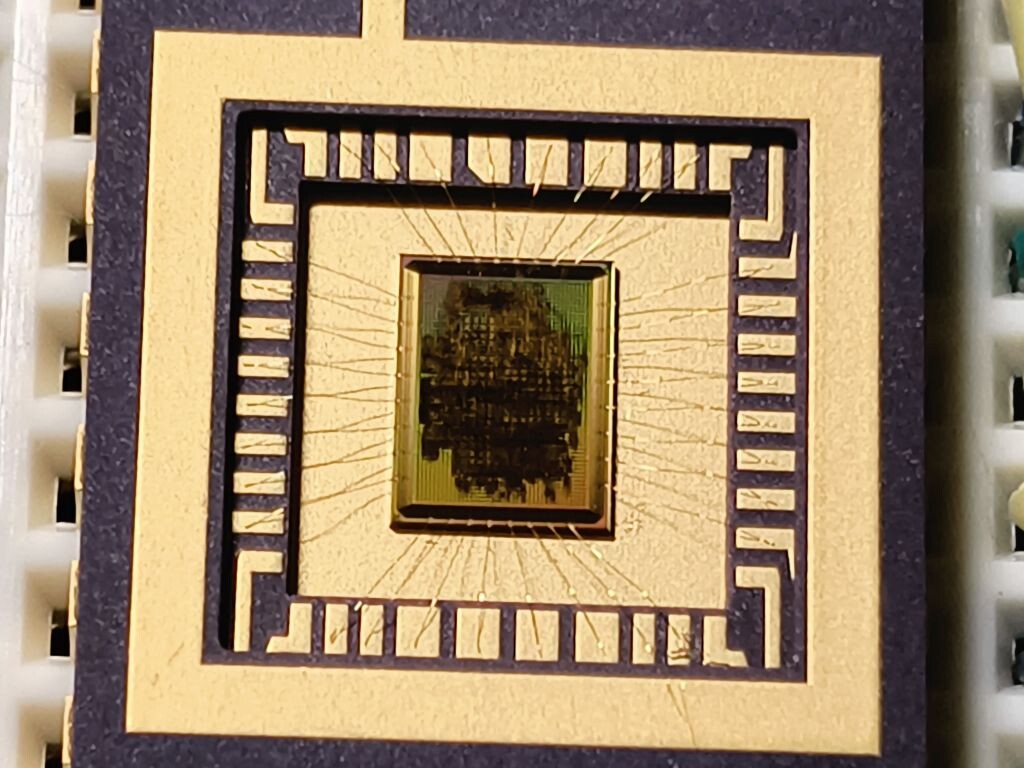
Now we’re ready for the fun part! Once programmed, the machine will begin performing the wirebonding - all 74 pins.
Tiny Tapeout's TTGF0p2 die fully wirebonded and ready for epoxy
We’re not finished yet - the die and bonds are extremely fragile, so for them to survive the journey back to you, we must
first cover them with an epoxy resin and bake them in the oven to harden.
Finished COBs: wirebonded and epoxied, ready for your project
Final Steps
Do they work?
…
Yes!!
We’ve been able to successfully run Tiny Tapeout’s own factory test on their TTGF0p2 shuttle, and can confirm that it
works as expected. We’d love to hear about your testing successes when you get your hands on your COBs, so please
come join our community on Discord!
Tiny Tapeout's TTGF0p2 factory test counting up (in binary, as shown on the LEDs)
That’s not all though - check out this scrolling VGA screensaver with the wafer.space logo. You can
view the source code for this on GitHub, or experiment
with it on VGA Playground.
An animated wafer.space logo screensaver output over VGA
Sylvain “tnt” Munaut has also been hard at work testing several designs onboard the TTGF0p2
shuttle and reporting their status. You can view these on Tiny Tapeout’s “Silicon Proven Projects” page - head to
tinytapeout.com/chips/silicon-proven/#ttgf0p2 to view the
currently tested projects on TTGF0p2.
If you’d like to see some more packaging goodness, Tiny Tapeout recently uploaded a video with some more behind the scenes
footage for their TT08 shuttle.
Behind the scenes footage of TT08 being wirebonded
Of course, COBs aren’t the only way to package your chip. Community member Thorben Moos
bonded their die to a stunning ceramic DIP, with others doing (or planning to do) their own bonding too.
Thorben Moos' Cloneless1 die in a ceramic package
Shipping Timeline
COB packaged parts have started to ship. You will receive a notification from Crowd Supply when your order is on its way.
Run 2: Slots Still Available
Run 2 slots are available on Crowd Supply until 30 June 2026. Standard pricing is now in effect:
1x1 (full) slot: $7,500 ($7.50/die)
0.5x1 (half width) slot: $4,500 ($4.50/die)
1x0.5 (half height) slot: $4,500 ($4.50/die)
Chip-on-board packaging is available as an add-on for $1,500 ($1.50/die).
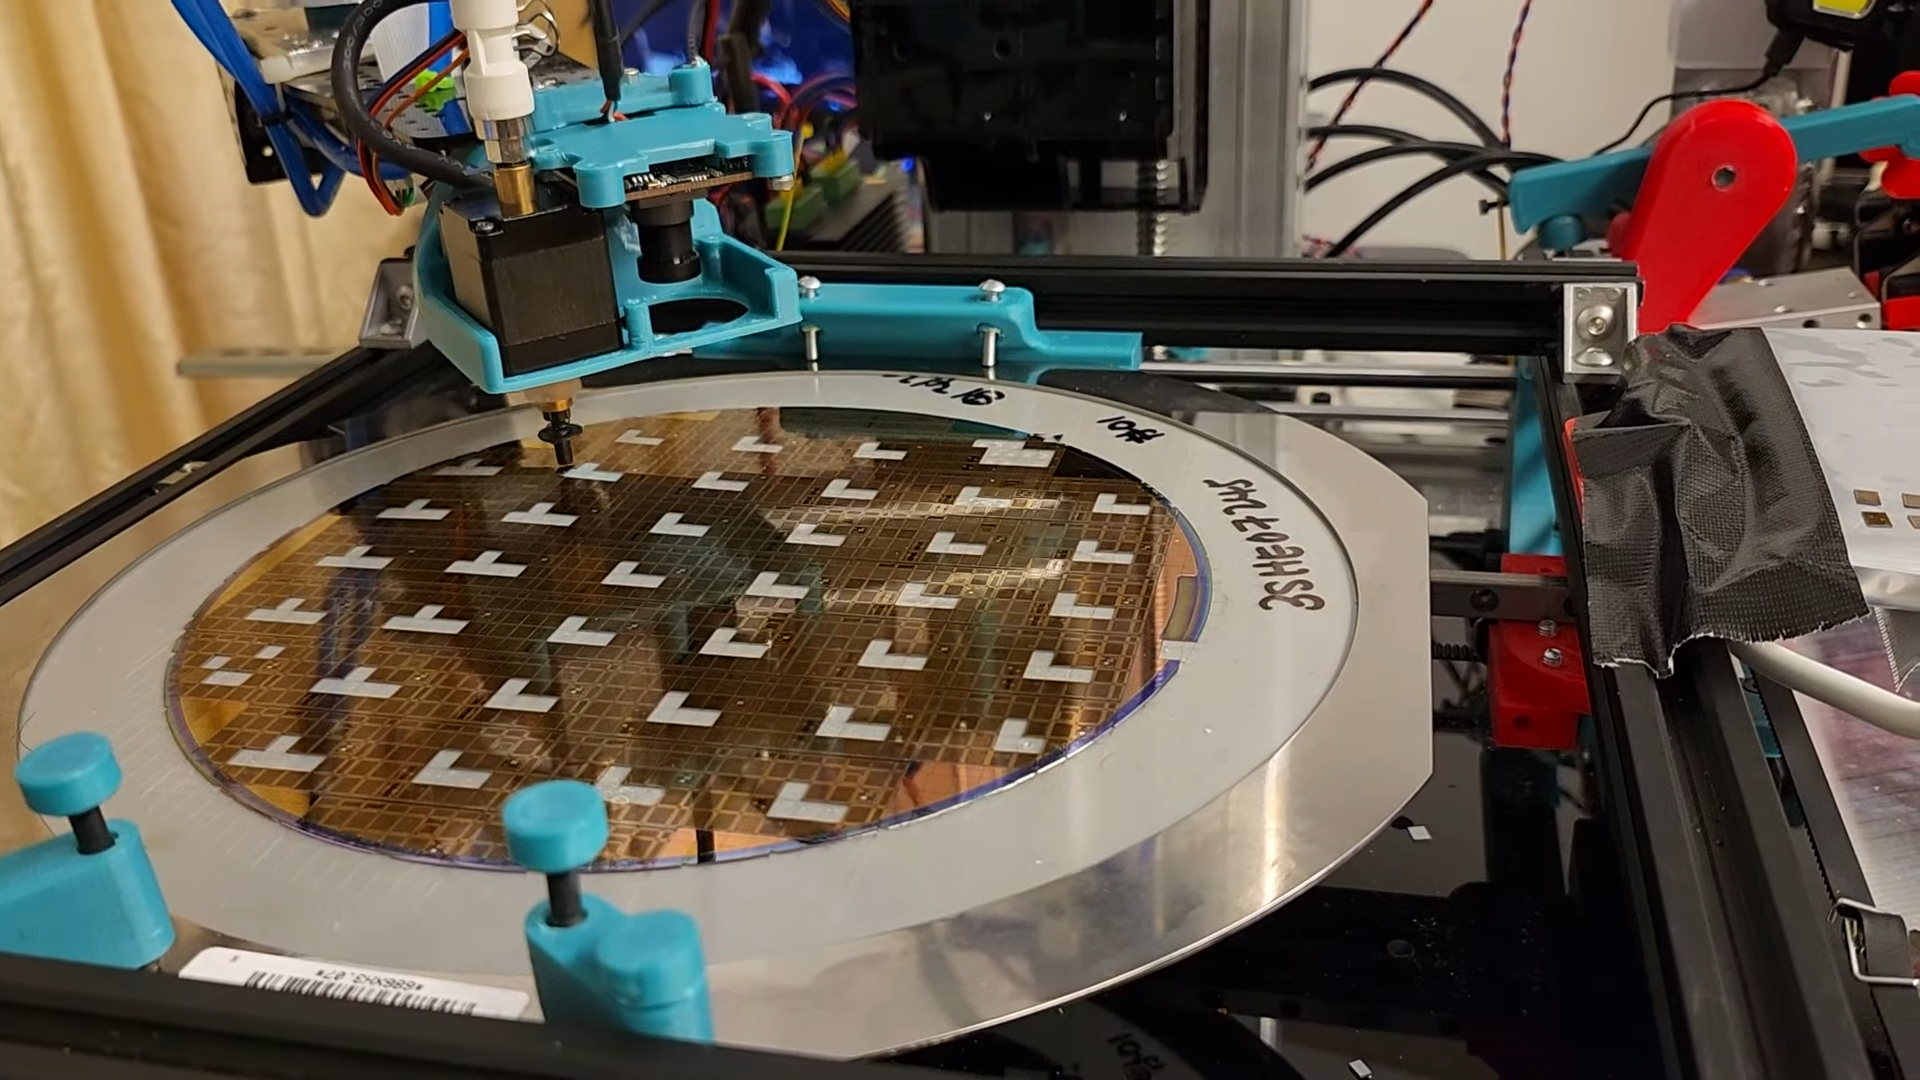
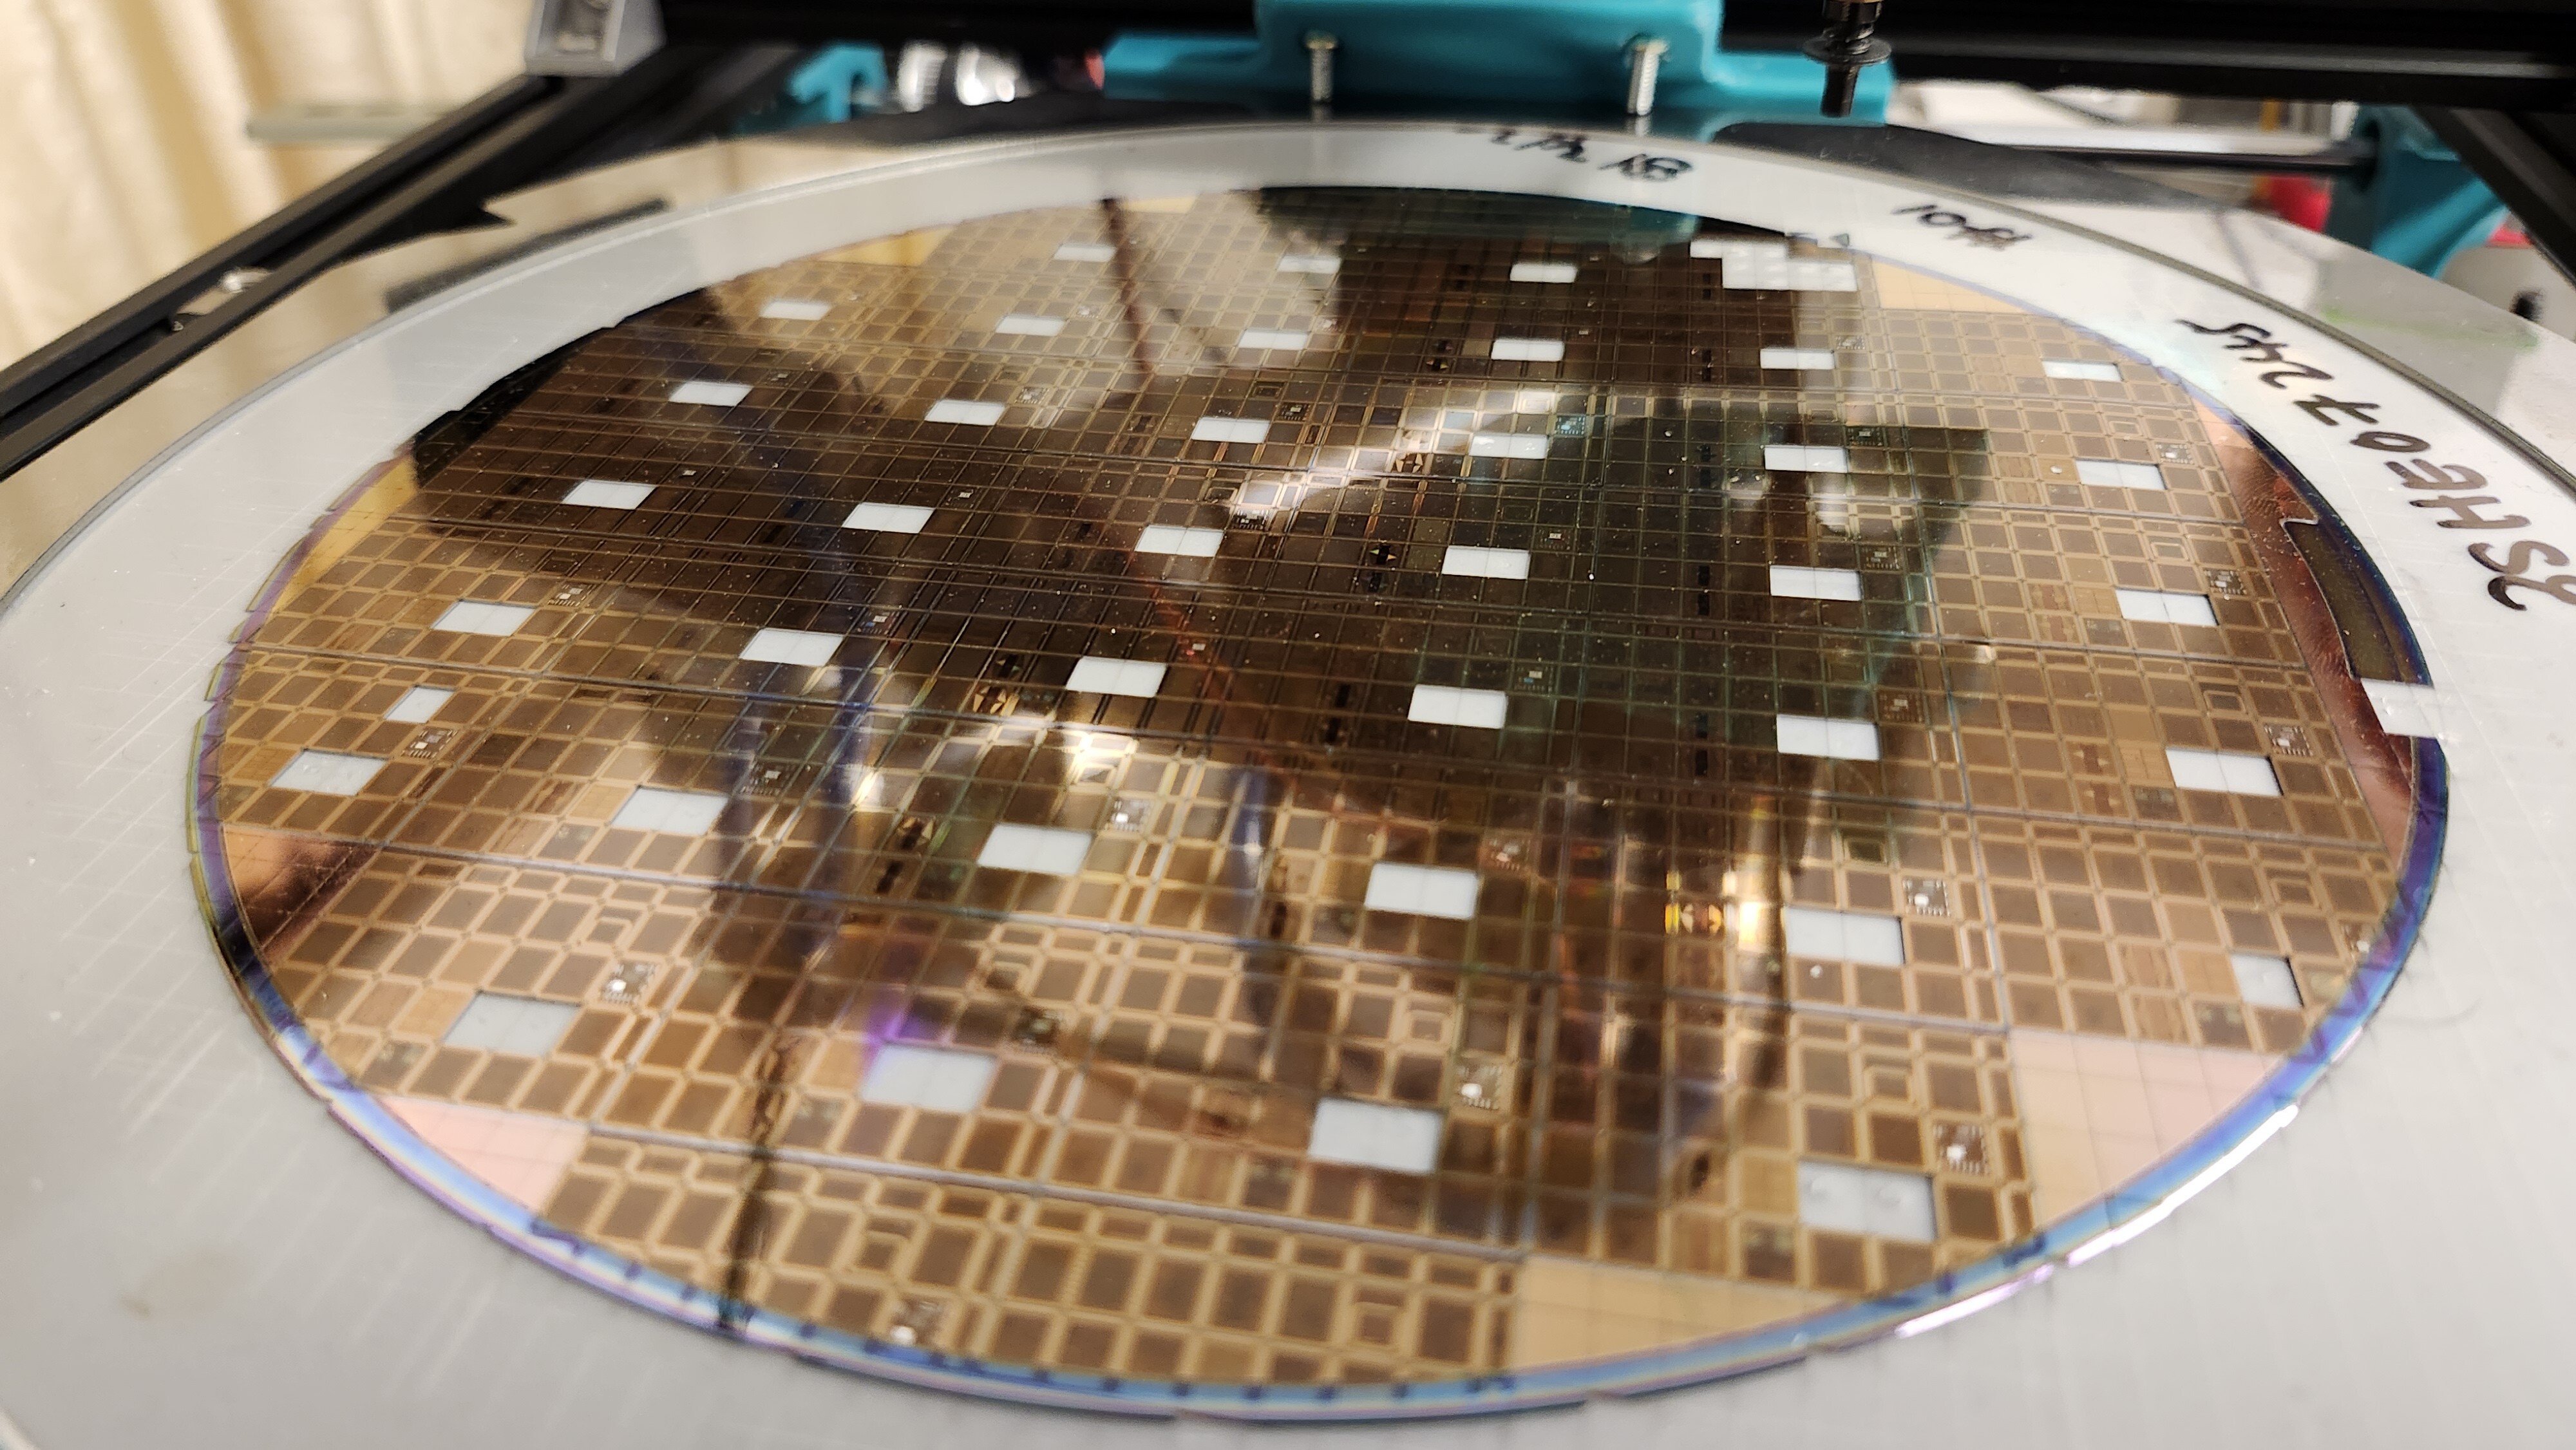
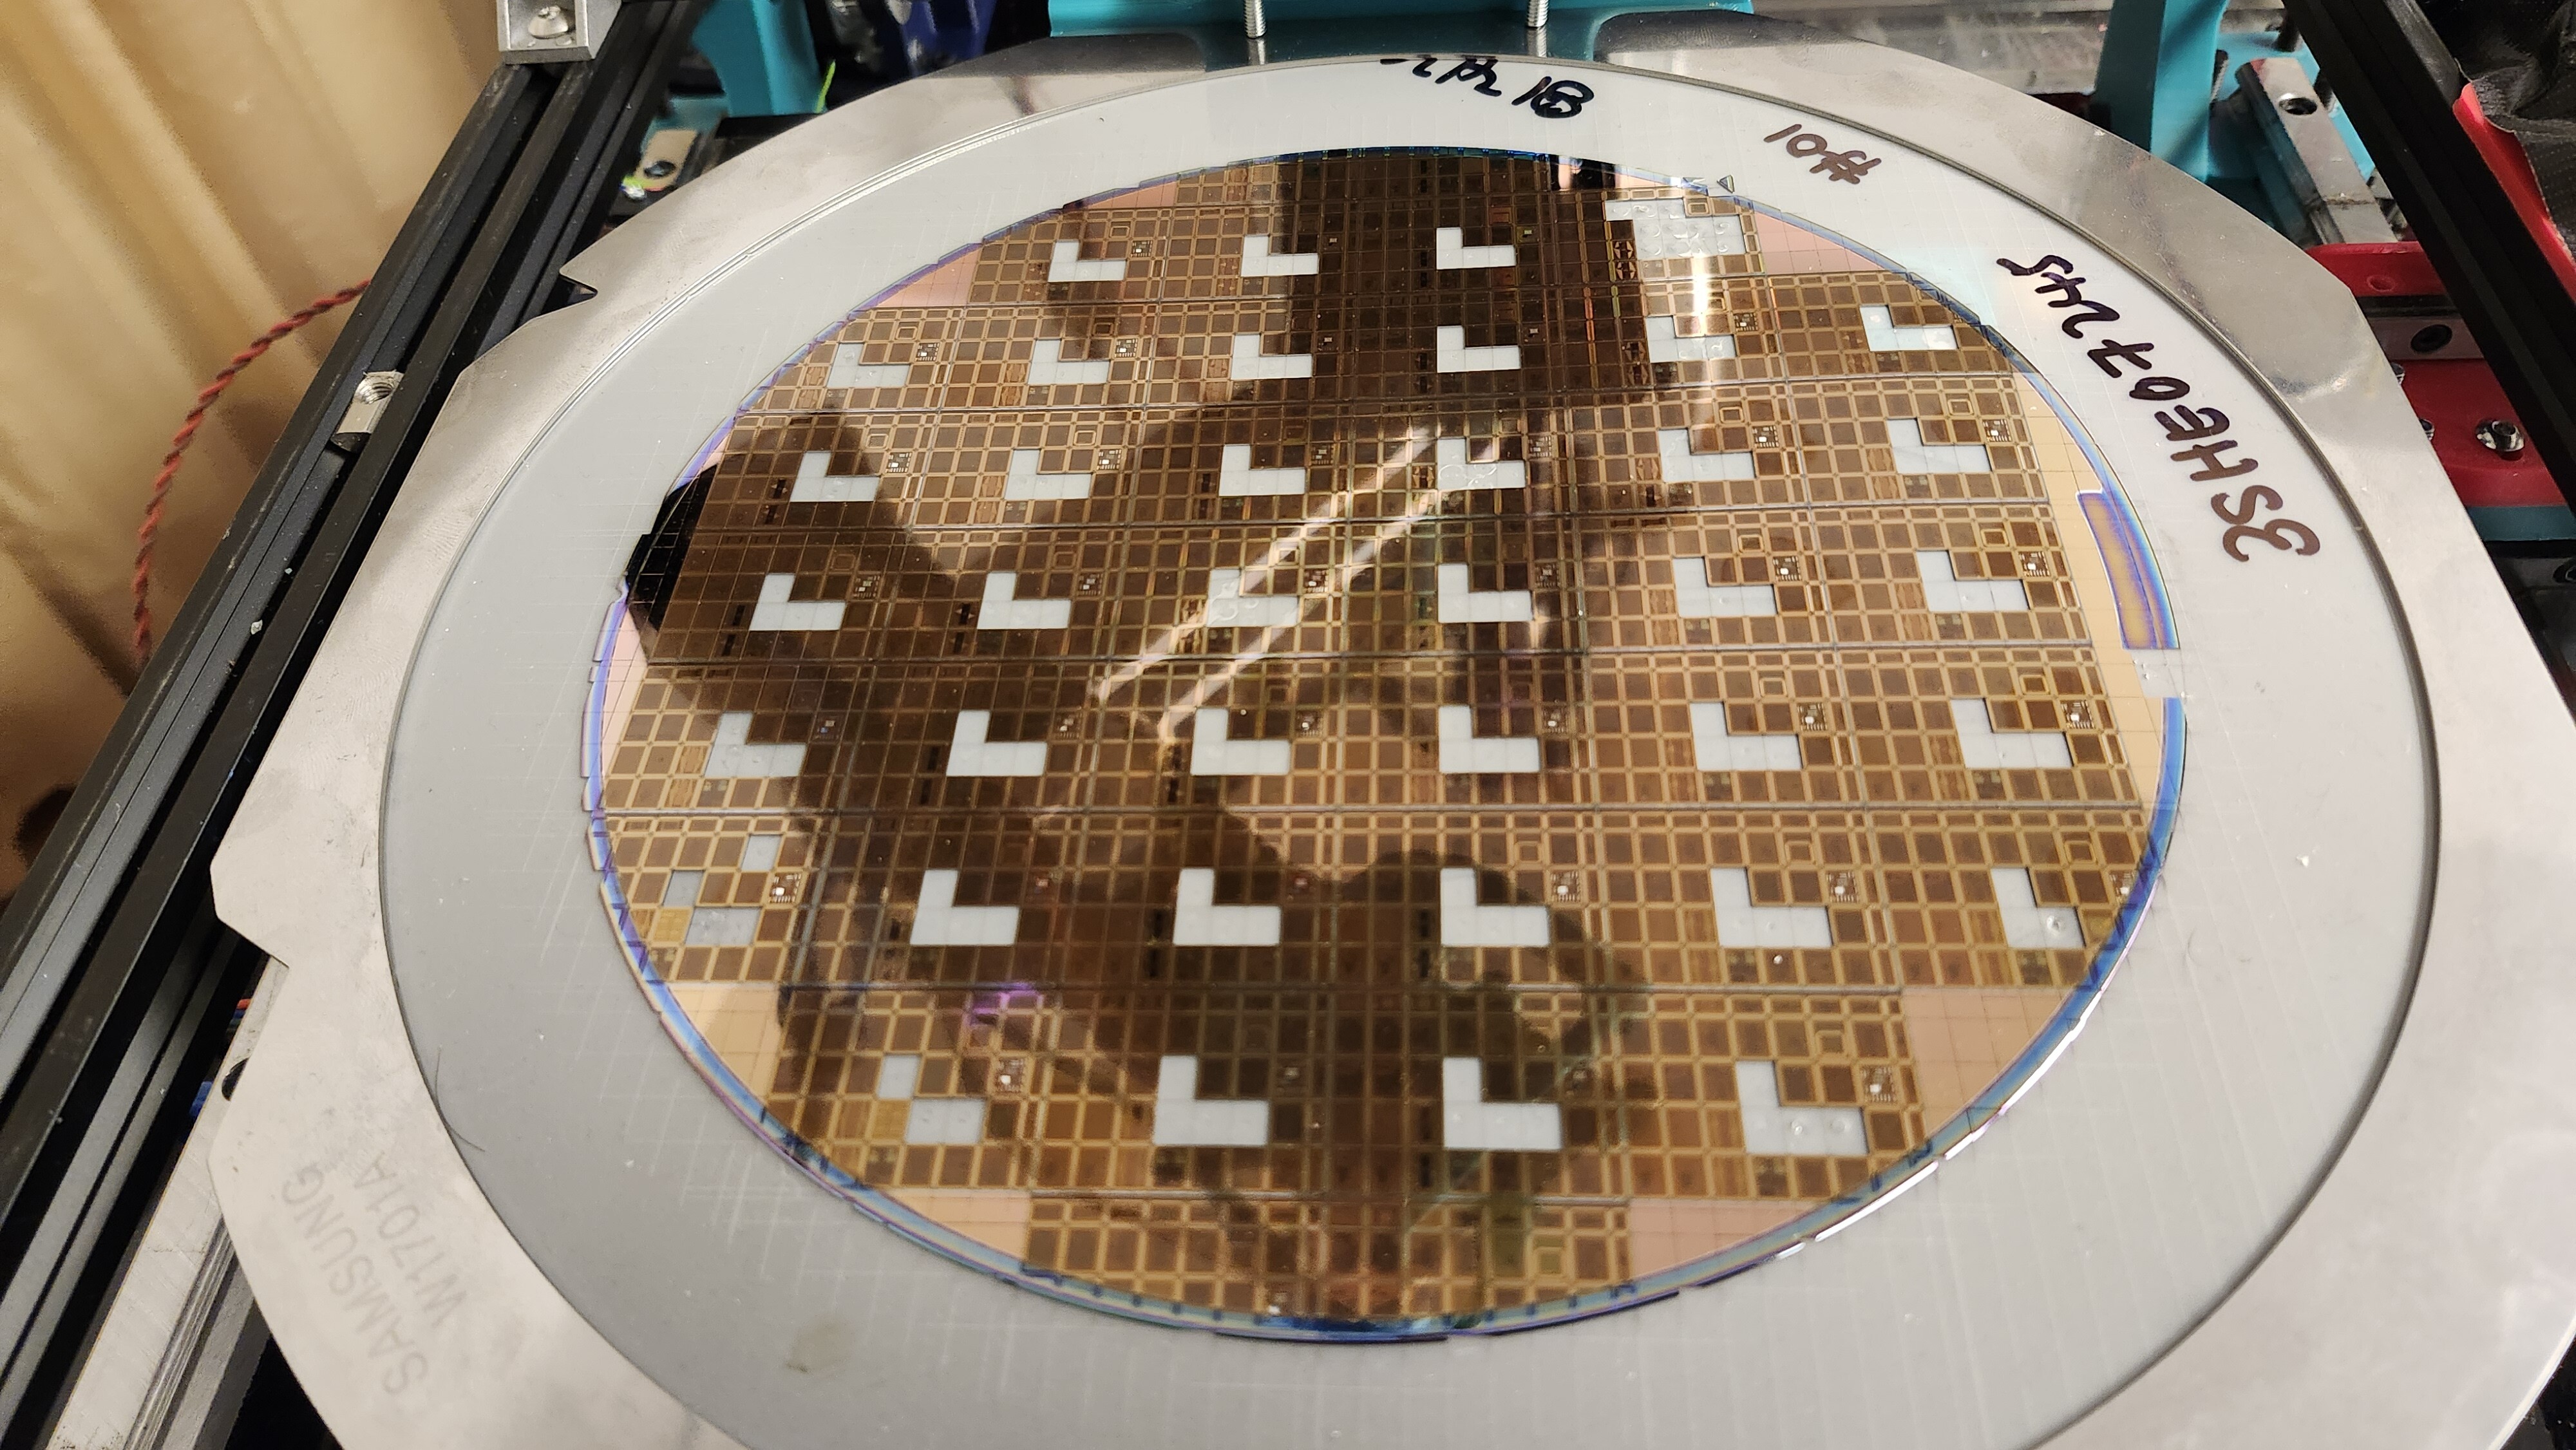
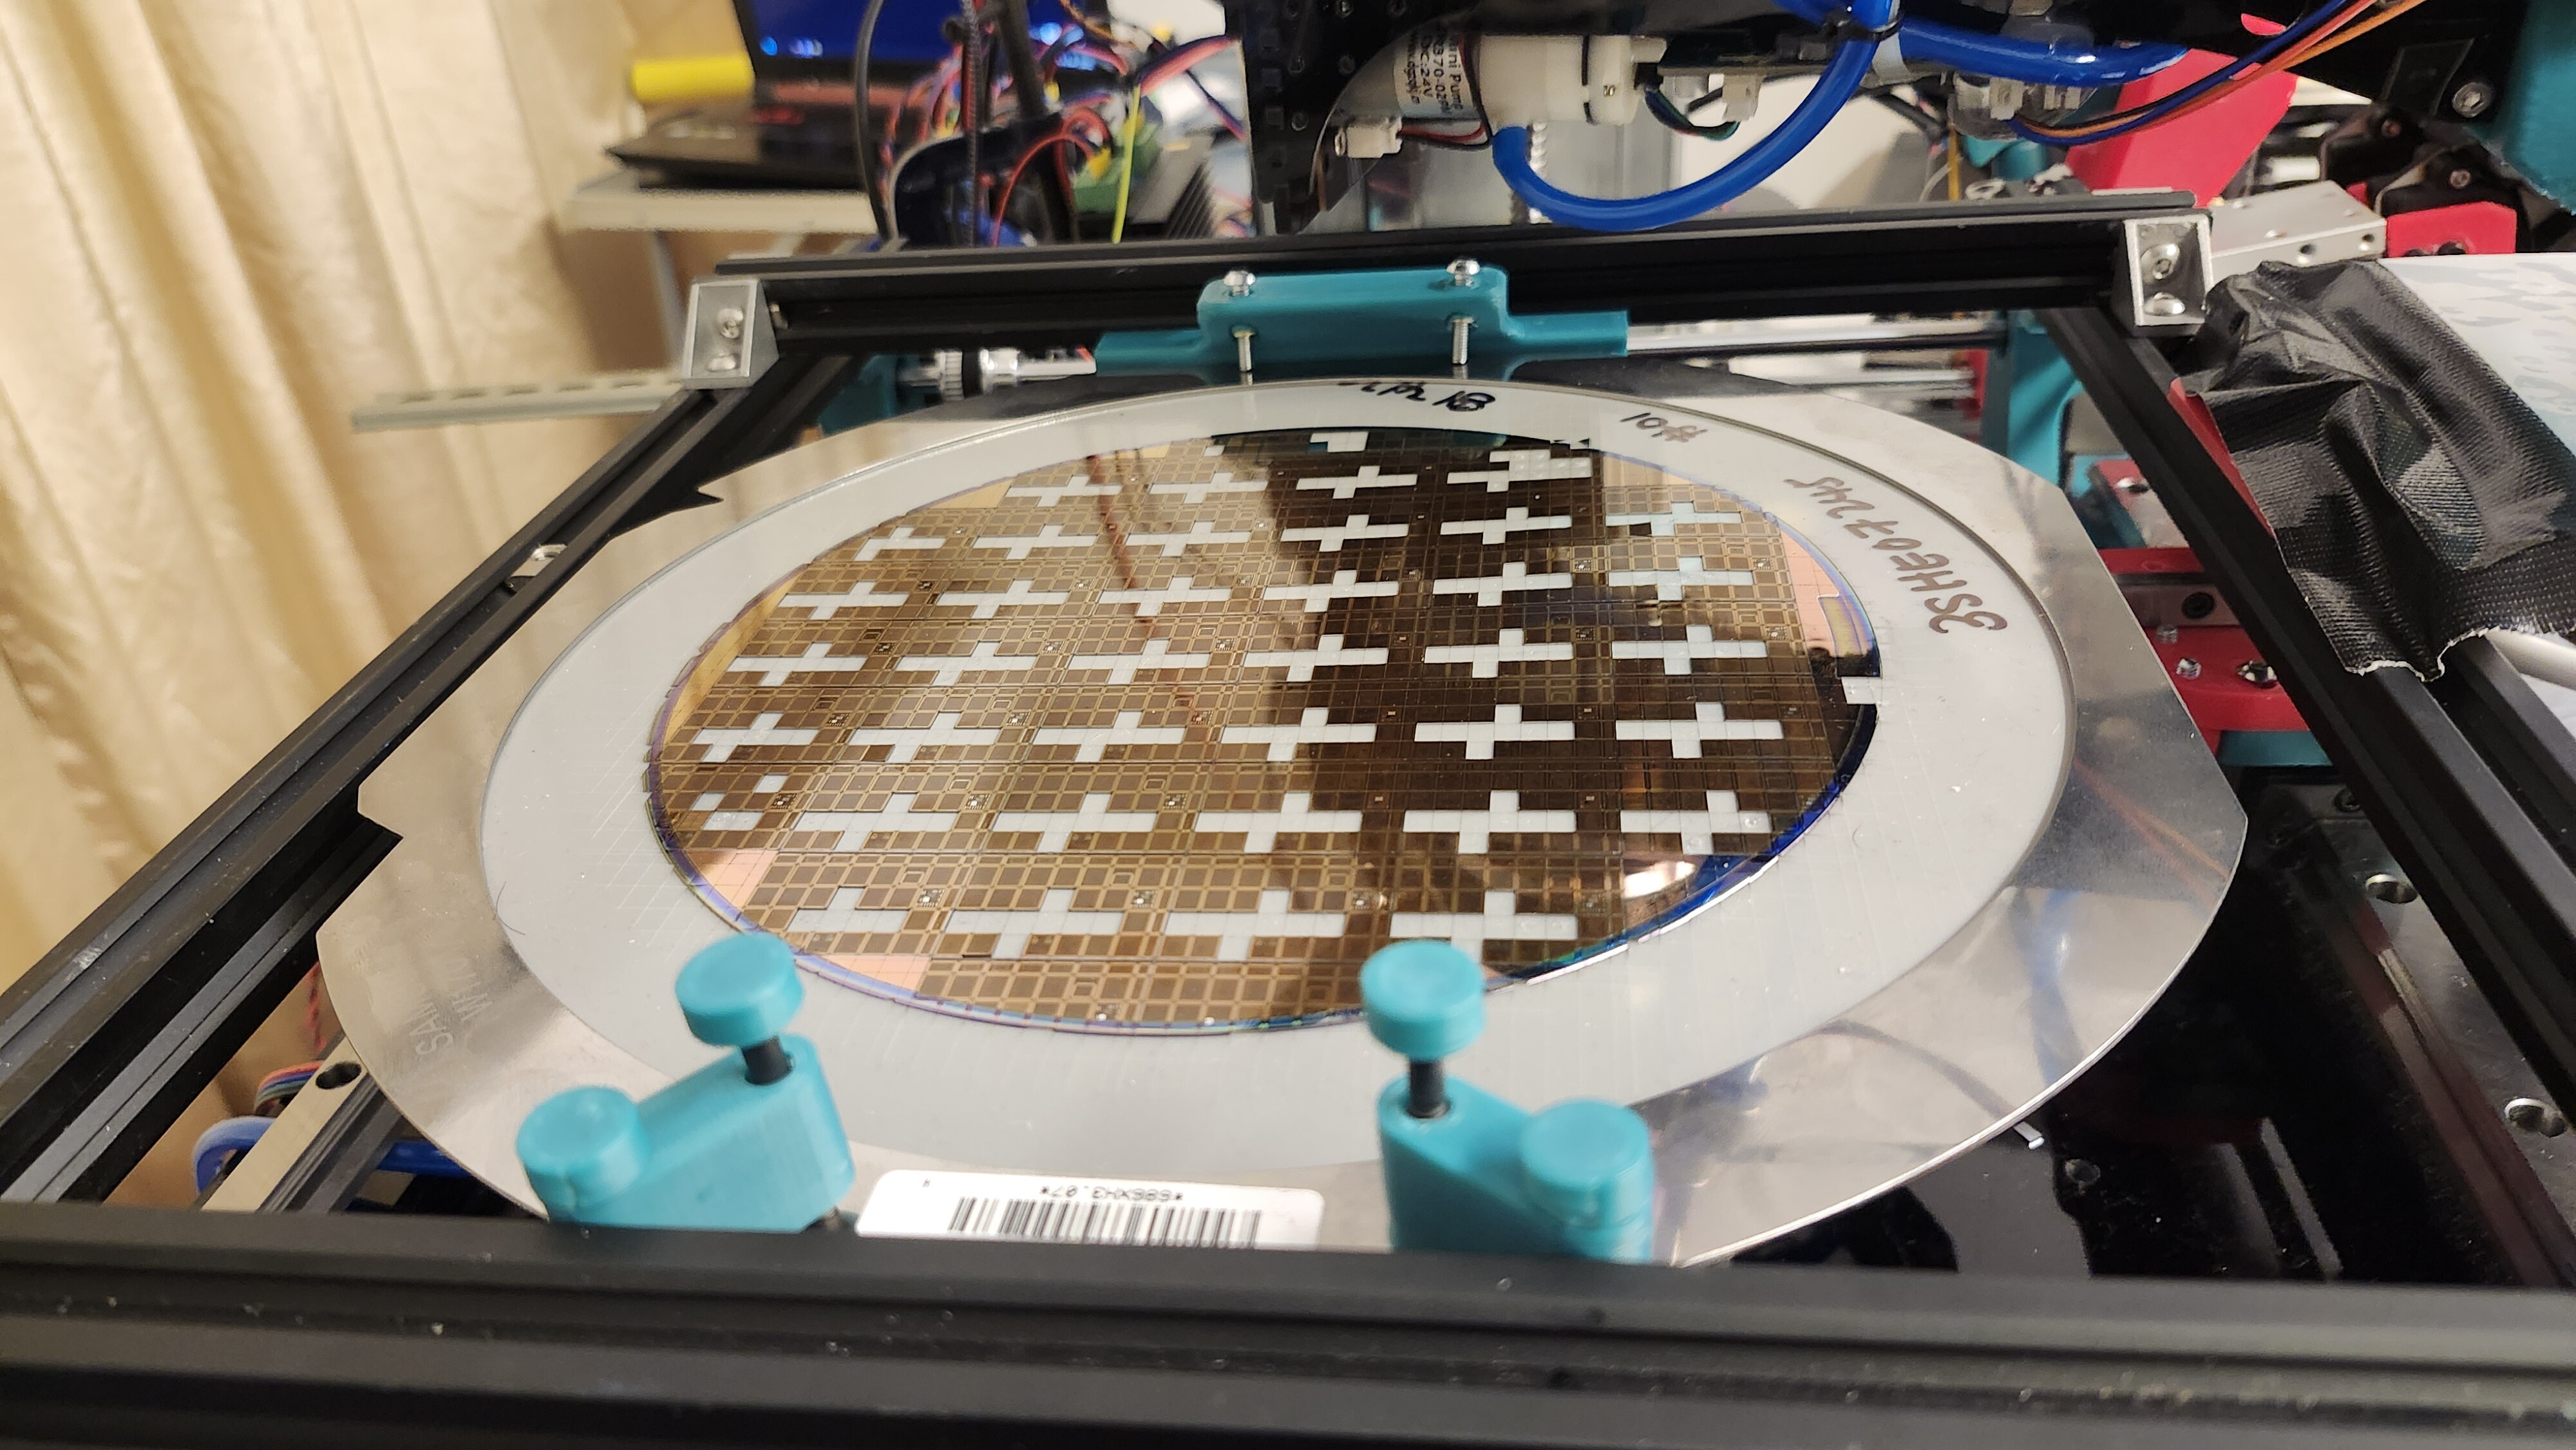
]]>Tim 'mithro' AnsellDie Sorting with Robots2026-05-29T12:00:00+00:002026-05-29T12:00:00+00:00https://wafer.space/news/sorting-bare-diesThe Run 1 wafers are diced and the individual dies can now be sorted. Here is a look at the process.
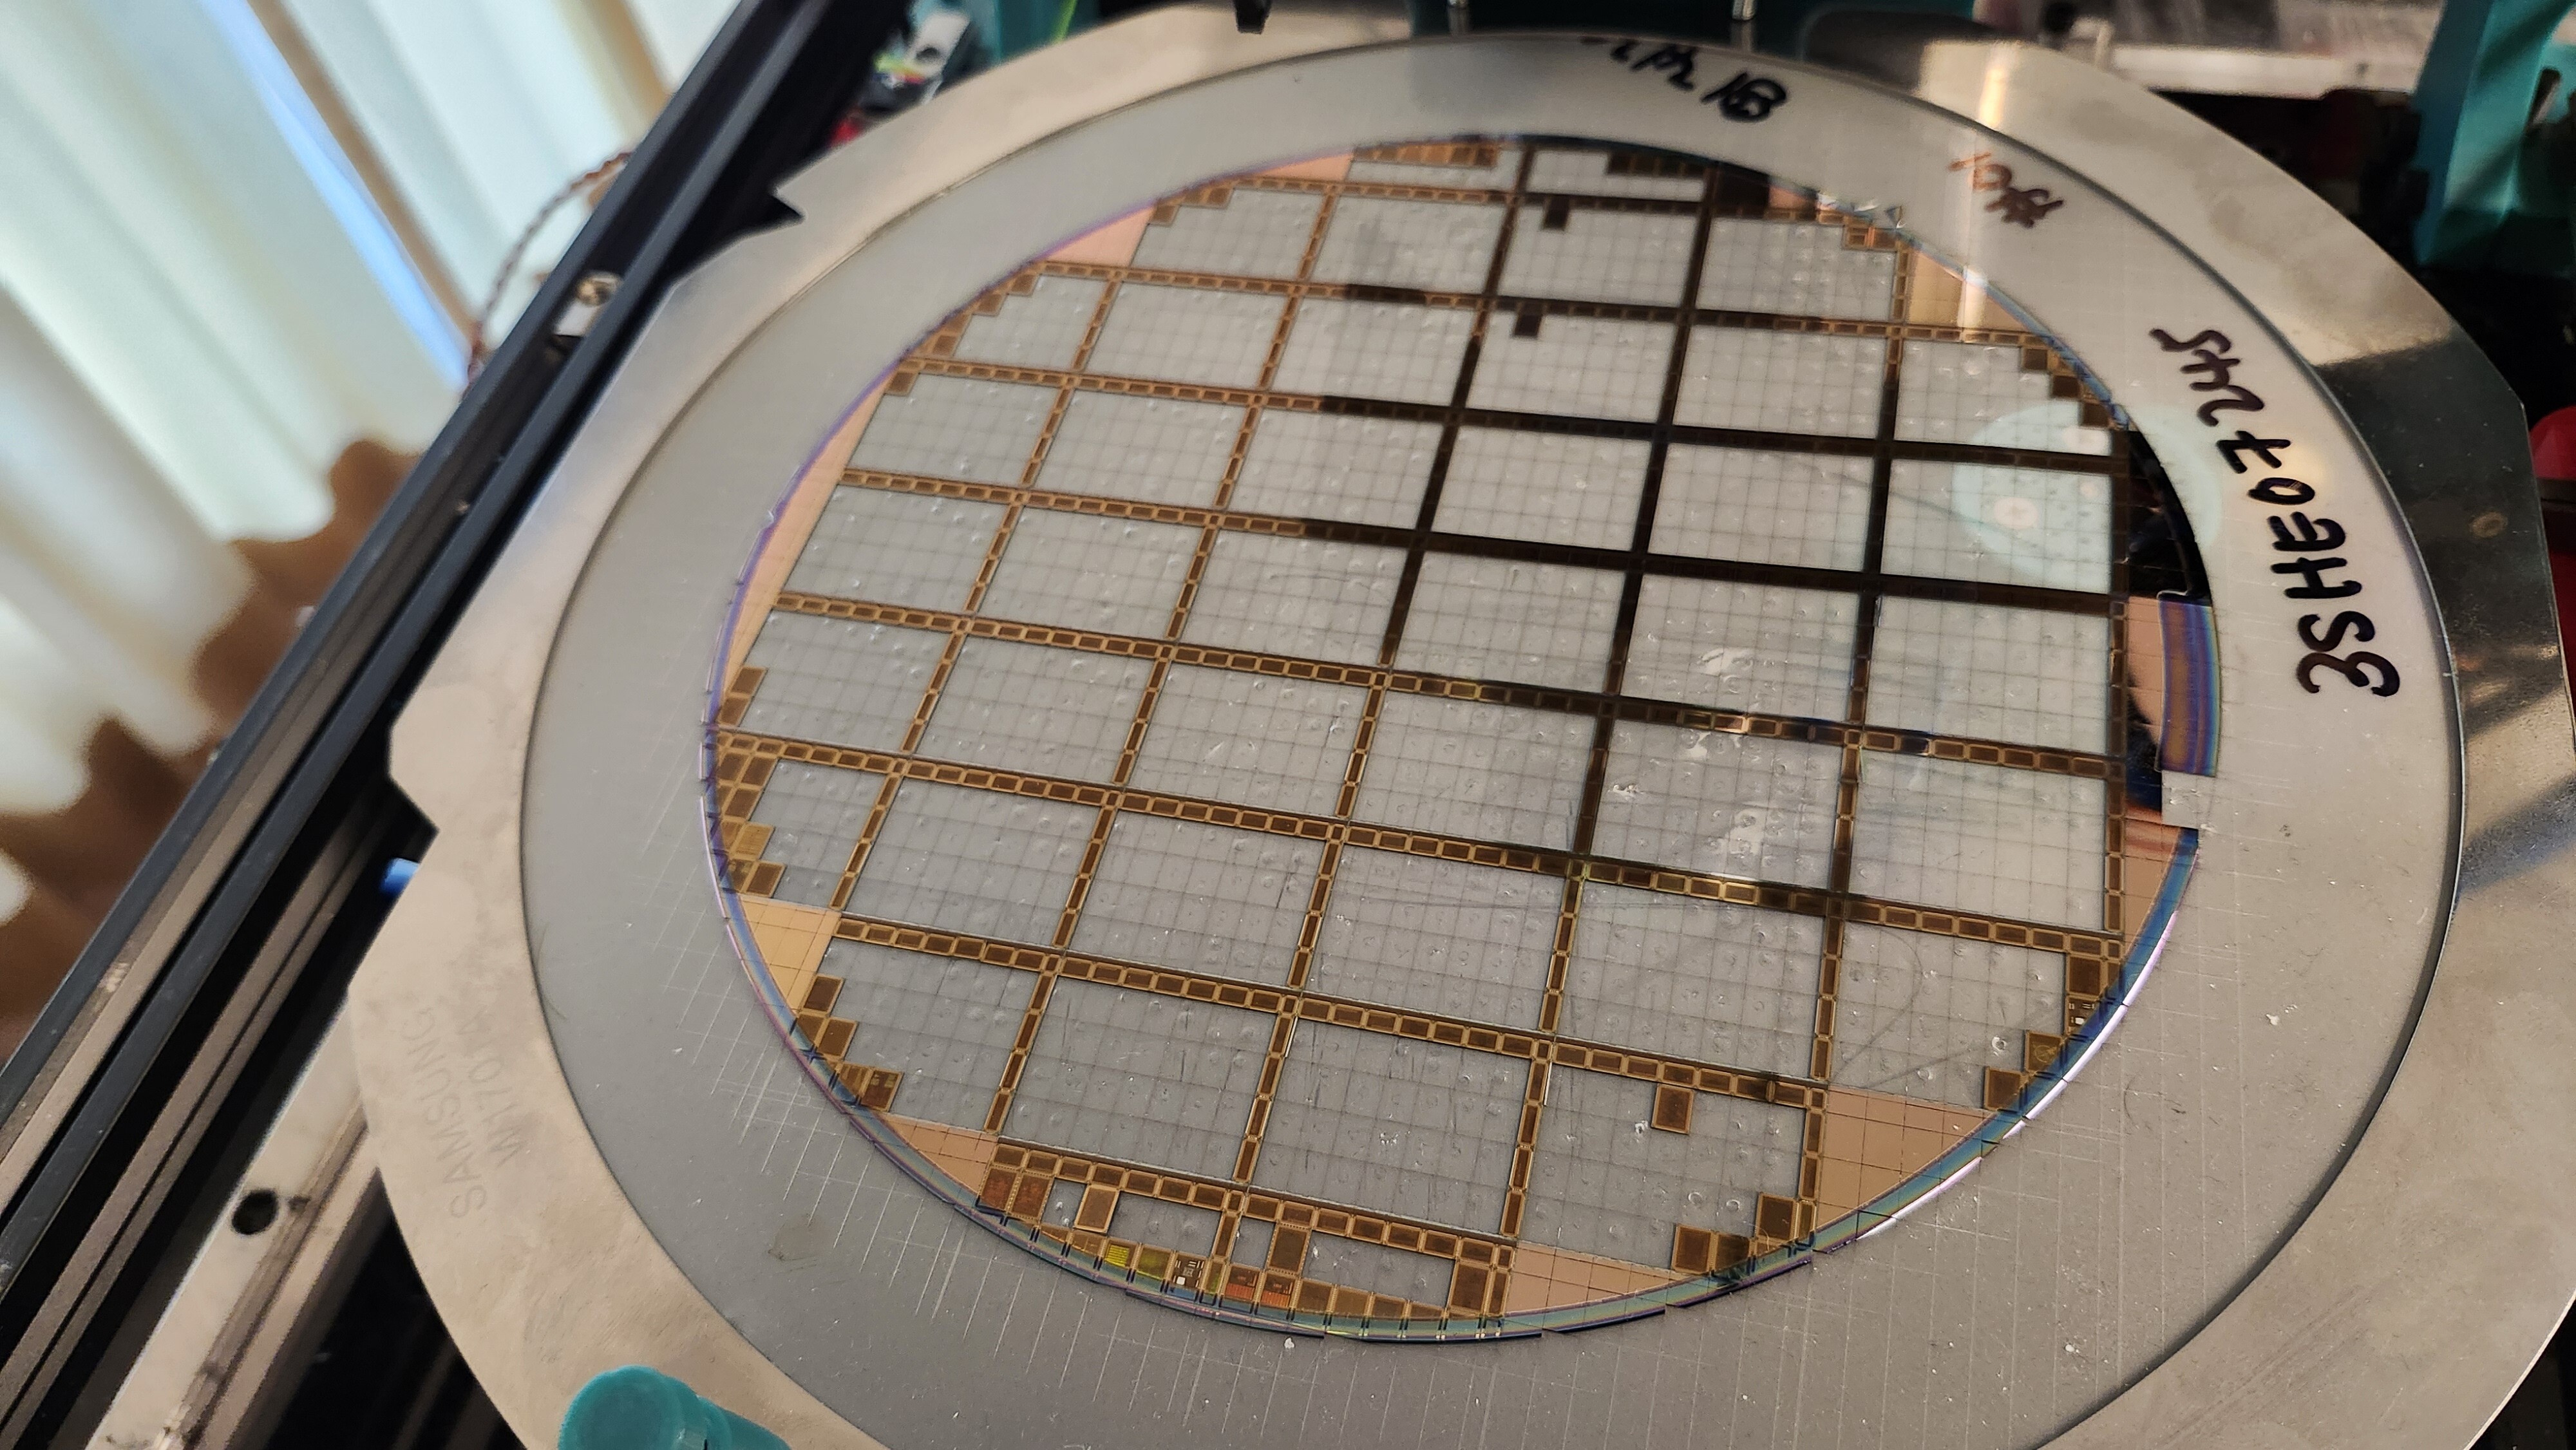
A diced wafer - note
the score marks visible on the lower half
The die sorting
robot picking up individual dies from the diced wafer
How Die Sorting Works
After the wafers are cut into individual dies, each die needs to be picked up, inspected, and placed into a tape-and-reel
for shipping. This is handled by the sorting robot which works through the diced wafer one die at a time.
Note the white layer of material under the wafer - this is tape. It holds the wafer together and the dies in place,
since the wafer loses all rigidity after the dicing.
Eventually your die will end up in one of these reels.
Steady die picking progress
Shipping Timeline
We have started shipping bare dies and chip-on-board packaged dies. Some of you may have received shipping notifications, but be
sure to keep an eye out.
]]>Tim 'mithro' AnsellRun 1 Wafers Have Arrived2026-05-27T12:00:00+00:002026-05-27T12:00:00+00:00https://wafer.space/news/run1-wafers-arrivedThe wafers are here.
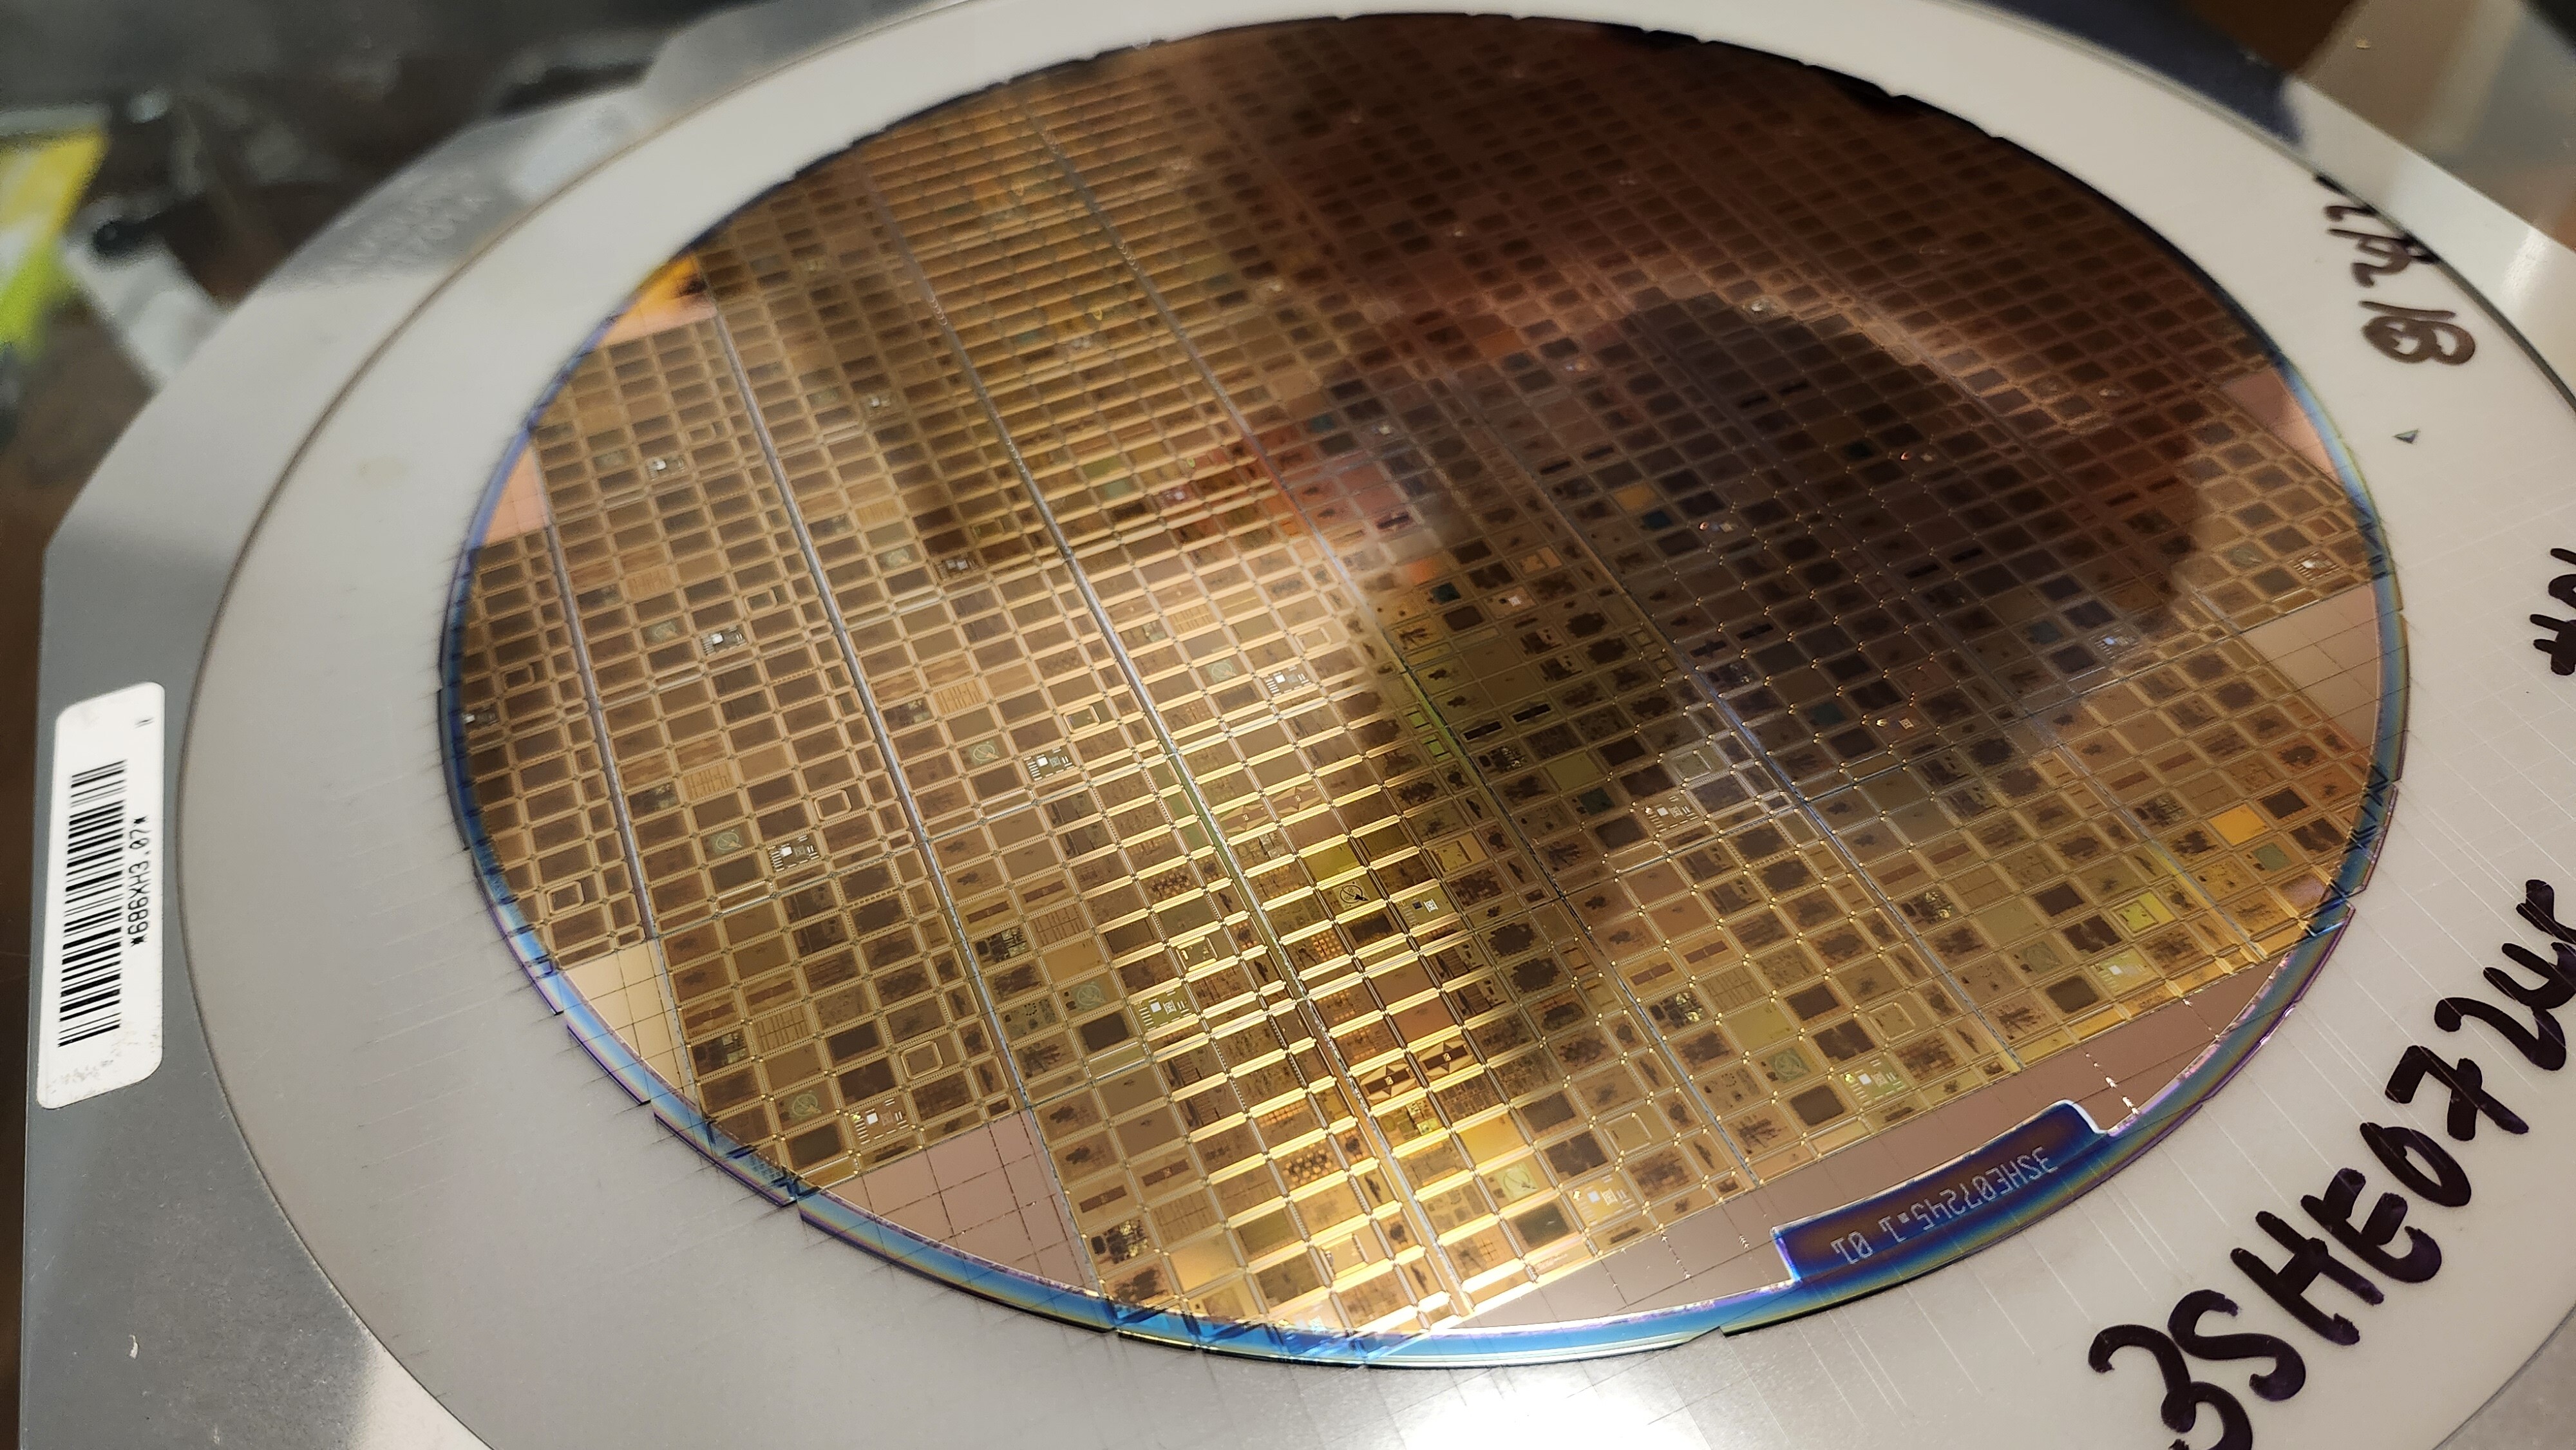
After 12 weeks at GlobalFoundries, the Run 1 wafers have been manufactured and returned to us. This is the moment where
your designs stop being GDSII files and start being real silicon.
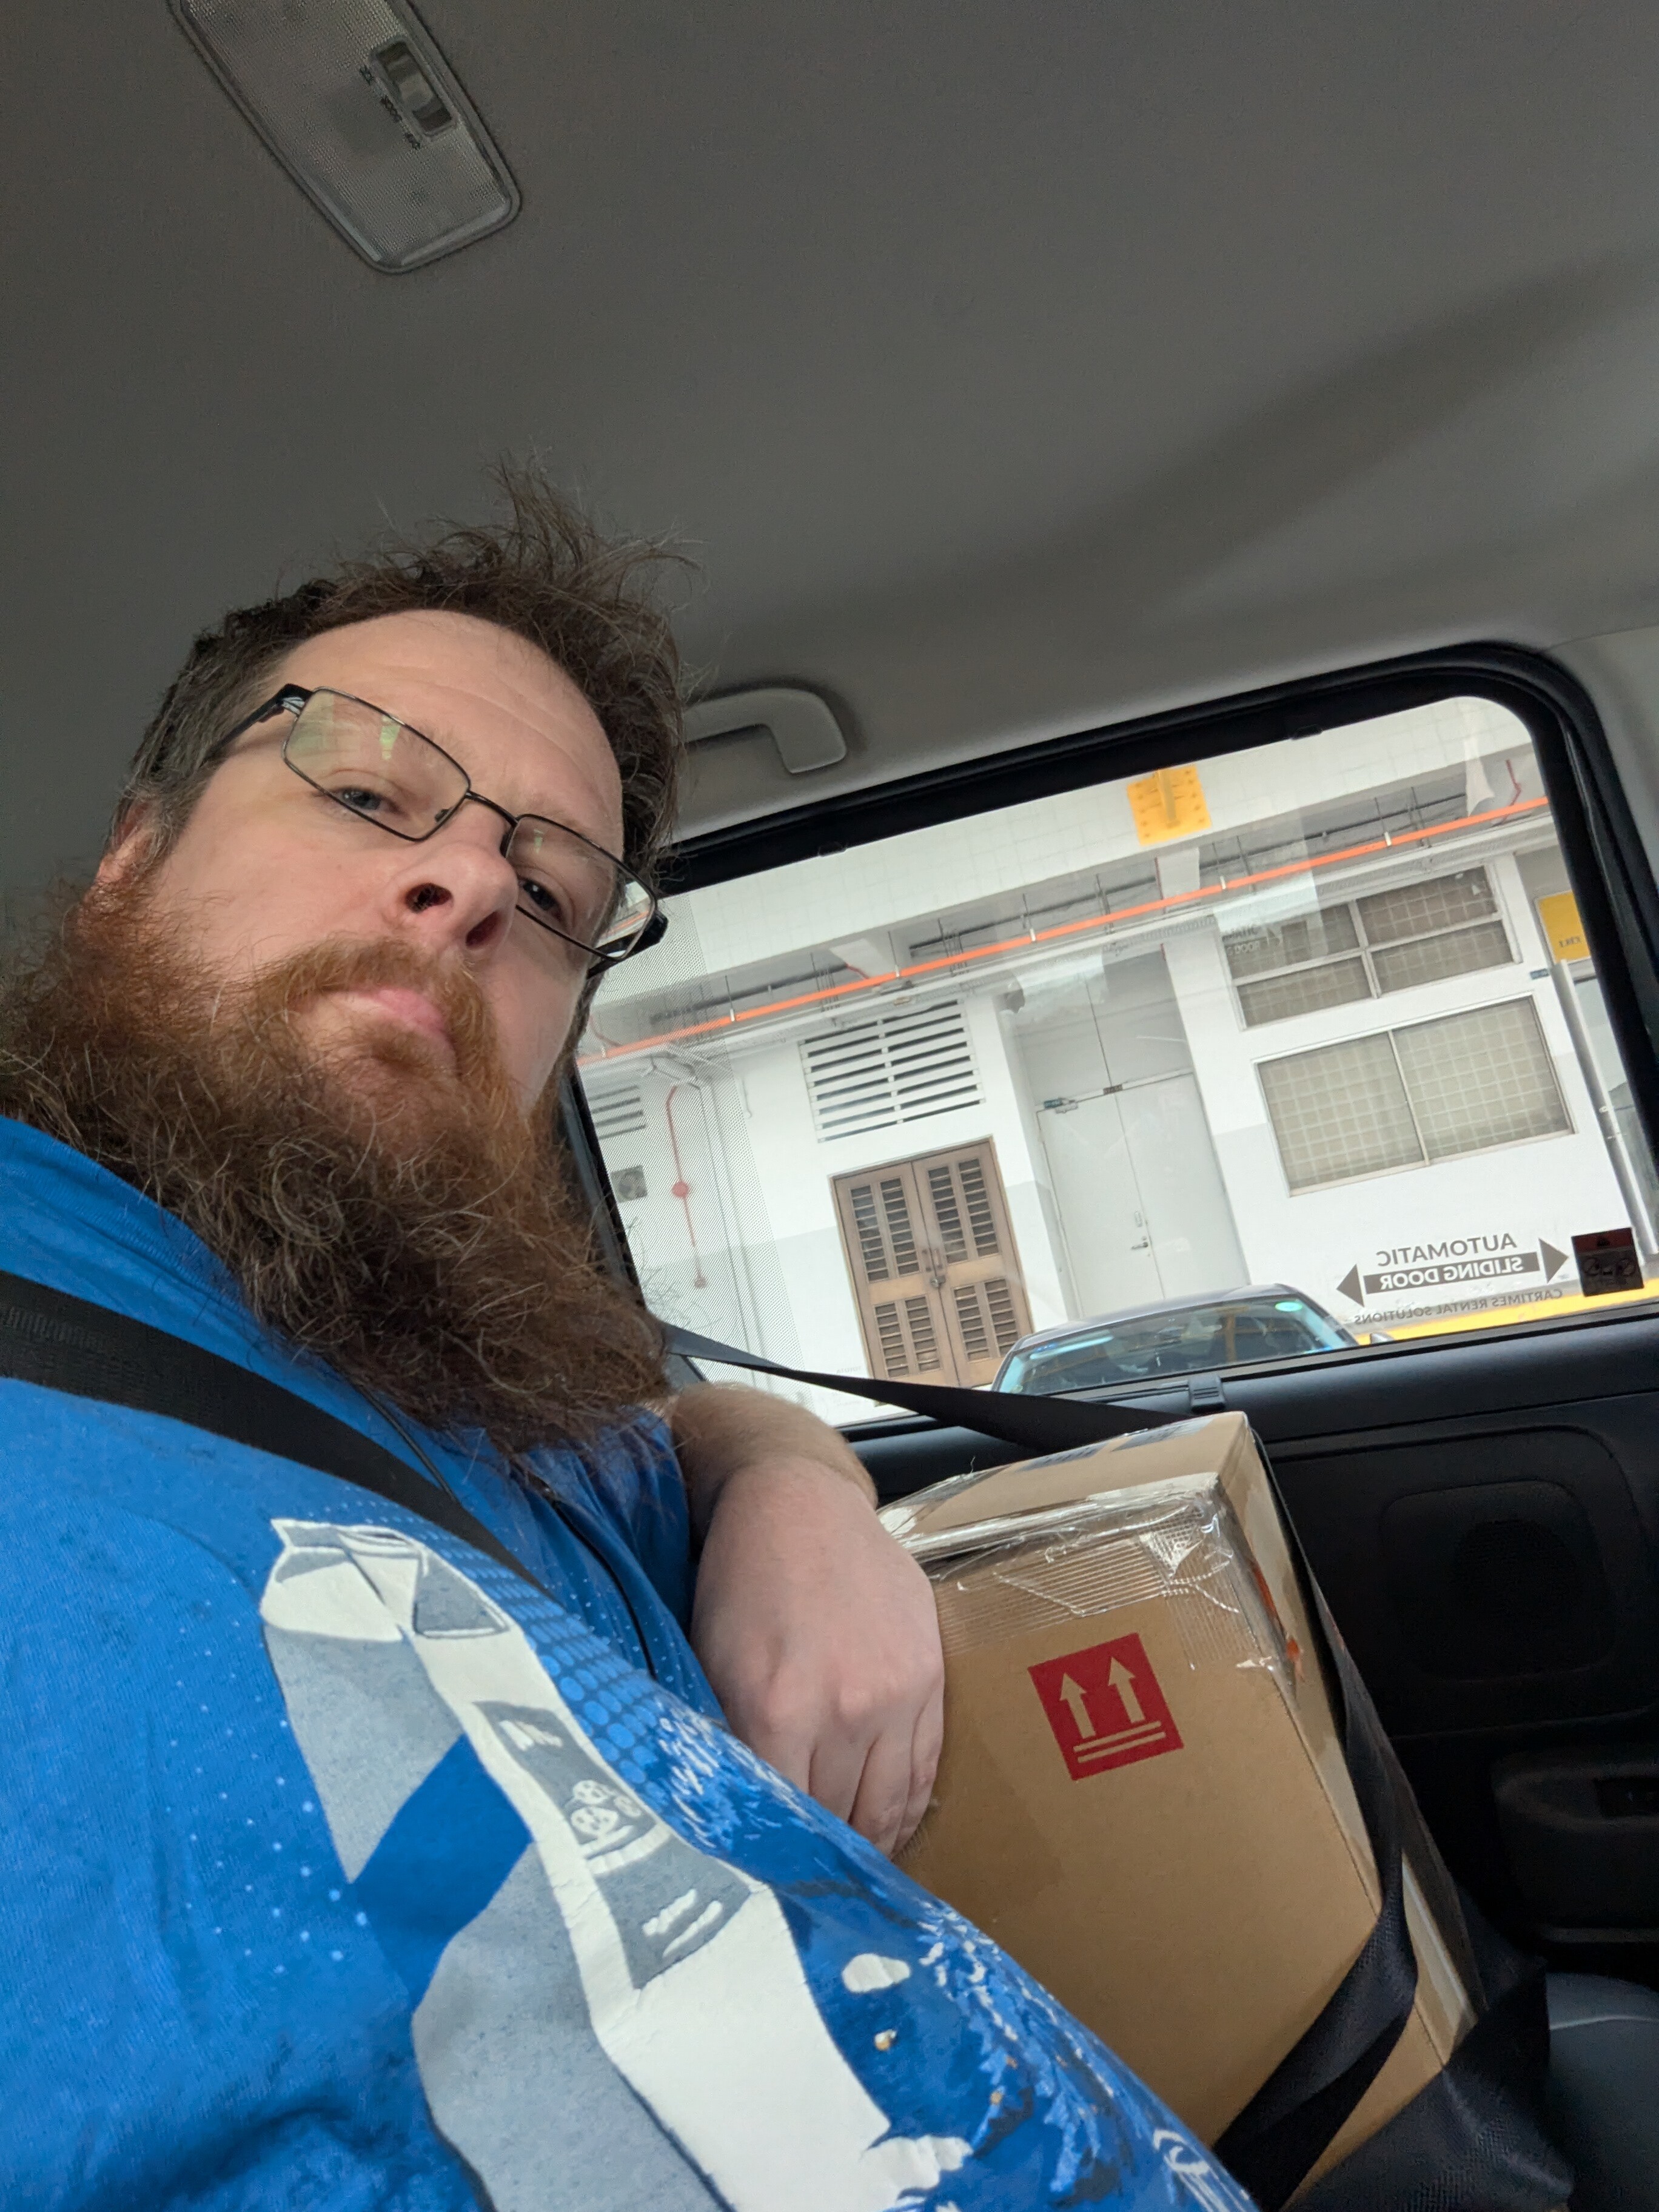
Tim 'mithro' Ansell
with the box containing Run 1 wafers fresh from GlobalFoundries
What Happens Next
Each wafer is cut into individual dies, and those dies are sorted by our robot before being packed for shipping (we’ll
have a separate update about this robot out soon!). We’ve already started shipping bare dies and chip-on-board parts,
so if you submitted a design on Run 1 then you should have already received some first samples. Keep an eye out for any
shipping notifications.
First look at the wafers
Run 2 is Open
If you missed Run 1 or want another slot, Run 2 is now open on Crowd Supply. Run 2 slots are available until 30 June 2026. Standard pricing is now in effect:
1x1 (full) slot: $7,500 ($7.50/die)
0.5x1 (half width) slot: $4,500 ($4.50/die)
1x0.5 (half height) slot: $4,500 ($4.50/die)
Chip-on-board packaging is available as an add-on for $1,500 ($1.50/die).
Every slot includes 1,000 dies. Half slots are new for Run 2.
]]>Tim 'mithro' AnsellGF180MCU Run 2 is Here!2026-05-17T12:00:00+00:002026-05-17T12:00:00+00:00https://wafer.space/news/run2-announcementHey folks,
Quick update from wafer.space with some news about what comes next.
Run 1 Status
First things first: we’ve received your Run 1 wafers and have been hard at work at picking and sorting everyone’s die.
We’ve already shipped some bare die, and others have gotten a few packaged parts, so make sure to keep an eye on your
inbox regarding any shipping notifications! While you’re waiting, be sure to check out the behind the scenes pictures
in our update post.
Run 2 is Here
We have launched our second GF180MCU production run, building on everything we learned from Run 1. The submission
platform, DRC tooling, and overall flow have all been improved based on real experience from this first shuttle. The
goal is a smoother process for everyone.
For those who are new here: we’re on a mission to bring you affordable silicon. 1,000 dies now starting from just $4,500.
That’s $4.50 per die using GlobalFoundries’ GF180MCU process. Real production
quantities, not just a handful of prototypes.
What is New
The biggest change for Run 2 is multiple slot sizes. In Run 1, every slot was the same size. For Run 2, we are
introducing half and full slot options. Smaller slots mean a lower cost of entry, so if your design does not need the
full 20 mm², you will not have to pay for it. This opens the door for more people to participate and for experienced
designers to run smaller test structures alongside larger projects.
We have also been working on improvements to the DRC checks, the submission platform, and the overall documentation.
Many of these improvements came directly from feedback and issues that Run 1 participants encountered, so thank you for
helping us make the process better.
Timeline
The campaign closes on 30 June 2026, with delivery of bare dies in Q4 2026. More details will be announced as we finalize things.
Get Involved
If you are interested in Run 2, or if you want to share it with someone who missed Run 1, here is how to stay in the loop:
Run 1 would not exist without the people who backed it. You made the first wafer.space shuttle
real, and that matters. The designs you submitted, the bugs you reported, the feedback you shared in Discord, the
problems you solved for each other - all of it is what makes Run 2 possible and better.
Whether you are planning to come back for Run 2 or just waiting for your Run 1 silicon to arrive, we appreciate you being part of this.
- Tim ‘mithro’ Ansell
]]>Tim 'mithro' Ansellwafer.space @ Hackaday Europe 20262026-05-15T12:00:00+00:002026-05-15T12:00:00+00:00https://wafer.space/news/hackaday-2026Hey everybody, nice short announcement today.
]]>Tim 'mithro' AnsellGF180MCU Run 2 is Coming!2026-03-01T12:00:00+00:002026-03-01T12:00:00+00:00https://wafer.space/news/run2-coming-soonHey folks,
We’re pleased to announce that Run 2 is coming soon! Whether you followed Run 1 or this is your first time hearing about wafer.space, we are glad you are here.
What is wafer.space?
wafer.space is pooled silicon fabrication. Think OSH Park, but for custom chips instead of PCBs. You design a chip using GlobalFoundries’ open GF180MCU PDK, submit your layout, and we handle fabrication, dicing, and delivery. $7 per chip, 1,000 chips per slot.
The tools are open source. The PDK is open source. Your design can be open or closed. No NDAs required to get started.
Run 1: Designs on Silicon
Run 1 closed in late November 2025 and the wafers are currently in production at GlobalFoundries. We filled the reticle with many designs from individuals, universities, startups, and community groups. 29 of those designs are public and available for you to study at github.com/wafer-space/ws-run1.
Some highlights from the run:
KianV: A 32-bit RISC-V SoC (RV32IMA with SV32 MMU) capable of running mainline Linux, built entirely with open-source tools.
FABulous: An open-source FPGA fabric with 480 LUT4s, programmable via Yosys and nextpnr. Yes, an FPGA implemented as an ASIC on an open PDK.
Z80 Open Silicon: A pin-compatible, open-source reimplementation of the classic Zilog Z80, targeting drop-in compatibility with vintage 8-bit computers.
Tiny Tapeout GF: The Tiny Tapeout multi-project chip ported to GF180MCU, with dozens of community designs packed onto a single die.
ISHI-KAI: 14 novice designers from the Japanese ISHI-KAI community submitted their first silicon designs together, creating analog circuits from inverters to PLLs.
The range of projects was incredible: from production-ready SoCs to first-time tapeouts, from retro computing to cutting-edge research. That is exactly what accessible fabrication enables.
What is New in Run 2
Run 2 builds on everything we learned from Run 1, with some significant improvements:
Multiple slot sizes: We are introducing quarter, half, and full slot options. Not every design needs 20 mm2. Smaller slots mean a lower cost of entry for simpler designs, while full slots remain available for larger projects.
Improved DRC and submission platform: The platform.wafer.space submission system has been refined based on Run 1 experience. Faster checks, clearer error messages, smoother workflow.
Better tooling: LibreLane, the project template, and the precheck tools all continue to improve. Every run makes the process smoother for the next one.
Early-bird pricing: Early supporters will be able to lock in discounted pricing. Stay subscribed for details.
Things get better with every run. That is the whole point of building sustainable infrastructure.
Timeline
The current target is a 2 July 2026 GDS submission deadline, with the campaign closing on 30 June 2026. The campaign will go live well before that, giving you plenty of time to design, verify, and submit. Bare dies are expected to ship by mid-October 2026.
Pricing details are coming soon. Subscribe to this campaign to be notified the moment we have them.
Get Involved Now
You do not need to wait for the campaign to launch to start designing. The tools and PDK are available today:
Start designing: Clone the gf180mcu-project-template and start experimenting. It includes a complete Nix environment with all the tools you need.
Join the community: The wafer.space Discord is where designers help each other with pad rings, DRC issues, floorplanning, and everything in between. It is also the fastest way to get answers from the wafer.space team.
Study Run 1 designs: Browse the 29 public designs from Run 1 to see what fits in the die area and how others approached their layouts.
The earlier you start, the more time you have to iterate. The best designs from Run 1 were the ones that started early and took advantage of community feedback.
More updates coming soon with pricing details, slot sizes, and timeline specifics. Stay tuned.
- Tim ‘mithro’ Ansell
]]>Tim 'mithro' AnsellLess than 48 hours to go!2025-11-27T12:00:00+00:002025-11-27T12:00:00+00:00https://wafer.space/news/final-reminderLess than 48 hours remain in the first shuttle campaign! If you hope to be on this shuttle, place your order now. If you’re facing purchasing obstacles, please don’t hesitate to get in touch.
The Deadline: 28th November 2025 @ 11:59 PM AoE (see in your timezone) — After this deadline you’ll be waiting until next year for the next shuttle run.
After You Purchase
Once you’ve purchased your slot, you have until 3rd December 2025 @ 11:59 PM AoE (see in your timezone) to submit your GDS files.
Run gf180mcu-precheck locally to verify your design before submitting. The precheck has been and will continue to be updated, so join the Discord to get notified of changes. This is the same DRC check that platform.wafer.space will run, so catching issues locally saves time.
Submit early! The DRC queue will get busy as the deadline approaches. If you find problems at the last minute, you may not have time to fix them.
If you run into issues, join the wafer.space Discord. Many people are putting the finishing touches on their designs right now, and problems you encounter have likely been solved by others who can offer guidance.
wafer.space bringing open accessible custom silicon fabrication
— Tim ‘mithro’ Ansell and the wafer.space Team
]]>Tim 'mithro' AnsellTiny Tapeout2025-11-22T12:00:00+00:002025-11-22T12:00:00+00:00https://wafer.space/news/tinytapeout-featurewafer.space is excited to collaborate with Tiny Tapeout to port their infrastructure to GF180MCU. Founded by Matt Venn, Tiny Tapeout has become a cornerstone of the open-silicon movement, empowering students, hobbyists, and even industry professionals to design and fabricate their own ASICs through approachable tools and collaborative workflows. Our collaboration provides an easy and affordable pathway from initial ideas and prototyping to building real products.
With Tiny Tapeout, you get a ready-to-go development board
Tiny Tapeout has already proven that accessible chip design works. By dramatically lowering the barrier to entry, they’ve enabled thousands of participants to bring their digital and analog designs to life. Now, our collaboration aims to take that further, helping designs move from prototype to product. The track record speaks for itself:
GDS renders from Tiny Tapeout shuttles
Building on this experience, Tiny Tapeout now joins wafer.space to bring GF180MCU into the mix. Our collaboration has enabled Tiny Tapeout to get exactly what they need from the standard wafer.space padframe, ensuring full compatibility, consistent manufacturability, and reliable integration with COB-based packaging workflows.
Both Tiny Tapeout and wafer.space have been thrilled by the community response. The GF0p2 shuttle already has dozens of projects submitted, and more are coming in every day. Here are just a few of the designs being built:
Modern Free and Open Source Silicon Clone of Zilog’s Z80
Rejunity is recreating Zilog’s Z80 with the goal to develop a drop-in replacement for 8-bit home computers such as the ZX Spectrum and recent DIY computer kits such as the RC2014.
Tiny-QV: A RISC-V SoC for Tiny Tapeout
Tiny-QV is a 4-bit-at-a-time RV32 processor, optimized for use on Tiny Tapeout with QSPI RAM and Flash. The aim is to make a small microcontroller that is as fast as practical given the Tiny Tapeout constraints.
Zedulo Test Chip
Zedulo TestChip1 is a UART-to-SPI bridge built using two IP blocks from the OpenTitan project (an open-source Root of Trust). By porting these OpenTitan components to GF180MCU, Zedulo demonstrates that verified, trustworthy hardware IP can be reused across different processes and platforms.
A programmable sound generator that uses a ring oscillator to generate tones or effects.
The project tiles are filling up fast:
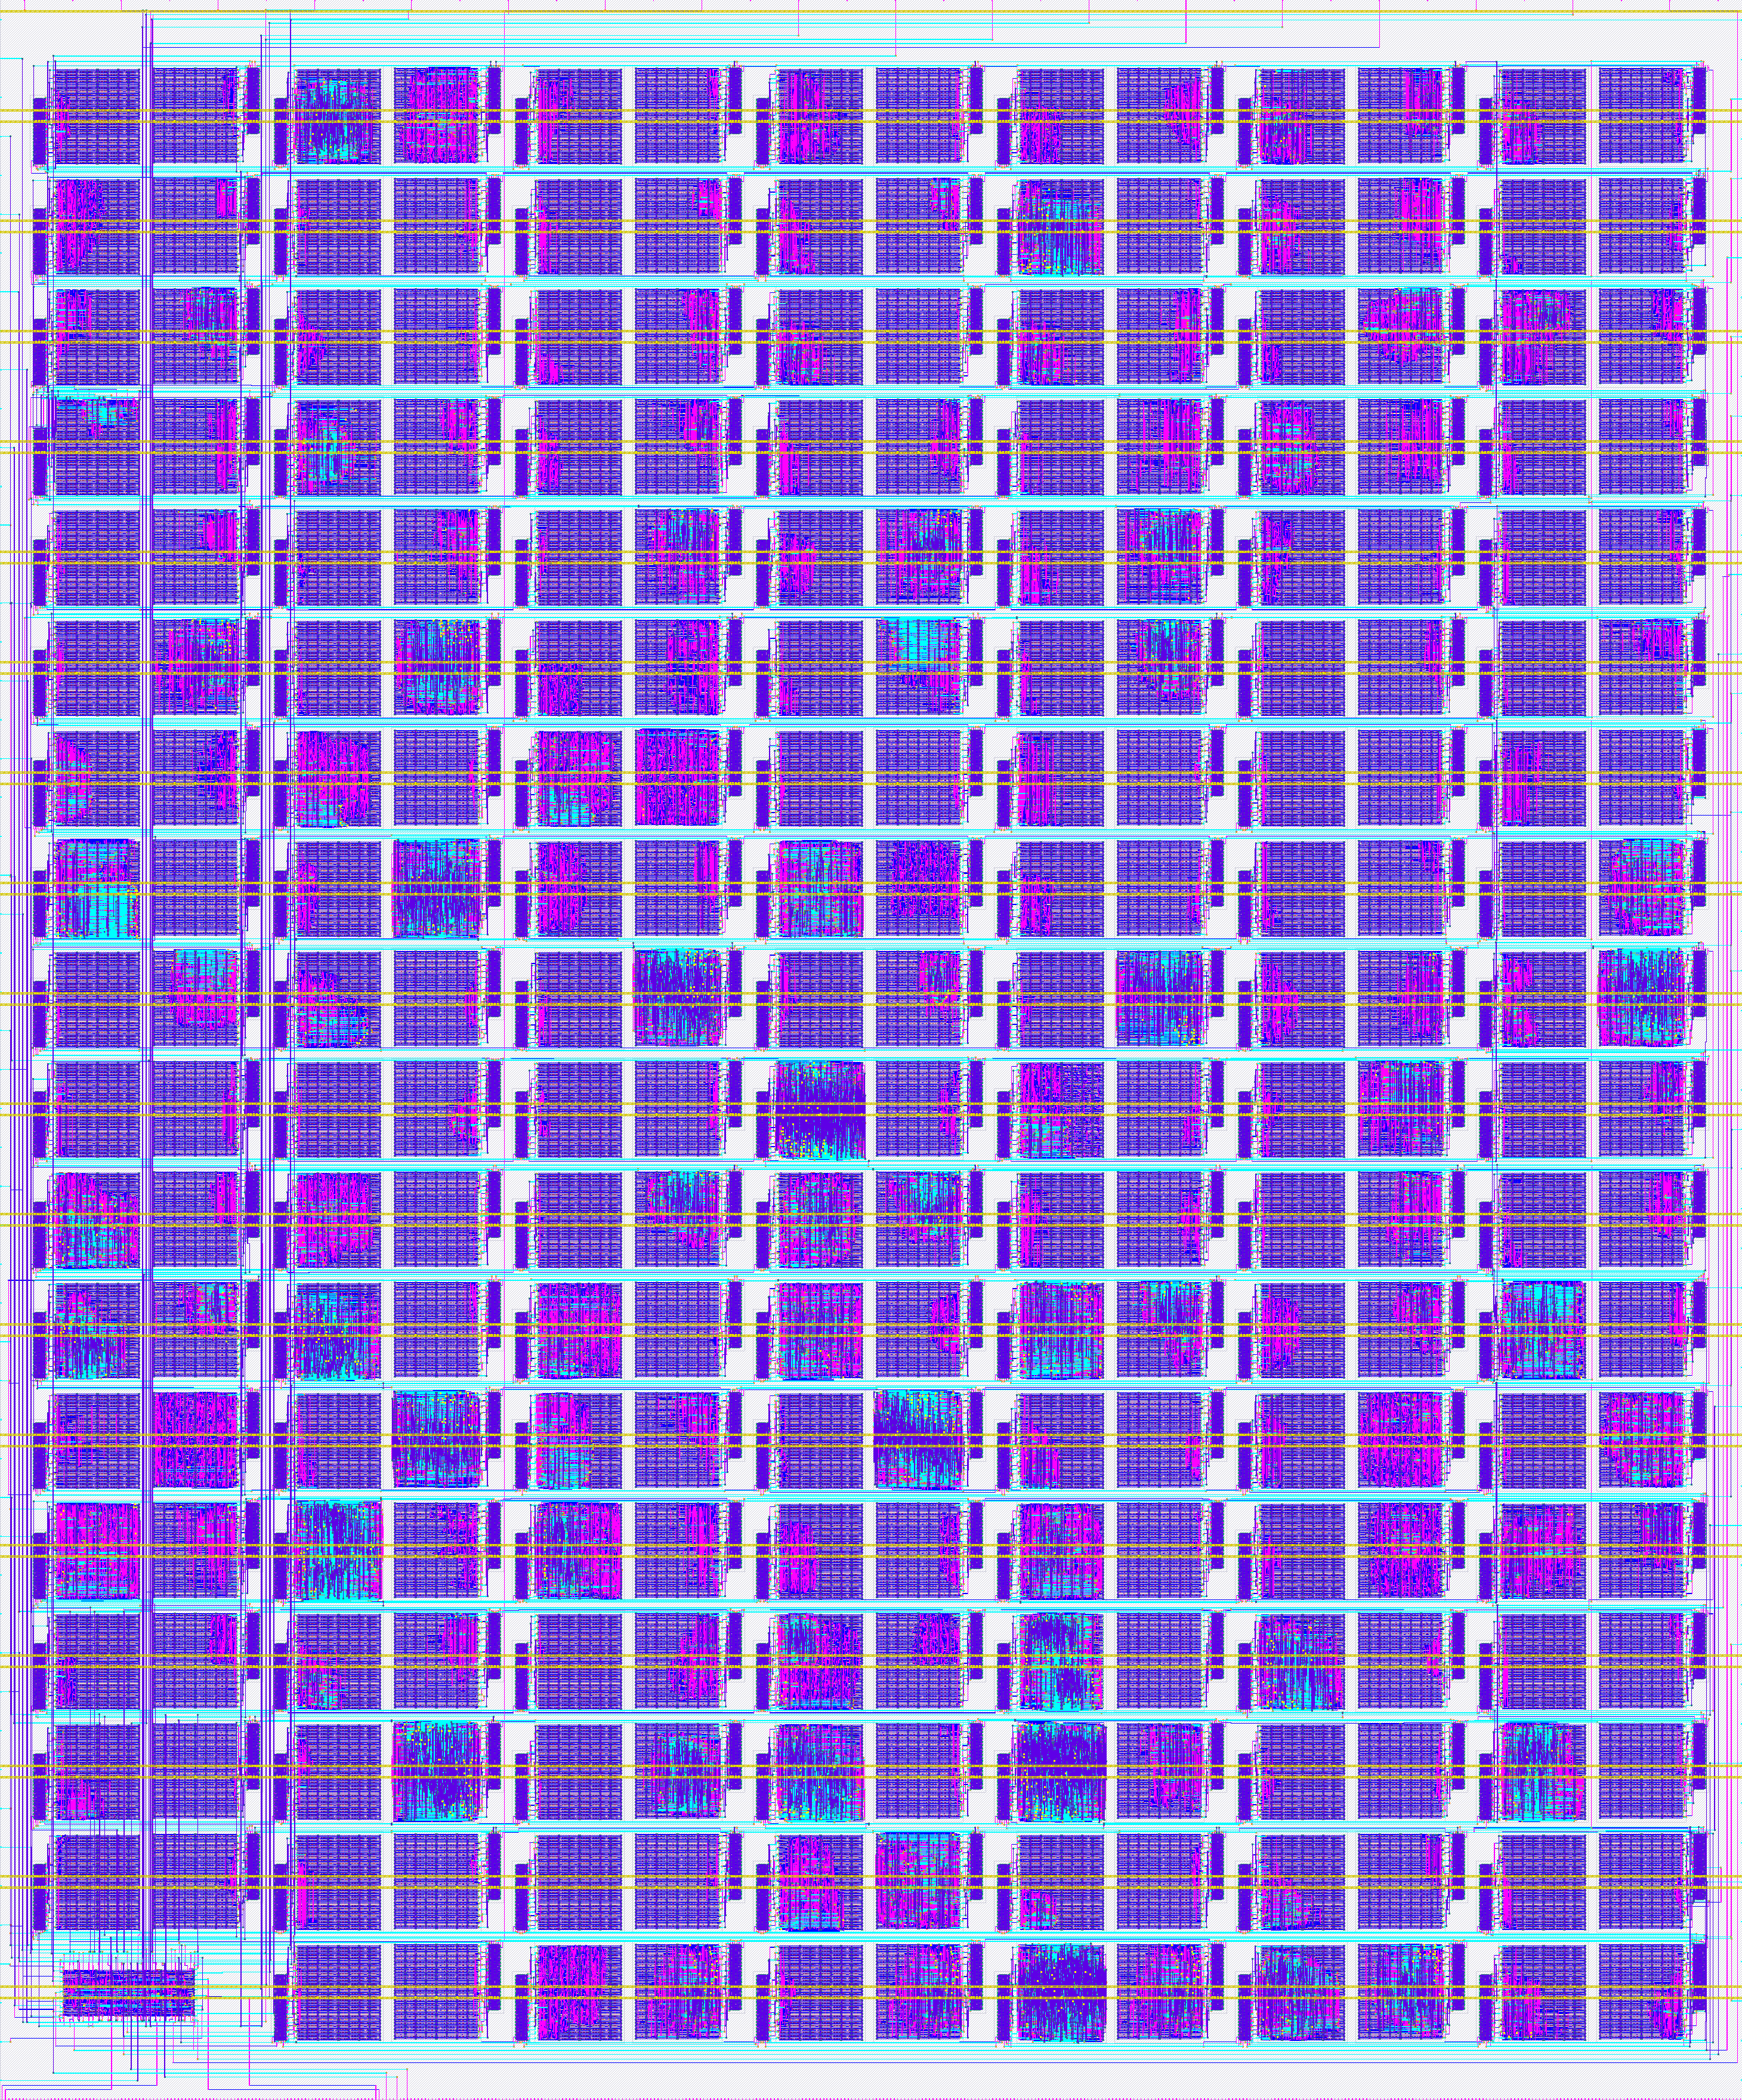
Project tiles already allocated on the GF0p2 run
Join Us!
We’re thrilled to have Tiny Tapeout and Matt Venn on board for our first wafer.space shuttle, but the most exciting part is having you join us too! Whether you’re a complete beginner or an experienced designer, now is the perfect time to get started.
Explore the Tiny Tapeout website for project ideas and tutorials, and watch the YouTube channel for walkthroughs and interviews. If you need something more structured, Matt’s excellent Zero to ASIC course will give you the knowledge and confidence to bring your ideas to silicon.
Even if you haven’t done a tapeout yet, join the community and start learning! Connect with us on the wafer.space Discord and join the #tinytapeout channel, or the Tiny Tapeout Discord and join the #ttgf0p2-tapeout channel. (You can also find us on Matrix at #gf180mcu.)
With Tiny Tapeout, anyone can get started with just a web browser and a few hours. Why not give it a try?
Don’t Miss Your Chance to Join the First Shuttle
wafer.space bringing open accessible custom silicon fabrication
We’re rapidly approaching the final milestones for this shuttle run, and now is the time to secure your spot:
November 28, 2025 - Last day to purchase a slot (Crowd Supply campaign closes)
December 3, 2025 - Final GDS submission deadline. Your design must be submitted to wafer.space by this date to be included in the run.
If you’ve been thinking about getting your own silicon made, whether it’s your first chip or your fiftieth, this is your moment. The tools are ready, the ecosystem is growing, and we’re here to help you every step of the way.
Reserve your slot, finish your design, and join us in shaping the future of accessible custom silicon.